Detailed Introduction to Remote Manager APIs
Remote Manager at its core is primarily API driven. The vast majority of the services provided by the system are accessible via the Remote Manager web service APIs.
In this article, you’ll see various techniques to discover what the Remote Manager APIs are and how to use them.
Notes about examples
These tools are strongly recommended if you like to use web service APIs from the command line.
HTTPie
The examples in this article use the HTTPie tool (https://httpie.io/) to demonstrate the web APIs. The HTTP response headers and response body are included in the output.
The HTTPie tool is a command line tool that can use a user’s netrc file to get credentials for API calls.
It allows the user to completely avoid URL encoding and use simple shortcut syntax to pass HTTP header values, API parameters, data payloads and select what output to display.
The examples are using HTTPie in a zshell environment, so you may have to modify each example for whatever environment and tool you use to call web service APIs. For simplicity, our recommendation is to download HTTPie.
jq and xq
Other tools you’ll see used in these examples consist of jq (https://stedolan.github.io/jq/) and xq (https://github.com/kislyuk/xq).
jq is a JSON command line processing tool, at its simplest, it allows you to format and colorize JSON. At its most complex it allows you to run queries and script like programs over JSON output.
xq is a wrapper for the jq tool that first converts XML input to JSON and then does normal jq processing on it.
API Authentication
The Remote Manager APIs use HTTP Basic Authentication. The username and password are the same as the username and password you use to sign-on to the Remote Manager UI or the application user you create.
In the examples here and in the API reference documentation, we often use the HTTPie tool or curl tool to call the APIs and do not discuss authentication. Authentication is the same for every API call.
Both HTTPie and curl can use the netrc file to load credentials for the API calls, HTTPie does this by default, curl requires a -n option.
If you use another tool, configure the tool to use HTTP Basic Authentication with the username and password.
HTTP Basic authentication is well-supported by languages and API tools.
If you are doing basic-auth manually, with a username of fred and a password of secret, do the following steps:
- Concatenate the username and password string with a colon, resulting in:
fred:secret
- Base64 encode the concatenated string, resulting in:
ZnJlZDpzZWNyZXQ=
- Prefix the value with Basic and a space, resulting in:
Basic ZnJlZDpzZWNyZXQ=
- Use the resulting value for the HTTP
Authorization header, resulting in a header of Authorization: Basic ZnJlZDpzZWNyZXQ=
Application Users
Your application can use any user and password in the system for API calls. The user role defines the access that the call has to the system.
For long term API access to Remote Manager we recommend creating application users in the system.
Application users are not allowed to sign-on to the Remote Manager UI and are used for API only access.
- In the Systems -> Users page, add a user and select the
Application or Read only application role.
- Assign the user a name and strong password
- Use the name and password for API applications.
API Keys
API keys can be used as an alternative to HTTP Basic Authentication when calling an API. API keys are useful when you have a script that needs to make API calls, your user normally requires two-factor authentication or your user logs in through a SAML identity provider (Single Sign-On).
API key creation is disabled by default and must be enabled by an administrator for your account under the account settings. Once enabled, each user in the account is able to create API keys in their user profile. The API keys work for users logging in through Single Sign-On and do not require two-factor authentication.
Creating an API key will return an id and secret. You must copy the secret and keep it secure as it is never returned after the key is created. Keys will expire after at most one year so you must replace any in use keys before they expire.
The headers X-API-KEY-ID and X-API-KEY-SECRET are used to supply the API key id and secret when making an API call.
curl:
curl -H "X-API-KEY-ID: <your-api-key-id>" -H "X-API-KEY-SECRET: <your-api-key-secret>" https://remotemanager.digi.com/ws/v1/devices/inventory
HTTPie
http https://remotemanager.digi.com/ws/v1/devices/inventory 'X-API-KEY-ID:<your-api-key-id>' 'X-API-KEY-SECRET:<your-api-key-secret>'
API Summary
Remote Manager APIs are typically case sensitive. That means the api /ws/v1/users/inventory exists, but /ws/v1/Users/Inventory will not work.
There are two main types of APIs in Remote Manager. Legacy APIs and Modern APIs.
API Explorer
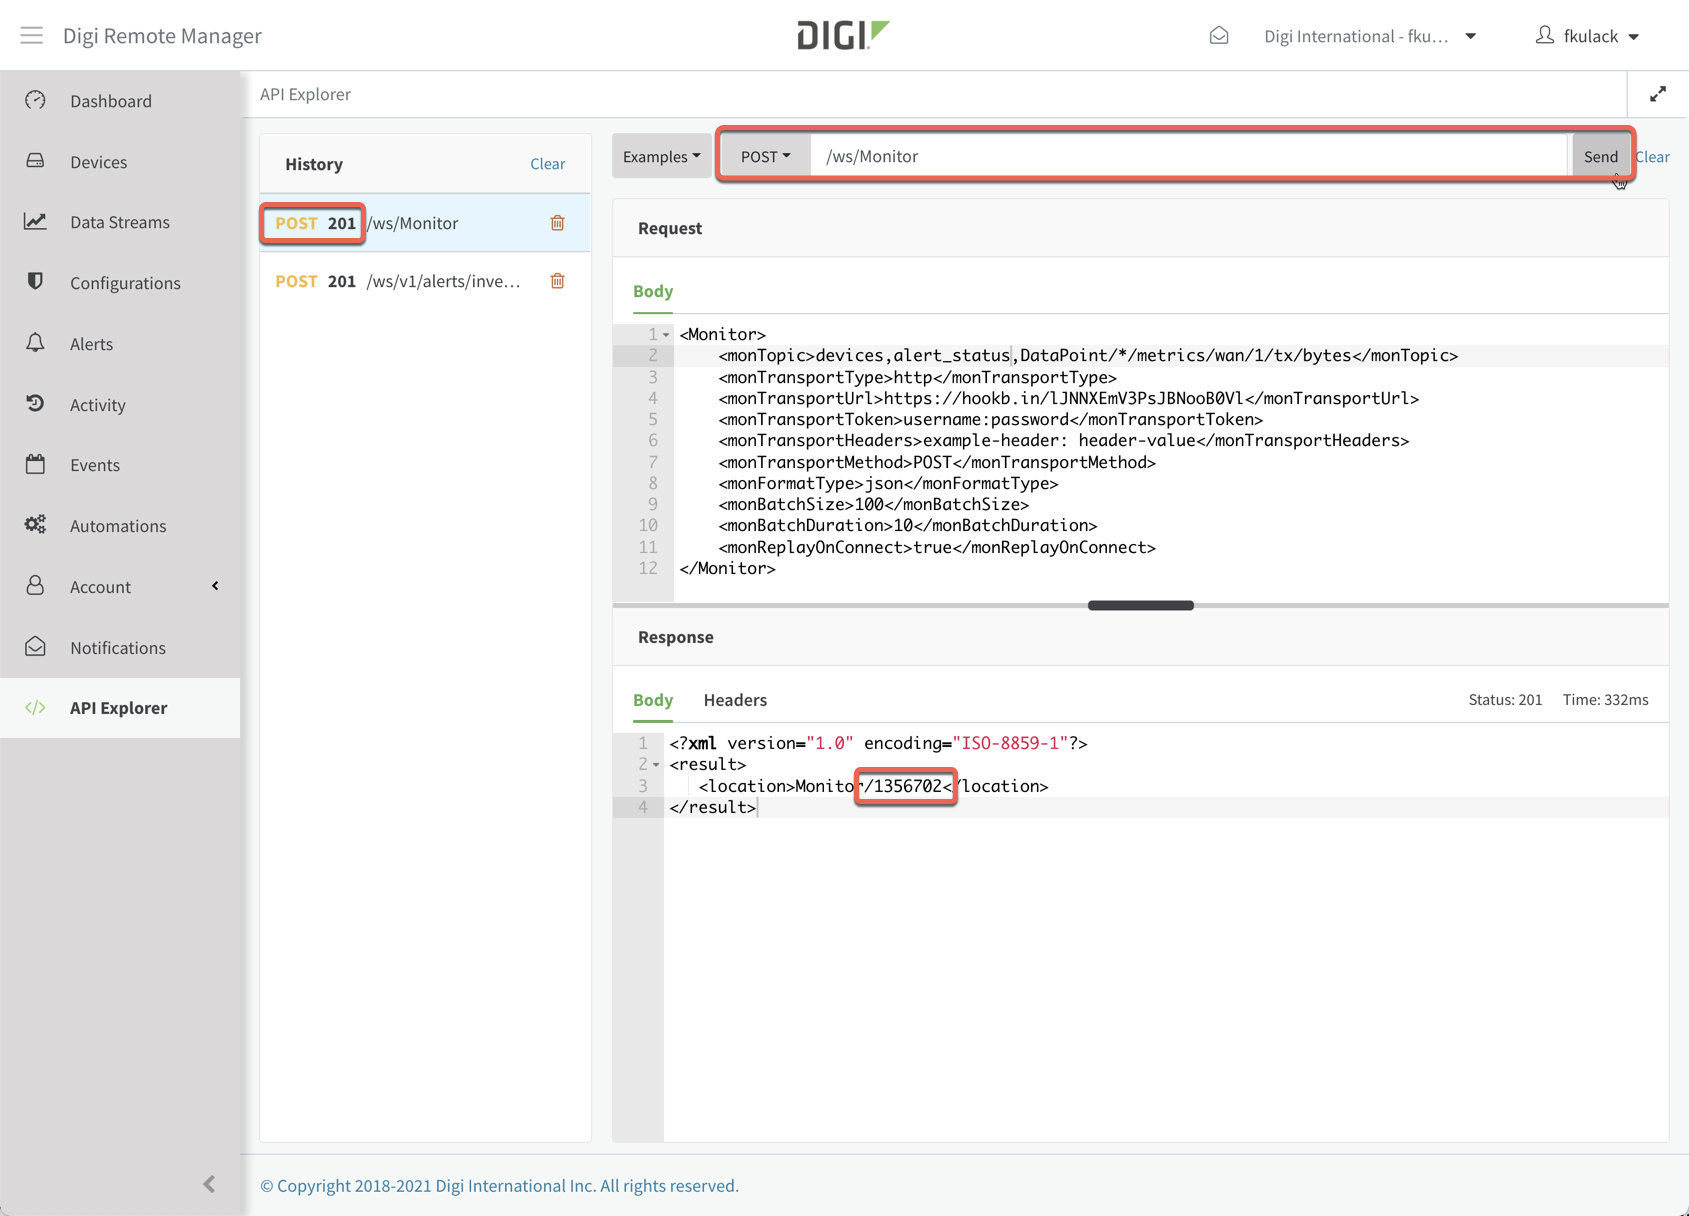
The Remote Manager UI has a page called “API explorer”. API explorer allows you to graphically explore the available APIs.
If you find a missing API or have questions about using the APIs, use the feedback button in the UI to request changes to the documentation.
The API explorer provides a set of examples, as well as the ability to type Remote Manager APIs and payloads in manually and enter parameters and select the HTTP method type.
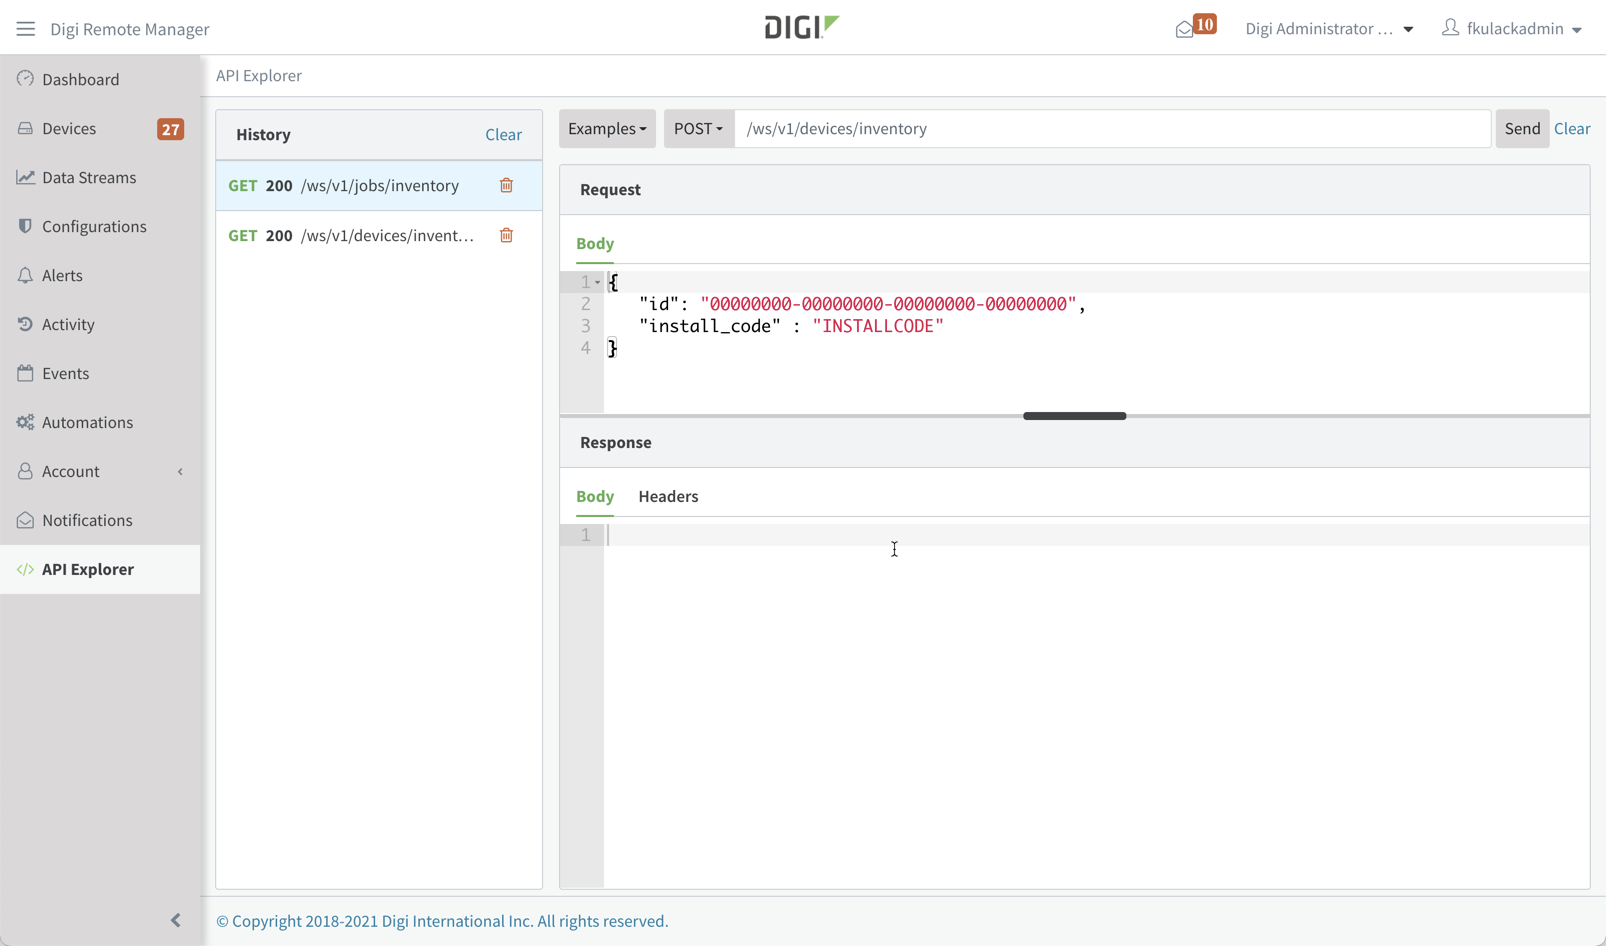
In this screen shot for API explorer, there are a couple of things to notice:
- I selected “Examples → v1/devices → Provision a device” and the example payload was added automatically, the API explorer helps determine payloads
- I have recently run 2 other APIs a GET /ws/v1/devices/inventory and a GET /ws/v1/jobs/inventory and those are in the history list, I can go back and look at the request and response payload while I’m still in this API explorer session
- I can pull down the button labeled “POST” to change to a different HTTP method and I can type in the pathname for the API.
You should spend some time experimenting with the APIs.
Self Documenting APIs
Our modern APIs provide a bit of self documentation. You can call top level APIs using GET and receive a json payload that describes the sub APIs and their usage.
At the top level, call /ws/v1 API to get a table of contents of all the major API types.
You’ll see in this example, there are 22 major categories of APIs in the Remote Manager system (this was from version 22.7 of Remote Manager).
➜ http remotemanager.digi.com/ws/v1
HTTP/1.1 200

{
  "count": 22,
  "list": [
    {
      "path": "/ws/v1/account"
    },
    {
      "path": "/ws/v1/alerts"
    },
    {
      "path": "/ws/v1/automations"
    },
    {
      "path": "/ws/v1/configs"
    },
    {
      "path": "/ws/v1/containers"
    },
    {
      "path": "/ws/v1/device_logs"
    },
    {
      "path": "/ws/v1/devices"
    },
    {
      "path": "/ws/v1/events"
    },
    {
      "path": "/ws/v1/files"
    },
    {
      "path": "/ws/v1/firmware_updates"
    },
    {
      "path": "/ws/v1/groups"
    },
    {
      "path": "/ws/v1/health_configs"
    },
    {
      "path": "/ws/v1/jobs"
    },
    {
      "path": "/ws/v1/metadata"
    },
    {
      "path": "/ws/v1/monitors"
    },
    {
      "path": "/ws/v1/network_interfaces"
    },
    {
      "path": "/ws/v1/notifications"
    },
    {
      "path": "/ws/v1/reports"
    },
    {
      "path": "/ws/v1/settings"
    },
    {
      "path": "/ws/v1/streams"
    },
    {
      "path": "/ws/v1/subaccounts"
    },
    {
      "path": "/ws/v1/users"
    }
  ]
}
You can use this trick again to see the APIs belonging to any category. In this example we see the automations API documentation.
In the automations API, there are 14 sub APIs (although there are actually more than that if you consider that some APIs support multiple HTTP methods like GET/POST/PUT/DELETE. For example the automations/inventory/{id} API is a GET/PUT/DELETE API
# Use jq to see JUST the API path names
➜ http remotemanager.digi.com/ws/v1/automations | jq -r ".list[] | .path"
/ws/v1/automations
/ws/v1/automations/inventory
/ws/v1/automations/inventory/{id}
/ws/v1/automations/run
/ws/v1/automations/runs
/ws/v1/automations/runs/cancel/{id}
/ws/v1/automations/runs/inventory
/ws/v1/automations/runs/inventory/{id}
/ws/v1/automations/runs/results/{id}/{device_id}
/ws/v1/automations/runs/status/{id}
/ws/v1/automations/runs/status/{id}/{device_id}
/ws/v1/automations/schedules
/ws/v1/automations/schedules/inventory
/ws/v1/automations/schedules/inventory/{id}
Query Language Syntax
One of the features that the self documenting APIs gives you is details on the query language for each API.
In the below output, we see that there’s an automations/inventory API that includes parameters “query”, “orderby”, “size” and “cursor” (like the majority of our v1 inventory APIs do). The payload then goes further to describethe query parameter: what fields can you use to construct your query, what operators each field supports and whether a field supports orderby.
From this description we know that for the objects returned by the automations/inventory API, the objects include the following fields and we can query
- A “customer_id” field that is a number
- An “id” field that is a number
- A “name” field that is text
All of the fields can be used in an orderby clause.
So we could build a query that looks like this (which would have to be correctly URL encoded).
customer_id = 1034 and id > 10 and name contains 'script'
See v1 API Query Language for more information about the query language capabilities
The query field shown in this describes queryable fields for the automations/inventory API.
➜ http remotemanager.digi.com/ws/v1/automations
HTTP/1.1 200

{
    "count": 14,
    "list": [
        {
            "path": "/ws/v1/automations/inventory",
            "requests": [
                {
                    "method": "GET",
                    "params": [
                        "query",
                        "orderby",
                        "size",
                        "cursor"
                    ],
                    "query": [
                        {
                            "field": "customer_id",
                            "operators": [
                                "=",
                                "<>",
                                "<",
                                "<=",
                                ">",
                                ">="
                            ],
                            "orderby": true,
                            "type": "Numeric"
                        },
                        {
                            "field": "id",
                            "operators": [
                                "=",
                                "<>",
                                "<",
                                "<=",
                                ">",
                                ">="
                            ],
                            "orderby": true,
                            "type": "Numeric"
                        },
                        {
                            "field": "name",
                            "operators": [
                                "=",
                                "contains",
                                "startsWith",
                                "endsWith",
                                "<>",
                                "<",
                                "<=",
                                ">",
                                ">="
                            ],
                            "orderby": true,
                            "type": "Text"
                        },
...snip...
Modern API Examples
Adding a device
In order to add a device to your account on Remote Manager, you can use the UI of course, but this article is about the API.
You can use a POST API (which is typically the type of API used for create operations) to the ws/v1/devices/inventory endpoint.
The required fields for posting a device are at least
- The device ID (A little like a UUID the canonical device ID is represented in the form 00000000-00000000-00000000-00000000). Depending on the type of device, it typically includes the device’s primary mac address or the device’s IMEI number.
- The install code or default password of the device. Usually printed on the label or part of the QR code on the device. This 10 or 12 character password is how a device is securely registered with the system. NOTE: Some older devices don’t use install codes for registration.
- Other fields like group, mac, tags, notes, and description can also be used.
For example, this request sends the json payload to the POST devices/inventory API.
The result is HTTP status 201 and we can see the device is created. Right now the device is disconnected and a lot of the fields that are identified the first time the device connects are not present.
➜ http POST remotemanager.digi.com/ws/v1/devices/inventory <<< '{"id":"00000000-00000000-0040FFFF-FF8001B0", "install_code":"MYPASSW0RD", "group": "test/group"}'
HTTP/1.1 201

{
    "count": 1,
    "list": [
        {
            "channels_uri": "/ws/v1/devices/channels/00000000-00000000-0040FFFF-FF8001B0",
            "connection_status": "disconnected",
            "customer_id": 73846,
            "firmware_status": "not_identified",
            "group": "test/group",
            "health_status": "unknown",
            "id": "00000000-00000000-0040FFFF-FF8001B0",
            "mac": "00:40:FF:80:01:B0",
            "maintenance_mode": "off",
            "management_uri": "/ws/v1/devices/management/00000000-00000000-0040FFFF-FF8001B0",
            "metrics_uri": "/ws/v1/devices/metrics/00000000-00000000-0040FFFF-FF8001B0",
            "restricted_status": "unrestricted",
            "type": " "
        }
    ]
}
Deleting a device
It’s a simple matter to remove a device from your account, assuming that its there already.
➜ http DELETE remotemanager.digi.com/ws/v1/devices/inventory/00000000-00000000-0040FFFF-FF8001B0
HTTP/1.1 204
Device queries
We can use the query language in the devices/inventory API to build rather complex queries to search for devices. This becomes particularly useful if using an account that has subaccounts from the API and searching for devices across all subaccounts in the system. See v1 API Query Language for more information about the types of queries you can build.
For example, if I want to search for devices that are currently live and connected to my account, have updated their status in some form in the last day, and are in an office with an IP range of 10.20.1.x, I would use this query.
We can also see here a more full payload describing an in-use device object.
➜ http remotemanager.digi.com/ws/v1/devices/inventory query=="connection_status = 'connected' and last_update > -1d and ip startswith '10.20.1.'"
HTTP/1.1 200

{
    "count": 2,
    "list": [
        {
            "alerts": 1,
            "capabilities": {
                "cli_service_available": true,
                "sm_compression_available": true,
                "sm_encryption_key_distribution_service_available": true,
                "sm_pack_available": true
            },
            "channels_uri": "/ws/v1/devices/channels/00000000-00000000-002704FF-FF30D5A1",
            "connection_status": "connected",
            "contact": "Fred A Kulack",
            "customer_id": 7493,
            "firmware_status": "none",
            "firmware_version": "20.11.32.168",
            "group": "demoGroup",
            "health_status": "error",
            "id": "00000000-00000000-002704FF-FF30D5A1",
            "ip": "10.20.1.109",
            "last_connect": "2021-02-18T14:21:16.883Z",
            "last_disconnect": "2021-02-18T14:19:42.387Z",
            "last_update": "2021-02-18T21:01:39.607Z",
            "location": "Rochester, MN",
            "mac": "00:27:04:30:D5:A1",
            "maintenance_mode": "off",
            "management_uri": "/ws/v1/devices/management/00000000-00000000-002704FF-FF30D5A1",
            "metrics_uri": "/ws/v1/devices/metrics/00000000-00000000-002704FF-FF30D5A1",
            "name": "SilverSurfer",
            "public_ip": "10.20.1.109",
            "registration_date": "2021-01-11T16:36:00.000Z",
            "restricted_status": "unrestricted",
            "serial_number": "6330010536411709",
            "sku": "ASB-6330-MX00-OUS",
            "tags": [
                "TestAutomations"
            ],
            "type": "AcceleratedConcepts 6330-MX",
            "vendor_id": 4261412874
        },
...snip...
Paging through results
By default, inventory and other paging APIs use a page size of 1000 to decrease load and prevent timeouts and make payload sizes manageable.
The APIs typically use the “size”, and “cursor” parameters as the way to page through results. When an API reaches the full page size, and there are still more objects to return, it also returns a cursor value and often a next_uri parameter.
The cursor or next_uri parameter are used to get the next page of results. Do not change the size parameter or any other parameters during subsequent calls.
For example, this is how you page through a set of results. There are 3 objects in my account that match the query. Since I use a page size of 1, I’ll have to page through 3 additional times. If all the remaining data is returned, no cursor or next_uri parameter is returned. In this case, page size is a perfect multiple of available data so one extra query is needed that returns 0 object.
# Initial Query
➜ http remotemanager.digi.com/ws/v1/devices/inventory query=="connection_status = 'connected'" size==1
HTTP/1.1 200

{
    "count": 1,
    "cursor": "b2b8205b-8247-9cdb-8247-9cdaaf6999c6",
    "list": [
        { ... snip out single device object...}
    ],
    "next_uri": "/ws/v1/devices/inventory?query=connection_status+%3D+%27connected%27&size=1&cursor=b2b8205b-8247-9cdb-8247-9cdaaf6999c6",
    "size": 1
}


# Next Page
➜ http remotemanager.digi.com/ws/v1/devices/inventory query=="connection_status = 'connected'" size==1 cursor==b2b8205b-8247-9cdb-8247-9cdaaf6999c6
HTTP/1.1 200

{
    "count": 1,
    "cursor": "08eef948-3858-60f7-3858-60f563bc71c1",
    "list": [
        { ... snip out single device object...}
    ],
    "next_uri": "/ws/v1/devices/inventory?query=connection_status+%3D+%27connected%27&size=1&cursor=08eef948-3858-60f7-3858-60f563bc71c1",
    "size": 1
}


# Next Page
➜ http remotemanager.digi.com/ws/v1/devices/inventory query=="connection_status = 'connected'" size==1 cursor==08eef948-3858-60f7-3858-60f563bc71c1
HTTP/1.1 200

{
    "count": 1,
    "cursor": "9ce7cc7a-9fbd-8739-9fbd-873a5d56244b",
    "list": [
        { ... snip out single device object...}
    ],
    "next_uri": "/ws/v1/devices/inventory?query=connection_status+%3D+%27connected%27&size=1&cursor=9ce7cc7a-9fbd-8739-9fbd-873a5d56244b",
    "size": 1
}


# Final query finds that we're at the end
➜ http remotemanager.digi.com/ws/v1/devices/inventory query=="connection_status = 'connected'" size==1 cursor==9ce7cc7a-9fbd-8739-9fbd-873a5d56244b
HTTP/1.1 200

{
    "count": 0,
    "list": [],
    "size": 1
}
Bulk APIs
Remote Manager bulk APIs are typically the same level and parameters as the inventory APIs. They allow direct CSV return of the json data.
For example, if we do the same query for devices we did in the previous example, we get some output like this:
➜ http remotemanager.digi.com/ws/v1/devices/bulk query=="connection_status = 'connected' and last_update > -1d and ip startswith '10.20.1.'"
HTTP/1.1 200

add_tags,address,alerts,capabilities,carrier,carrier2,cellular_modem_id,channels_uri,compliant,connection_status,contact,customer_id,description,extended_address,firmware_id,firmware_status,firmware_version,geoposition,group,health_status,id,install_code,ip,ipsec_status,ipsec_status2,ipsec_status3,ipsec_status4,key,last_compliant,last_connect,last_disconnect,last_noncompliant,last_noncompliant_reason,last_update,location,mac,maintenance_mode,management_uri,metrics_uri,name,network,network2,notes,parent,password,product_id,public_ip,registration_date,remove_tags,restricted_status,serial_number,signal_percent,signal_percent2,signal_quality,signal_quality2,signal_strength,signal_strength2,sku,tags,type,vendor_id
,,1,413696,,,,"/ws/v1/devices/channels/00000000-00000000-002704FF-FF30D5A1",,connected,"Fred A Kulack",7493,,,,none,20.11.32.168,,demoGroup,error,"00000000-00000000-002704FF-FF30D5A1",,10.20.1.109,,,,,,,2021-02-18T14:21:16.883Z,2021-02-18T14:19:42.387Z,,,2021-02-18T21:01:39.607Z,"Rochester, MN",00:27:04:30:D5:A1,off,"/ws/v1/devices/management/00000000-00000000-002704FF-FF30D5A1","/ws/v1/devices/metrics/00000000-00000000-002704FF-FF30D5A1",SilverSurfer,,,,,,,10.20.1.109,2021-01-11T16:36:00.000Z,,unrestricted,6330010536411709,,,,,,,ASB-6330-MX00-OUS,TestAutomations,"AcceleratedConcepts 6330-MX",4261412874
,,0,,"Bugs Bunny's Binary Bandwidth","Daffy Duck's Digital Services",,"/ws/v1/devices/channels/00000000-00000000-0040FFFF-FF10A300",no,connected,,7493,,,,not_identified,4.8.0.10,"44.067327, -92.506738",demoGroup,normal,"00000000-00000000-0040FFFF-FF10A300",,10.20.1.115,,,,,,2019-12-20T19:58:28.000Z,2021-02-18T14:21:19.663Z,2021-02-18T14:19:42.387Z,2020-12-10T21:32:57.740Z,"Firmware 4.8.0.10 is not compliant",2021-02-18T21:15:01.410Z,,00:40:FF:10:A3:00,off,"/ws/v1/devices/management/00000000-00000000-0040FFFF-FF10A300","/ws/v1/devices/metrics/00000000-00000000-0040FFFF-FF10A300",GhostRider,"FourF (44Ghz)","1XRTT, EVDO0",,,,,10.20.1.115,2019-06-17T15:30:00.000Z,,unrestricted,WR54-001854,90,30,-10,-40,-22,-88,,TestAutomations,"TransPort WR54-DUAL-CELLULAR",4261412873
...etc...
Fields for bulk APIs.
You can use the fields parameter for the bulk APIs to only include the desired fields in the CSV output.
➜ http remotemanager.digi.com/ws/v1/devices/bulk query=="connection_status = 'connected' and last_update > -1d and ip startswith '10.20.1.'" fields=id,connection_status,last_update
HTTP/1.1 200

id,connection_status,last_update
00000000-00000000-002704FF-FF30D5A1,connected,2021-02-18T21:01:39.607Z
00000000-00000000-0040FFFF-FF10A300,connected,2021-02-18T21:15:01.410Z
...etc...
Legacy API Examples
API conditions
At the beginning we talked about the legacy APIs being a much more direct mapping of the Remote Manager data model than the v1 APIs.
Because of that, instead of having a storage agnostic query capability for filtering and searching, the legacy APIs use SQL syntax.
NOTE: We do scrub the SQL syntax to prevent SQL injection and use of sql functions and other attacks.
Additionally, conditions require the exact use of the field names (and yes, those fields are what’s in the physical DB. Yuck!)
For example, the /ws/DeviceCore is the legacy API that is closest to ws/v1/devices/inventory API. It returns the device core object.
Lets construct a legacy condition that matches our v1/devices/inventory query
connection_status = 'connected' and last_update > -1d and ip startswith '10.20.1.'"
Note the differences and relative difficulty of use with regard to the enumerated type dpConnectionStatus, and the update time not supporting timestamp shortcuts.
➜ http remotemanager.digi.com/ws/DeviceCore condition=="dpConnectionStatus = 1 and dpGlobalIP like '10.20.1.%' and dpLastUpdateTime > '2021-02-17T21:15:01.410Z'"
HTTP/1.1 200

<?xml version="1.0" encoding="ISO-8859-1"?>
<result>
   <resultTotalRows>2</resultTotalRows>
   <requestedStartRow>0</requestedStartRow>
   <resultSize>2</resultSize>
   <requestedSize>1000</requestedSize>
   <remainingSize>0</remainingSize>
   <DeviceCore>
      <id>
         <devId>3412224</devId>
         <devVersion>7</devVersion>
      </id>
      <devRecordStartDate>2021-01-20T14:29:00.000Z</devRecordStartDate>
      <devSerialNo>6330010536411709</devSerialNo>
      <devMac>00:27:04:30:D5:A1</devMac>
      <devConnectwareId>00000000-00000000-002704FF-FF30D5A1</devConnectwareId>
      <cstId>7493</cstId>
      <grpId>261067</grpId>
      <devEffectiveStartDate>2021-01-11T16:36:00.000Z</devEffectiveStartDate>
      <devTerminated>false</devTerminated>
      <dvVendorId>4261412874</dvVendorId>
      <dpDeviceType>AcceleratedConcepts 6330-MX</dpDeviceType>
      <dpFirmwareLevel>336273576</dpFirmwareLevel>
      <dpFirmwareLevelDesc>20.11.32.168</dpFirmwareLevelDesc>
      <dpRestrictedStatus>0</dpRestrictedStatus>
      <dpLastKnownIp>10.20.1.109</dpLastKnownIp>
      <dpGlobalIp>10.20.1.109</dpGlobalIp>
      <dpConnectionStatus>1</dpConnectionStatus>
      <dpLastConnectTime>2021-02-18T14:21:16.883Z</dpLastConnectTime>
      <dpContact>Fred A Kulack</dpContact>
      <dpDescription/>
      <dpLocation>Rochester, MN</dpLocation>
      <dpZigbeeCapabilities>0</dpZigbeeCapabilities>
      <dpCapabilities>481907</dpCapabilities>
      <dpTags>,TestAutomations,</dpTags>
      <grpPath>demoGroup</grpPath>
      <dpLastDisconnectTime>2021-02-18T14:19:42.387Z</dpLastDisconnectTime>
      <dpLastUpdateTime>2021-02-18T21:01:39.607Z</dpLastUpdateTime>
      <dpHealthStatus>2</dpHealthStatus>
      <dpName>SilverSurfer</dpName>
      <numFiredAlarms>1</numFiredAlarms>
      <dpSku>ASB-6330-MX00-OUS</dpSku>
      <dpFirmwareStatus>2</dpFirmwareStatus>
   </DeviceCore>
   <DeviceCore>
        ... snip out single device object...
   </DeviceCore>
</result>
Paging through results
The Legacy API pages through results in a slightly different form, using the size and start parameters.
As you go through each query, you start at row 0, and increase your start row by the requested size for each page.
The output pages use the fields requestedSize, resultSize and resultTotalRows and remainingSize.
In this example, you can see we page through 3 pages.
# Initial page, start at row 0
➜ http remotemanager.digi.com/ws/DeviceCore condition=="dpConnectionStatus = 1" size==1
HTTP/1.1 200

<?xml version="1.0" encoding="ISO-8859-1"?>
<result>
   <resultTotalRows>3</resultTotalRows>
   <requestedStartRow>0</requestedStartRow>
   <resultSize>1</resultSize>
   <requestedSize>1</requestedSize>
   <remainingSize>2</remainingSize>
   <DeviceCore>
    ... snip out single device object...
   </DeviceCore>
</result>

# Next page, start at row 1
➜ http remotemanager.digi.com/ws/DeviceCore condition=="dpConnectionStatus = 1" size==1 start==1
HTTP/1.1 200

<?xml version="1.0" encoding="ISO-8859-1"?>
<result>
   <resultTotalRows>3</resultTotalRows>
   <requestedStartRow>1</requestedStartRow>
   <resultSize>1</resultSize>
   <requestedSize>1</requestedSize>
   <remainingSize>1</remainingSize>
   <DeviceCore>
   ... snip out single device object...
   </DeviceCore>
</result>

# Final page, start at row 2
➜ http remotemanager.digi.com/ws/DeviceCore condition=="dpConnectionStatus = 1" size==1 start==2
HTTP/1.1 200

<?xml version="1.0" encoding="ISO-8859-1"?>
<result>
   <resultTotalRows>3</resultTotalRows>
   <requestedStartRow>2</requestedStartRow>
   <resultSize>1</resultSize>
   <requestedSize>1</requestedSize>
   <remainingSize>0</remainingSize>
   <DeviceCore>
    ... snip out single device object...
   </DeviceCore>
</result>
JSON output for legacy APIs
You can add a retrieve json from many of the Legacy APIs. However because of the way the legacy API works the conversion is IMPERFECT and you can miss data..
Instead, a preferred solution is to convert to json in the client, using for example the xq tool mentioned at the beginning of this document.
➜ http remotemanager.digi.com/ws/DeviceCore Accept:application/json condition=="dpConnectionStatus = 1" size==1
HTTP/1.1 200

{
    "items": [
        {
            "cstId": "7493",
            "devConnectwareId": "00000000-00000000-0004F3FF-FF0E4BD8",
            "devEffectiveStartDate": "2020-06-02T17:55:00.000Z",
            "devMac": "00:04:F3:0E:4B:D8",
            "devRecordStartDate": "2021-01-29T17:05:00.000Z",
            "devSerialNo": "IX14-420042",
            "devTerminated": "false",
            "dpCapabilities": "481907",
            "dpCompliant": "true",
            "dpConnectionStatus": "1",
            "dpContact": "Fred Kulack",
            "dpDescription": "S1luwLvGdnfF0nFnoPQ8Rb0bLeecqV5K0p0BSBlZRd1EddeV8y",
            "dpDeviceType": "Digi IX14",
            "dpFirmwareLevel": "336273576",
            "dpFirmwareLevelDesc": "20.11.32.168",
            "dpFirmwareStatus": "2",
            "dpGlobalIp": "172.20.10.3",
            "dpHealthStatus": "0",
            "dpLastCompliant": "2021-01-29T17:21:42.203Z",
            "dpLastConnectTime": "2021-02-18T14:21:17.130Z",
            "dpLastDisconnectTime": "2021-02-18T14:19:42.387Z",
            "dpLastKnownIp": "172.20.10.3",
            "dpLastNonCompliant": "2021-01-29T17:21:38.583Z",
            "dpLastNonCompliantReason": "1 settings are not compliant: system/1/contact",
            "dpLastUpdateTime": "2021-02-18T22:08:29.560Z",
            "dpLocation": "Rochester, MN 1",
            "dpName": "Vision",
            "dpRestrictedStatus": "0",
            "dpSignalPercent": "47",
            "dpSku": "IX14-M601",
            "dpTags": ",TestAutomations,",
            "dpZigbeeCapabilities": "0",
            "dvVendorId": "4261412874",
            "grpId": "228227",
            "grpPath": "Configs",
            "id": {
                "devId": "3134058",
                "devVersion": "24"
            },
            "numFiredAlarms": "1"
        }
    ],
    "remainingSize": "2",
    "requestedSize": "1",
    "requestedStartRow": "0",
    "resultSize": "1",
    "resultTotalRows": "3"
}
v1 API Query Language
Some Remote Manager v1 APIs include a query parameter for GET requests. Using the query parameter, you can build complex expressions for selecting Remote Manager objects.
Query language summary
- Similar in concept to SQL or other query languages.
- Use conditions and operators based on field types.
- Single quoted text literals
'TheText' .
- Text escape for quote character is the quote:
'isn''t difficult' .
- Numeric literals support 0x prefix for hex.
- Relative values from “now’ for timestamp values. For example,
-10s for 10 seconds ago or +30d for 30 days from now.
- Text-based comparisons are case insensitive.
- Use the
and and or keywords as well as parenthesis to group simple conditions into more complex expressions.
- Use the
not keyword to negate individual conditions or complex parenthesized conditions.
- Use the special value keyword
empty to represent empty string, null, and unset.
Info
Although the query parameter in each API provides the same query expression capability, the fields that you can query depend on the fields returned for objects of that API. For example, a query using the ws/v1/devices/inventory API specifies device fields, while a query using the ws/v1/alerts/inventory APIs specifies alert fields.
Warning
Be sure to correctly URL encode the query expression (for example space encodes to %20 in a URL parameter value.
Specify values in query conditions
The syntax for specifying literal values varies depending on the type of literal value. Not all syntaxes from other query languages are supported.
| Value Type |
Description |
| String, Enumerated String, Group |
Specify these values using single quotes. If the value contains a single quote, specify two single quotes. Enumerated strings cannot accept all values, for example connection_status can only be connected or disconnected. For example: connection_status = 'connected' or name = 'Fred''s Device' or group = 'TheGroup' or not group = 'TheGroup' |
| Numeric |
Specify these values using a normal decimal number notation or a hex number notation. For example: value = 0 or value = -3.14or value = 0x10 |
| Timestamp |
Specify these values using a relative time notation where positive or negative values are supported. Use a one letter suffix to indicate time units: s for seconds, m for minutes, h for hours, d for days (exactly 24 hours) and w for weeks (exactly 7 days). For example: last_updated > -60m or last_connect >= -24h or expires < +30d |
| Geoposition |
Specify a bounding box value. The geoposition can be within or outside of the bounding box. The bounding box consists of four coordinates of the form: [ Southwest longitude, Southwest latitude, Northeast longitude, Northwest latitude ]. For example, to select items approximately within the continental United States: geoposition within [ 125.0, 25.0, 65.0, 50.0 ] |
Specify operators in query conditions
The following table summarizes Remote Manager v1 query language conditions.
| Operator |
Permitted Types |
Description |
| = <> |
Enumerated String, Enumerated Value, Group, Tags, Timestamp |
Exact equality or inequality. For a tag, indicates the presense or absense of the tag on the item. For a group, indicates the full group path. |
| < <= >= > |
String, Numeric, Timestamp |
The string, number or timestamp sorts before or after the value. |
| contains |
String, Tag |
The String contains the specified substring. Any tag contains the specified substring. |
| startswith, endsWith |
String, Tag, Group |
The string starts with or ends with the specified value. Any tag starts with or ends with the specified value. For a group, targets the full group path. For example, group startswith 'test/' targets any device in the root/test group and all subgroups, while group startswith 'test' targets any device in the root/test* groups and any subgroups. |
| within, outside |
Geoposition |
The geoposition is within or outside of a bounding box. For example, to select items approximately within the continental United Statess, query for geoposition within [ 125.0, 25.0, 65.0, 50.0 ] |
Example Queries
-
Complex Queries
- Query of
group startsWith '/NorthWest' and (connection_status = 'disconnected' or signal_percent < 20) - find any devices in the /Northwest group and any subgroups that are either disconnected or have a low signal strength
- Query of
tags = 'important' and (health_status = 'error' or health_status = 'warning') - Find any devices that have the ‘important’ tag and are in an error or warning health status
- Query of
tags = 'important' and not (health_status = 'error' or health_status = 'warning') - Find any devices that have the ‘important’ tag and are not in an error or warning health status
- Query of
last_connect = empty - Find any devices whose last connect value is unset (have never connected).
- Query of
not last_connect = empty - Find any devices whose last connect value is set (have connected at least once).
-
Group Queries
- Query of
group = '/test' - query full group path, so matches any device in group ‘/test’ and ignores any subgroups.
- Query of
group startsWith 'test/' - query full group path, so matches any device in the test root group and any subgroups.
- Query of
group startsWith 'test' - query full group path, so matches any device in any root group whose name starts with ’test’ and all subgroups.
- Query of
group endsWith '/leaf' - query full group path, so matches any device in any path that ends with the group name ’leaf’.
-
Tag Queries
- Query of
tags = empty - matches any device having no tags.
- Query of
tags <> empty - matches any device having any tags.
- Query of
tags = 'sensor' - matches any device having a tag ‘sensor’.
- Query of
tags <> 'sensor' - matches any device having no tag ‘sensor’.
- Query of
tags contains 'ns' - matches any device having any tag containing ’ns’.
- Query of
tags startsWith 'sens' - matches any device having any tag that starts with ‘sens’.
- Query of
tags endsWith 'or' - matches any device having any tag that ends with ‘or’.
-
Geoposition Queries
- Query of
geoposition within [ 125.0, 25.0, 65.0, 50.0 ] - matches any device with coordinates within the specified bounding box (approximately the continental United States).
- Query of
geoposition outside [ 125.0, 25.0, 65.0, 50.0 ] - matches any device with coordinates outside the specified bounding box (approximately the continental United States).
Working with Subaccounts
This article describes how to make use of Digi Remote Manager APIs to work with subaccounts.
Introduction
This article describes how to make use of Digi Remote Manager APIs to work with subaccounts.
When an account has multiple subaccounts:
- Devices can be assigned to the parent group or a subaccount and be moved between the accounts by a user of the parent account
- Users can be assigned to a child subaccount and those users only have access to devices in the child group
v1/subaccounts API
The v1/subaccounts API is used to create, edit, and delete subaccounts.
Use GET /ws/v1/subaccounts/inventory to get a list of the parent account and all subaccounts.
POST to /ws/v1/subaccounts/inventory to create an account. An example payload is:
{
   "company_name": "Company ABC",
   "email": "user@company-abc.com",
   "username": "user-company-abc",
   "password": "xxxx",
   "name": "My display name",
   "notes": "Any notes that might be relevant for the parent account. The sub account cannot see the name, notes or tags fields. For example: The security procedures are under review for this account.",
   "tags": [ "Good Standing", "Gold Plan" ]
}
The body of the response will contain a customer_id field which is the key used for making other API requests for the subccount.
{
  "company_name": "Company ABC",
  "username": "user-company-abc",
  "password": "xxx",
  "email": "user@company-abc.com",
  "customer_id": 74214,
  "name": "My display name",
  "notes": "Any notes that might be relevant for the parent account. The sub account cannot see the name, notes or tags fields. For example: The security procedures are under review for this account.",
  "tags": [
    "Good Standing",
    "Gold Plan"
  ]
}
The following APIs would be used to get, update, and delete that subaccount:
-
GET /ws/v1/subaccounts/inventory/74214
-
PUT /ws/v1/subaccounts/inventory/74214 with a payload that has the requested changes
-
DELETE /ws/v1/subaccounts/inventory/74214
For information on the API, see v1/subaccounts.
Viewing Inventory Across All Subaccounts
After creating subaccounts and assigning devices to them, the account-filter header is used to get results that include the items in the parent account and all subaccounts.
Use this API to get a list of all devices in the parent and all subaccounts
curl -u 'parentuser' -H "account-filter: all" https://remotemanager.digi.com/ws/v1/devices/inventory
The account-filter header can be used to get lists of items which include the parent and all subaccounts from APIs such as:
- GET v1/devices/inventory
- GET v1/jobs/inventory
- GET v1/users/inventory
- GET v1/configs/inventory
Working with an item in a subaccount
Once an item is found, use the actor header to work with it. For example, to update a device in a subaccount use a PUT with an API request in the format:
curl -u 'parentuser' -H "actor: 74214" -X PUT -d '{"notes": "user data here"}' https://remotemanager.digi.com/ws/v1/devices/inventory/00000000-00000000-00000000-00000000
Similarly, use the actor header with any API call to allow items to be created, updated, or deleted in the subaccount.
Use a POST to create a device in the subaccount with the format:
curl -u 'parentuser' -H "actor: 74214" -H 'Content-Type: application/json' -X POST -d '{"id": "00000000-00000000-00000000-00000000", "install_code" : "INSTALLCODE"}' https://remotemanager.digi.com/ws/v1/devices/inventory
When the actor header is used on a GET, only items in the subaccount will be returned.
The table below shows what the result will be when a parent account user makes an API call to GET /ws/v1/devices/inventory using the specified headers. The account is set up with a parent account and 2 subaccounts.
ParentAccount (customer_id = 50)
ChildAccount-A (customer_id=55) and ChildAccount-B (customer_id=56)
| actor |
account-filter |
Result |
|
|
Lists devices in ParentAccount |
| 55 |
|
Lists devices in ChildAccount-A |
|
all |
Lists devices in ParentAccount, ChildAccount-A, and ChildAccount-B |
Throttles
This article describes what throttles are and how to prevent throttling.
What are throttles?
Throttles generally protect Digi Remote Manager from “rogue” devices or applications using system resources in a way that denies services to others.
Throttling generally occurs when a device or application is “over-using” its Digi Remote Manager access, where the allowed usage metrics are determined by subscription level which is based on the account type such as Premier.
Throttle Implementation
Throttles are calculated on a sliding scale (transactions per minute) and maintain a queue in order to provide bursting capabilities. An example is a sliding window of x transactions per y time interval (12 transactions per hour). Also, throttles may limit the number of concurrent requests, example is concurrent web service requests.
There is a sliding 10 second window for requests (so, for instance, at a limit of 180 per minute, you can send at most 30 in a ten second window before you hit that limit).
Device Data Service Throttler
Device data uploads are limited to 60 per minute. An example is a device uploading data into data streams (note that multiple data points can be sent in a single upload). One concurrent transaction is the maximum allowed since the data service can only process one request at a time. If exceeded a server error status is returned to the device, the device either has to slow down and retry.
This throttle can be controlled by a subscription to Device Throttling. Premier accounts have the values set to 60 transactions per minute. Other account types may have more restrictive device throttling.
Web Services Throttler
The web services throttler limits the number of web service API calls allowed by a customer. This is controlled by the subscription to Web Service messaging. An example is for Premier accounts the values are set to 240 transactions per minute and 4 concurrent transactions. Other account types may have more restrictive web service throttling.
When a throttle rate is exceeded the request results in an HTTP response status code of 429
Alarms
A System Throttles alarm event will be fired if devices are sending data too fast or if web service requests are exceeded.
Effects of Throttling
When requests are being throttled, it can cause issues for your intended solution. Suppose you have devices sending up data points to Remote Manager and you have an application that is continuously querying using web service requests to do the following:
Warning
NOTE: Do not actually do this - it is NOT scalable as explained below.
Get a list of devices using /ws/v1/devices/inventory
for each device
	for each expected stream name
		 get stream history using /ws/v1/streams/history/device-id/your-stream-name
		 for each datapoint
		 	process datapoint for solution
If this loop is going as fast as possible, it is likely to encounter throttling. Side effects of throttling to the intended solution include:
- Data from a device not being processed as quickly as desired
- SCI Requests to a device being throttled and difficult to get processed because the throttling caused by the queries makes the SCI request retries fail repeatedly
Additionally, when requesting the history for each stream, data in the stream is likely to be retrieved that is not needed as it has already been processed or has not changed since the previous request.
Solutions to Prevent Throttling
Use Monitors
Monitors allow data to be stored and retrieved efficiently. The data can be pushed to your solution as it arrives via HTTP or TCP monitors or you can use a polling monitor with a cursor. Monitors will only send new data so your solution will not have to process historical data multiple times. The data can be persisted so data is not lost if your application is not available temporarily.
For a practical tutorial with monitors, see Tutorial: Experimenting with Remote Manager Monitors
When using monitors, be sure to pay attention to the batch_size, batch_duration, and persistent values to make your solution process data as effectively as possible.
Use Remote Manager Features
If your solution requires processing at regular intervals, consider using the automations feature.
If your solution requires continuous verification of device firmware, device configuration, and device file system contents, consider using the configurations feature.
If you need to upgrade device firmware or modem firmware, consider using the automations or configurations feature.
Tutorial: Experimenting With Monitors
This tutorial goes through the steps required to create a web hook that receives several types of information
- It receives information about the status of all devices in your Remote Manager account
- It receives alerts when devices in a particular group are offline for an extended period of time (5 minutes)
- It receives any data points uploaded from all devices to the data stream metrics/wan/1/tx/bytes in order to keep track of the number of bytes sent out the wan.
You might want a solution like this so you can easily track your registered inventory and the state of it, including knowing when to debug a critical connectivity problem if a device loses connectivity.
Monitor Introduction
Remote Manager generates events for a variety of scenarios. This includes uploading data from devices, device state changes, and alarms that have triggered or reset.
Monitors effectively provide an event driven alternative to repeated queries with possibly complex conditions. Monitors also provide a way to receive events of many types from many devices. Fetching the data for all these devices and heterogeneous resource types may require a very large number of queries in order to retrieve all the data.
Push Monitors
A push monitor is an interface that a user can use to write applications that take advantage of event driven programming to watch for or “monitor” when events occur. Using a push monitor involves creating a client application that is an HTTP web server or a client application that connects with TCP to wait for events to be received. Push monitors can be “persistent”, so that if the user’s server crashes or is unavailable, events that may have been missed by the monitor can be resent or replayed.
Performance is improved by using push monitors because the user doesn’t have to poll for data and only those events which match the monitor “topic” will be delivered.
Create a push monitor using a post to the /ws/Monitor API.
Query Monitors
A polling or query monitor is an interface very similar to a push monitor. A query monitor will aggregate various types of monitor events into a single queue. Instead of the system pushing the events to a target web server application or through an active TCP connection, the user can later query that queue in an efficient polling fashion, requesting only the “next” events from the queue, and easily skipping all events they’ve seen already.
Performance is improved by using query monitors because the caller doesn’t have to call many APIs to get a variety of data from the system and the query monitor parameters allow continuing where the last call left off using a “polling cursor”. Query monitors can also reduce complexity because a server infrastructure doesn’t need to be maintained.
Create a query monitor using a post to the /ws/Monitor API, retrieve events from the monitor using the /ws/v1/monitors/history API.
Event types
There are a wide variety of events that occur and the events also indicate an operation (for example, create, update, delete of a resource)
alert_status event - Alerts are triggered, reset or acknowledged (a modern version of AlarmStatus)devices event - When a device is added, removed or changes its properties (a modern version of DeviceCore)firmware_updates and firmware_updates_progress events - When a firmware update finishes or changes its progressjobs and JobResult events - When SCI jobs on the system created, run, or are completedCLIEvent event - When a console session starts, terminates or the device sends dataDataPoint event - When a device uploads an individual data pointDataStream event - When operations on a data stream occurDeviceCore event - When a device itself is created, updated or deletedFileData and FileDataCore events - When files are manipulated on the systemXbeeCore event - When an Xbee device is created, update or deleted- Others…
Alerting Introduction
In general, this tutorial isn’t about the alerting capabilities of Remote Manager.
Suffice it to say that Remote Manager has Alarms and Alerts. They are the same thing. The term “alarms” is used in many of the classic APIs and user interfaces, while “alerts” typically refer to the same feature in modern (/ws/v1) APIs and user interfaces. You can create alerts using the Remote Manager API explorer, the classic Remote Manager user interface or the modern user interface.
In general, an alert definition is created to trigger on some condition. The alert fires when the condition occurs and stays in a fired state unless:
- The alert is manually reset
- The alert is configured to automatically reset upon some other condition
- The alert is marked acknowledged by manual user action
The system may send notification emails for alerts, but that is not the topic for discussion in this tutorial.
Some of the types of alerts:
- Device Offline - fires when a device is offline for a specific amount of time
- Device Excessive Disconnects - Fires when the number of disconnects of a device reaches a threshold
- DataPoint Condition - Fires when a data point is updated to a certain value or range
- DataPoint On Change - Fires when the value of a data point changes from a previous value to a new value
- Missing DataPoint - Fires when a data point isn’t updated in a timely fashion
- Device Name On Change - Fires when the name of a device is changed
- Others…
Alert UI
In the modern Remote Manager user interface, you can see all of the existing alerts and create new alerts by navigating to Alerts → Definitions. Use the Create button to define a new alert. After adding an alert in this way, you can call ws/v1/alerts/inventory to see alert definition.
Alert UI - Classic
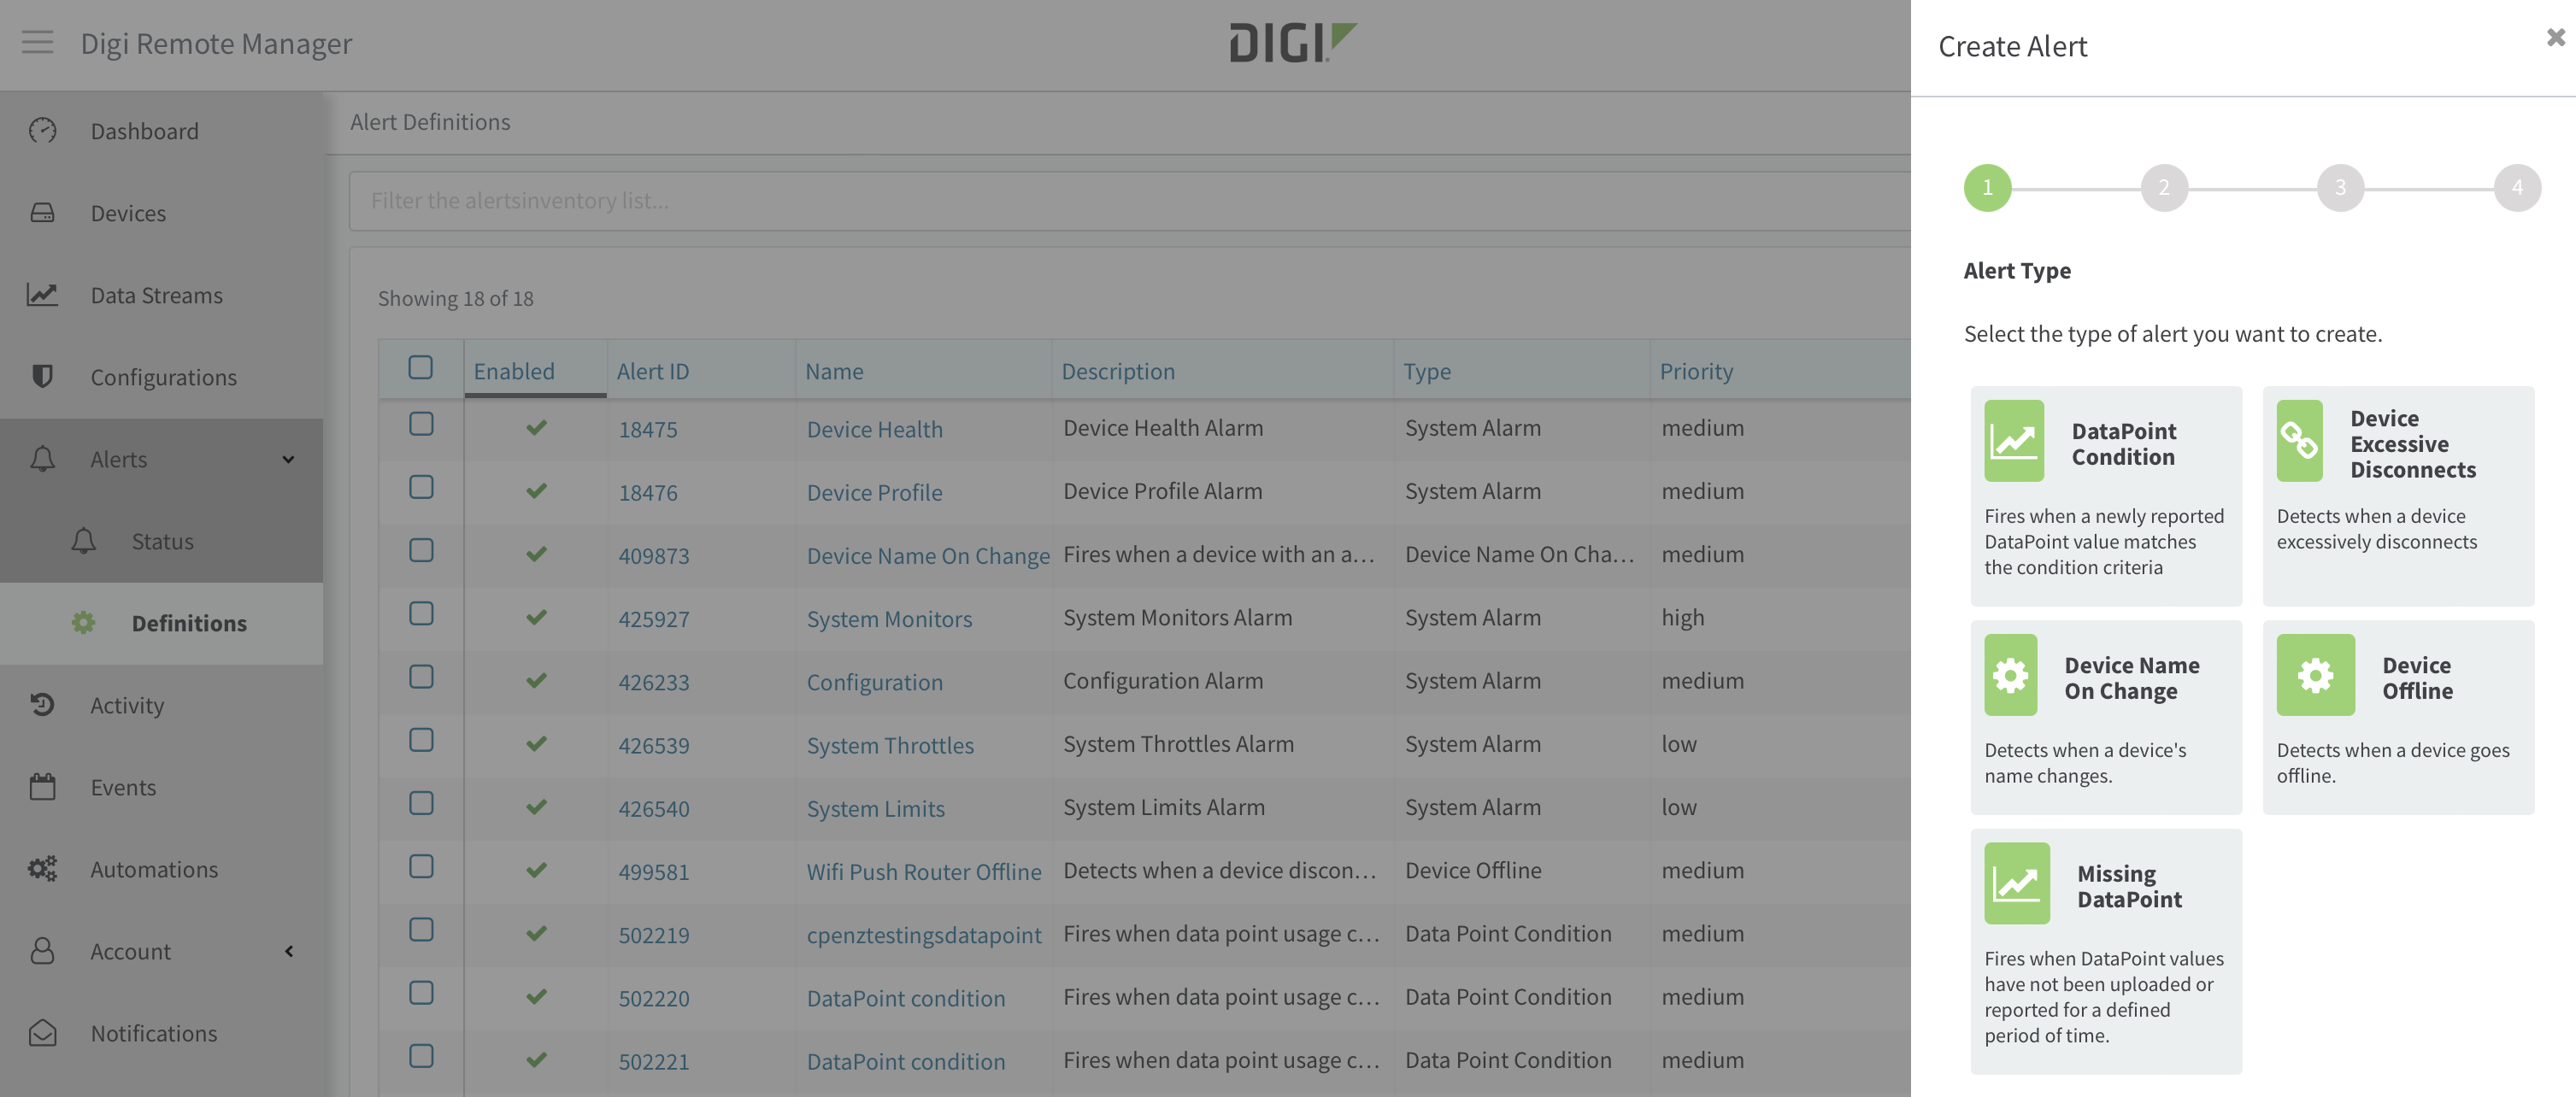
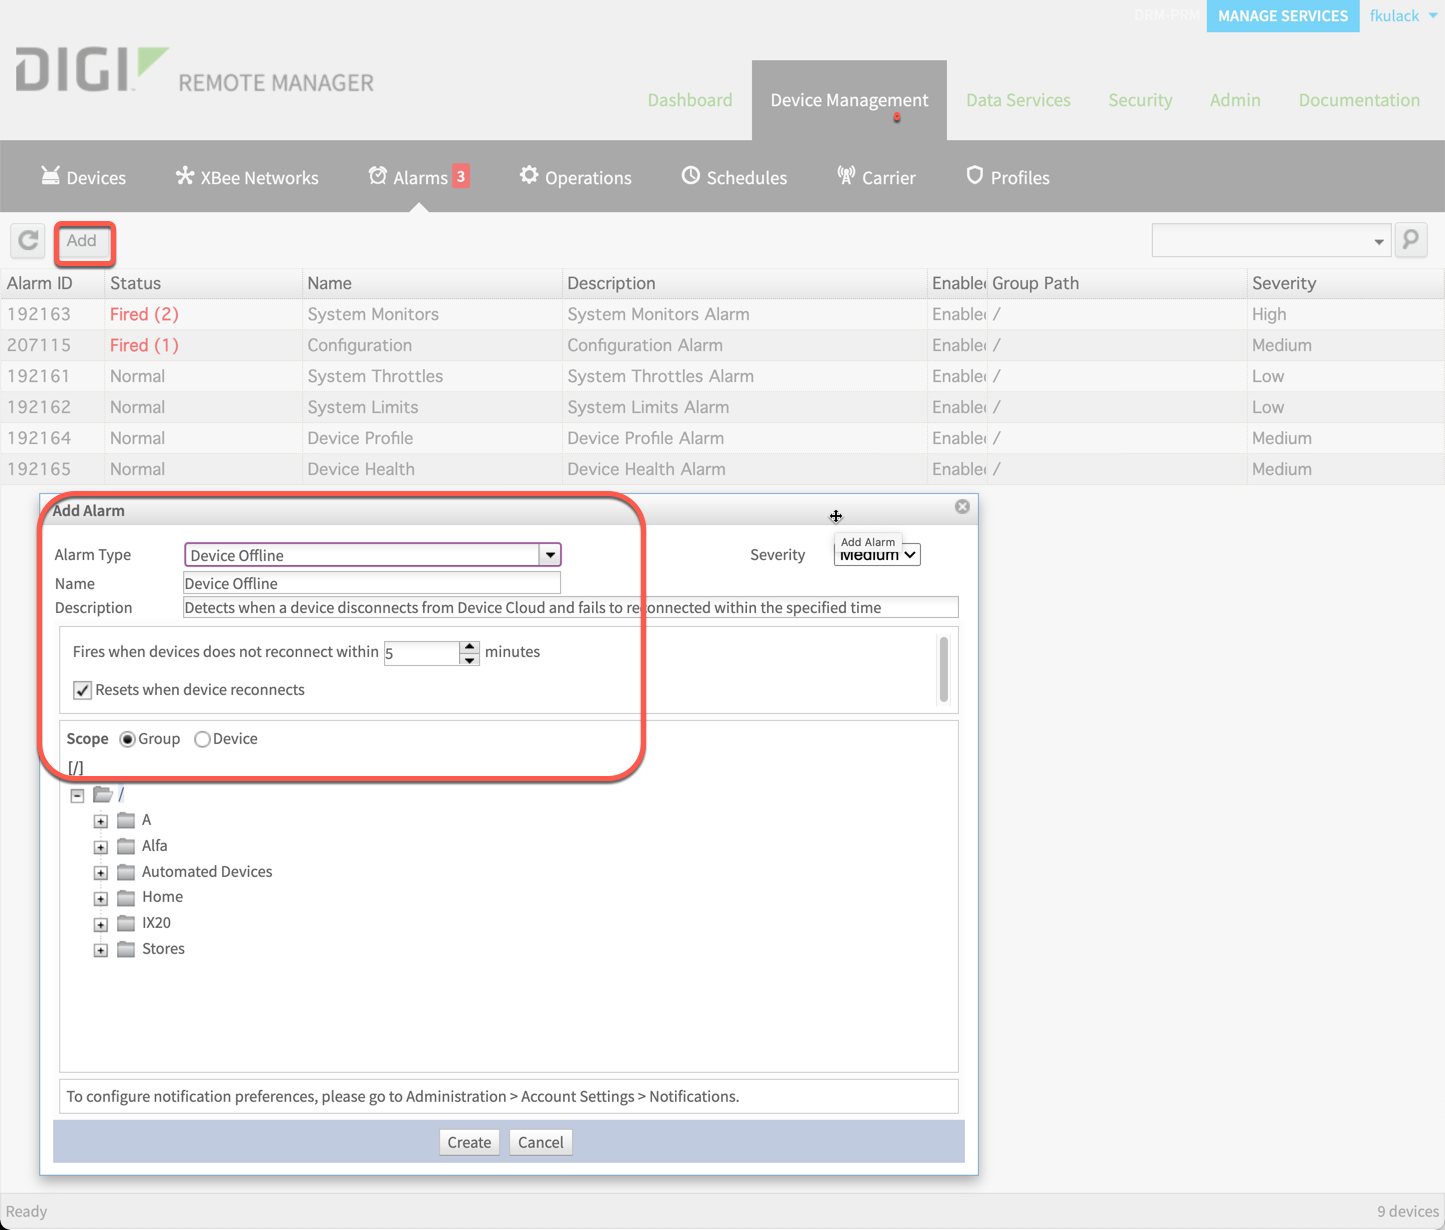
Some of the alert types are not in the modern Remote Manager user interface. You can see all of the available alert types and their properties by using the classic Remote Manager UI and navigating to Device Management → Alarms and using the Add alarm dialog. After adding an alarm in this way, you can call ws/v1/alerts/inventory to see the modern version of an alert that is represented by the alarm.
Receive Monitor Events
In our example, we used the Hookbin web tool at https://hookbin.com/ to capture and inspect monitor events sent from Remote Manager. NOTE The HookBin site is no longer available, but other similar sites work well for this sort of experimenting. For example: https://requestbin.com/.
Setup an Alert
We’re going to start by setting up an alert to watch for device offline events. When a device in our Remote Manager account group “Stores” disconnects, and stays disconnected for 5 minutes, we want an alert to fire so that we can be notified of the condition.
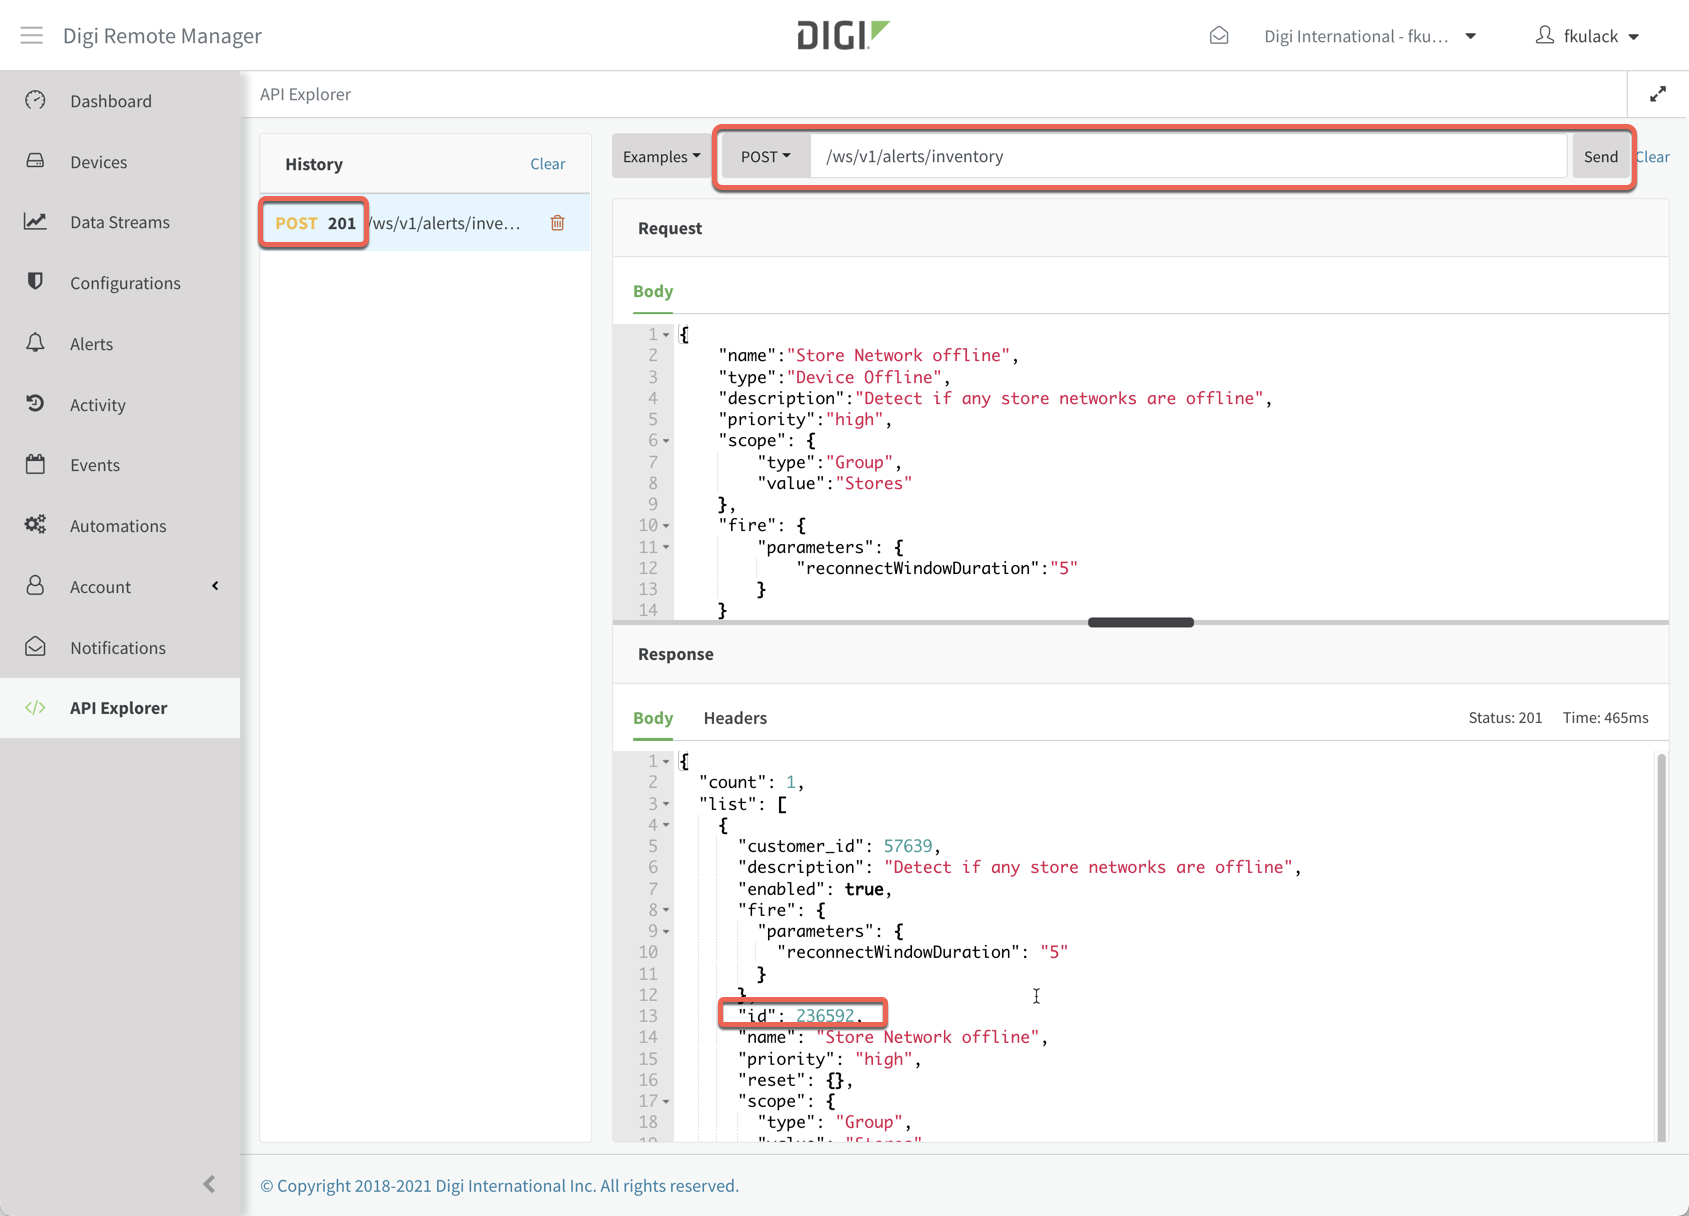
In the introduction to alerts section, we showed how to navigate to the user interface and create an alert. In this section, we’re going to use the API explorer to create this alert by POSTing a payload directly to the /ws/v1/alerts/inventory API.
The payload looks like this, and creates an alert named “Store Network offline” for any device in group “Stores”.
{
    "name":"Store Network offline",
    "type":"Device Offline",
    "description":"Detect if any store networks are offline",
    "priority":"high",
    "scope": {
        "type":"Group",
        "value":"Stores"
    },
    "fire": {
        "parameters": {
            "reconnectWindowDuration":"5"
        }
    }
}
In the following screen shot you can see we created an alert, with alert ID of 236592. We’ll use that in the monitor and identify an event sent with that alert ID later.
Setting up the Monitor
Receiver
Go to https://requestbin.com/ and create your own web hook. In the example that follows, we create a hook using the old hookbin web site, and it had a URL of https://hookb.in/lJNNXEmV3PsJBNooB0Vl.
You can test that hook using Postman or any stand alone tool that calls web APIs. Here is an example in cURL on the command line:
curl -X POST -d '{"test":"42"}' https://hookb.in/lJNNXEmV3PsJBNooB0Vl
{"success":true}
Create the monitor
Create the monitor by posting a payload to the /ws/v1/monitors/inventory API. The monitor payload describes some required configuration features for the monitor.
For this example, we will use the following payload:
{
    "topics" : [
        "devices",
        "alert_status",
        "DataPoint/*/metrics/wan/1/tx/bytes"
    ],
    "type": "http",
    "url": "https://hookb.in/lJNNXEmV3PsJBNooB0Vl",
    "auth_token": "username:password",
    "headers" : [
        "example-header: header-value"
    ],
    "method": "POST",
    "format": "json",
    "batch_size": 100,
    "batch_duration": 10,
    "persistent": true
}
Some of these parameters are obvious, others are not, I’ll briefly describe what they represent.
- topics - Specific event topics from the monitor introduction section. Note that some events, like DataPoint take qualifiers to get specific about what type of resource is being monitored.
- type - We’re setting up an outgoing HTTP monitor, other options are “tcp” and “polling” for a query only monitor
- auth_token - Is the basic auth required for this monitor
- headers - Headers that can additionally be sent along with each request (useful for API keys or other types of authentication)
- method - HTTP Post or put are used
- format - What format should the payload be sent to the target in? Supported format types are json or xml
- batch_size - Maximum of how many events should be batched together? Don’t recommend setting this to 1, your monitor may not be able to keep up in busy situations.
- batch_duration - If the batch isn’t full, at what point should the data be sent anyway?
- persistent - If your monitor is not up and can’t receive data, should data be kept so it can be re-sent? Note, all monitor data expires after 7 days. This is sometimes referred to as an “auto replay on connect” because it ensures we persist all data that would have been destined to the monitor even if its down or there have been systemic problems with it and replay any missed data to the target if the target has been down.
- NOTE: Any monitor that has persistent and is saving data, can have its history (events that were generated) retrieved using the ws/v1/monitors/history API until those events expire.
So, in the following screen shot you can see that we’ve created the monitor with ID 1356702. We’ll use that later in other API calls.
Create the monitor with the XML APIs
Create the monitor by posting a payload to the /ws/Monitor API. The monitor payload describes some required configuration features for the monitor.
For this example, we will use the following payload:
<Monitor>
    <monTopic>devices,alert_status,DataPoint/*/metrics/wan/1/tx/bytes</monTopic>
    <monTransportType>http</monTransportType>
    <monTransportUrl>https://hookb.in/lJNNXEmV3PsJBNooB0Vl</monTransportUrl>
    <monTransportToken>username:password</monTransportToken>
    <monTransportHeaders>example-header: header-value</monTransportHeaders>
    <monTransportMethod>POST</monTransportMethod>
    <monFormatType>json</monFormatType>
    <monBatchSize>100</monBatchSize>
    <monBatchDuration>10</monBatchDuration>
    <monReplayOnConnect>true</monReplayOnConnect>
</Monitor>
Some of these parameters are obvious, others are not, I’ll briefly describe what they represent.
- monTopic - Specific event topics from the monitor introduction section. Note that some events, like DataPoint take qualifiers to get specific about what type of resource is being monitored.
- monTransportType - We’re setting up an outgoing HTTP monitor, other options are “tcp” and “polling” for a query only monitor
- monTransportToken - Is the basic auth required for this monitor
- monTransportHeaders - Headers that can additionally be sent along with each request (useful for API keys or other types of authentication)
- monTransportMethod - Post or put are used
- monFormatType - What format should the payload be sent to the target in? Supported format types are json or xml
- monBatchSize - Maximum of how many events should be batched together? Don’t recommend setting this to 1, your monitor may not be able to keep up in busy situations.
- monBatchDuration - If the batch isn’t full, at what point should the data be sent anyway?
- monReplayOnConnect - If your monitor is not up and can’t receive data, should data be kept so it can be re-sent? Note, all monitor data expires after 7 days. This is sometimes referred to as a “persistent monitor” because it ensures we persist all data that would have been destined to the monitor even if its down or there have been systemic problems with it.
- NOTE: Any monitor that has monReplayOnConnect and is saving data, can have its history (events that were generated) retrieved using the ws/v1/monitors/history API until those events expire.
Use API Explorer
We can use API explorer for creating the monitor using either the json API ws/v1/monitors/inventory or the xml API ws/Monitor. So, in the following screen shot you can see that we’ve created the monitor with ID 1356702. We’ll use that ID later in other API calls.
Watch the monitor
At this point, we can go back to hook bin and look at what events we might be receiving. We will immediately start to receive some events.
- Any time the device status is updated (it connects, disconnects, is moved to a new group, gets a new name, etc, etc)
- Any time it uploads a data point for stream metrics/wan/1/tx/bytes (my test device is set to upload every 5 minutes)
- Any time any alert status changes
The first message we receive at hook is shown below.
Monitor Payload: initial
We get a Basic authorization and example-header HTTP header matching what we’ve setup in our monitor. In this post, we’ve received a single monitor event as indicated by the monitor-aggregate-count header.
The payload is as follows. This is an alert status event showing that the monitor was connected. The alert_status event has an id of 192163 which is a different alert than the one we created so we don’t have to pay attention to it.
Some fields of the payload:
- Monitor payloads have a Document and Msg element where the Msg element is either an individual event or a list of events (in json, “Msg” is either an object or an array of objects)
- topic - Depending on the event type, the topic represents routing/summary information about the payload.
- group, operation, timestamp - More information about when and why the individual event was generated
- alert_status - This element will be named depending on what the data type is. In payloads in this tutorial, you’ll see this element being a “device”, a “DataPoint” or the “alert_status” because those are the topics used when we created the monitor.
{
  "Document": {
    "Msg": {
      "topic": "57639/alert_status/192163/Monitor%3A1356700",
      "group": "*",
      "operation": "INSERTION",
      "timestamp": "2021-11-18T18:22:55.604Z",
      "alert_status": {
        "customer_id": 57639,
        "enabled": true,
        "id": 192163,
        "last_update": "2021-11-18T18:22:55.535Z",
        "maintenance_mode": "off",
        "notes": "Monitor connected",
        "severity": "high",
        "source": "Monitor:1356700",
        "status": "reset"
      }
    }
  }
}
The screen shot of the first event from hookbin is shown here:

Monitor Payload: device and DataPoint
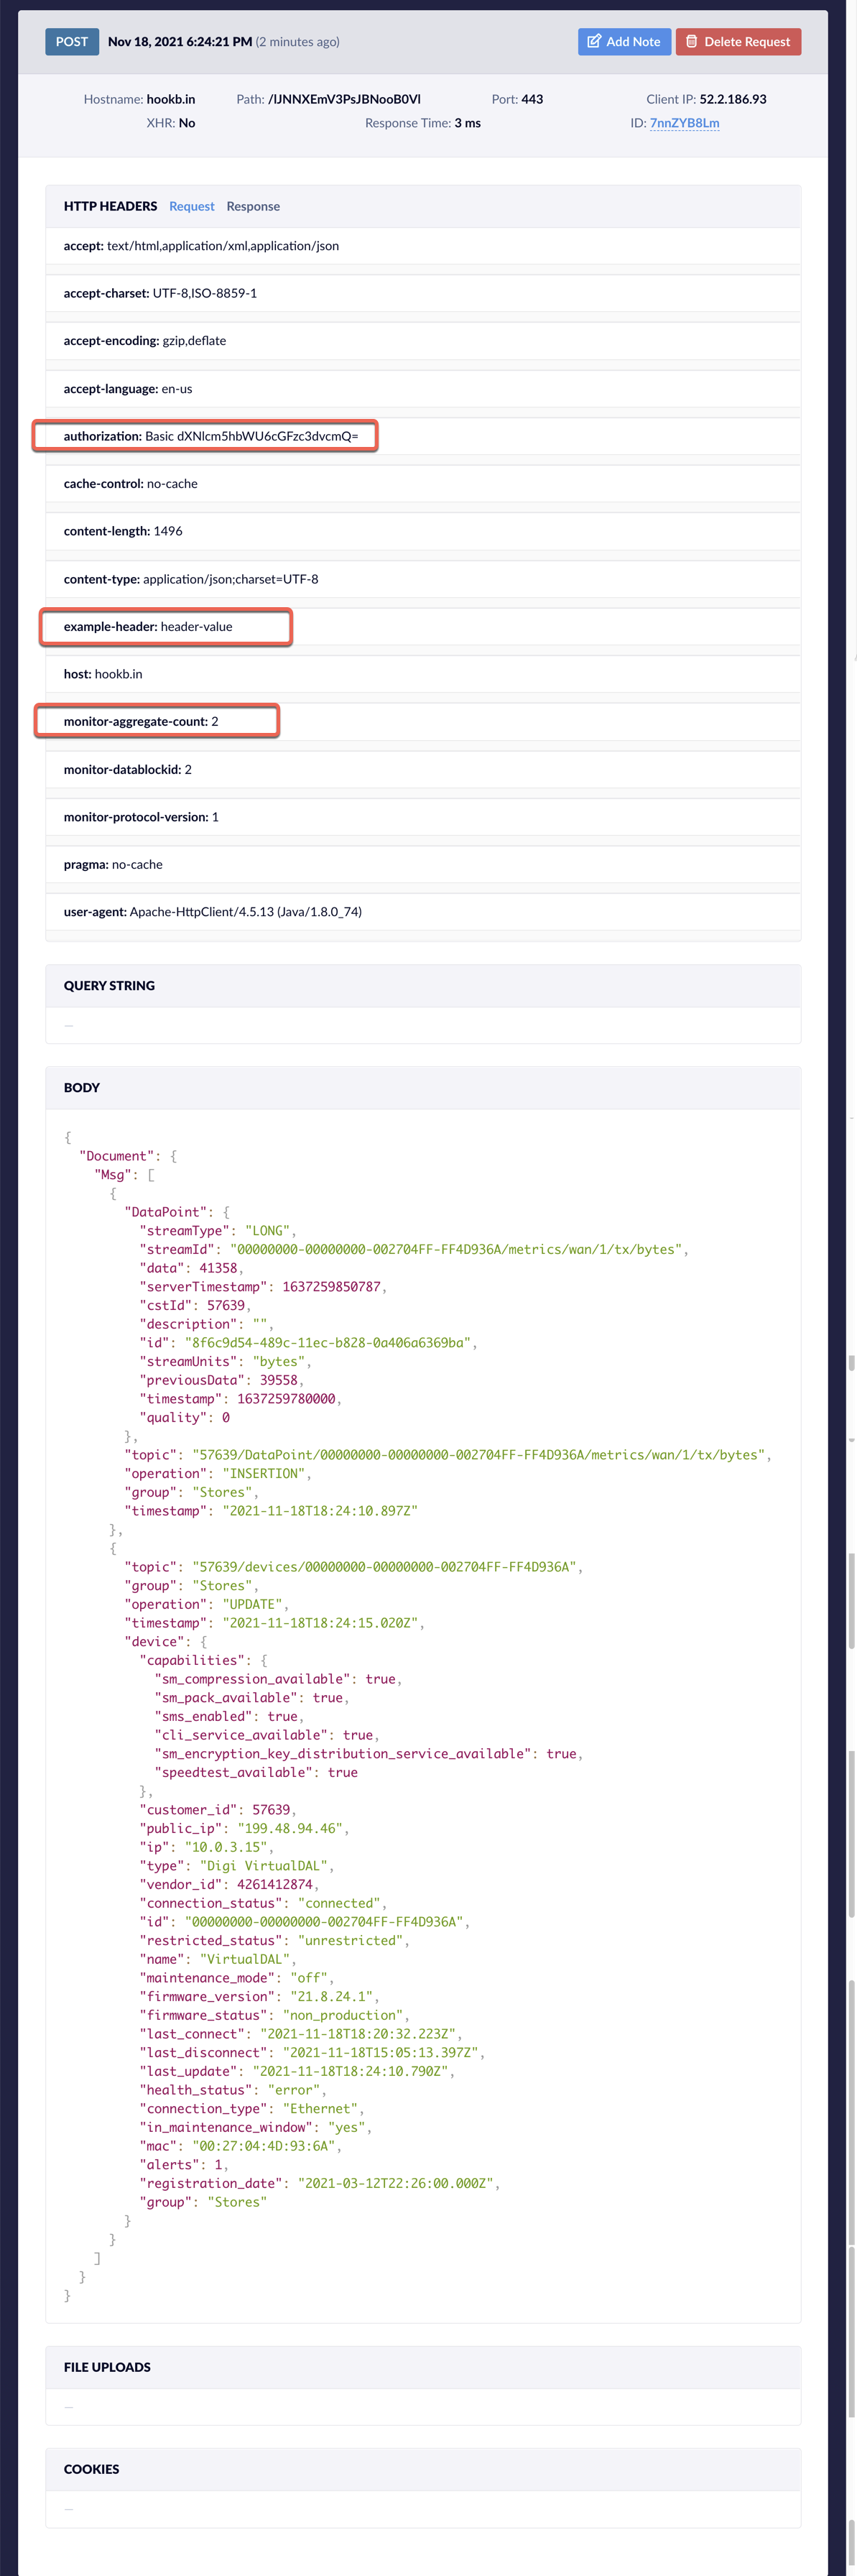
When the device updates its metric data, the monitor receives another payload. Note in this payload, there are 2 events in the monitor payload, so the “monitor-aggregate-count” HTTP header is 2.
Also note that the “Msg” element in the payload is a list, containing each of the two types of events, a “DataPoint” and the “device” payload with the device being updated.
Of special interest in this payload:
- The data point is being updated from a previous value of 39558 to 41358 bytes (The streamUnits field indicates bytes)
- That this device being updated is in the “Stores” group, so that the handler of the event can take some different action depending on that information.
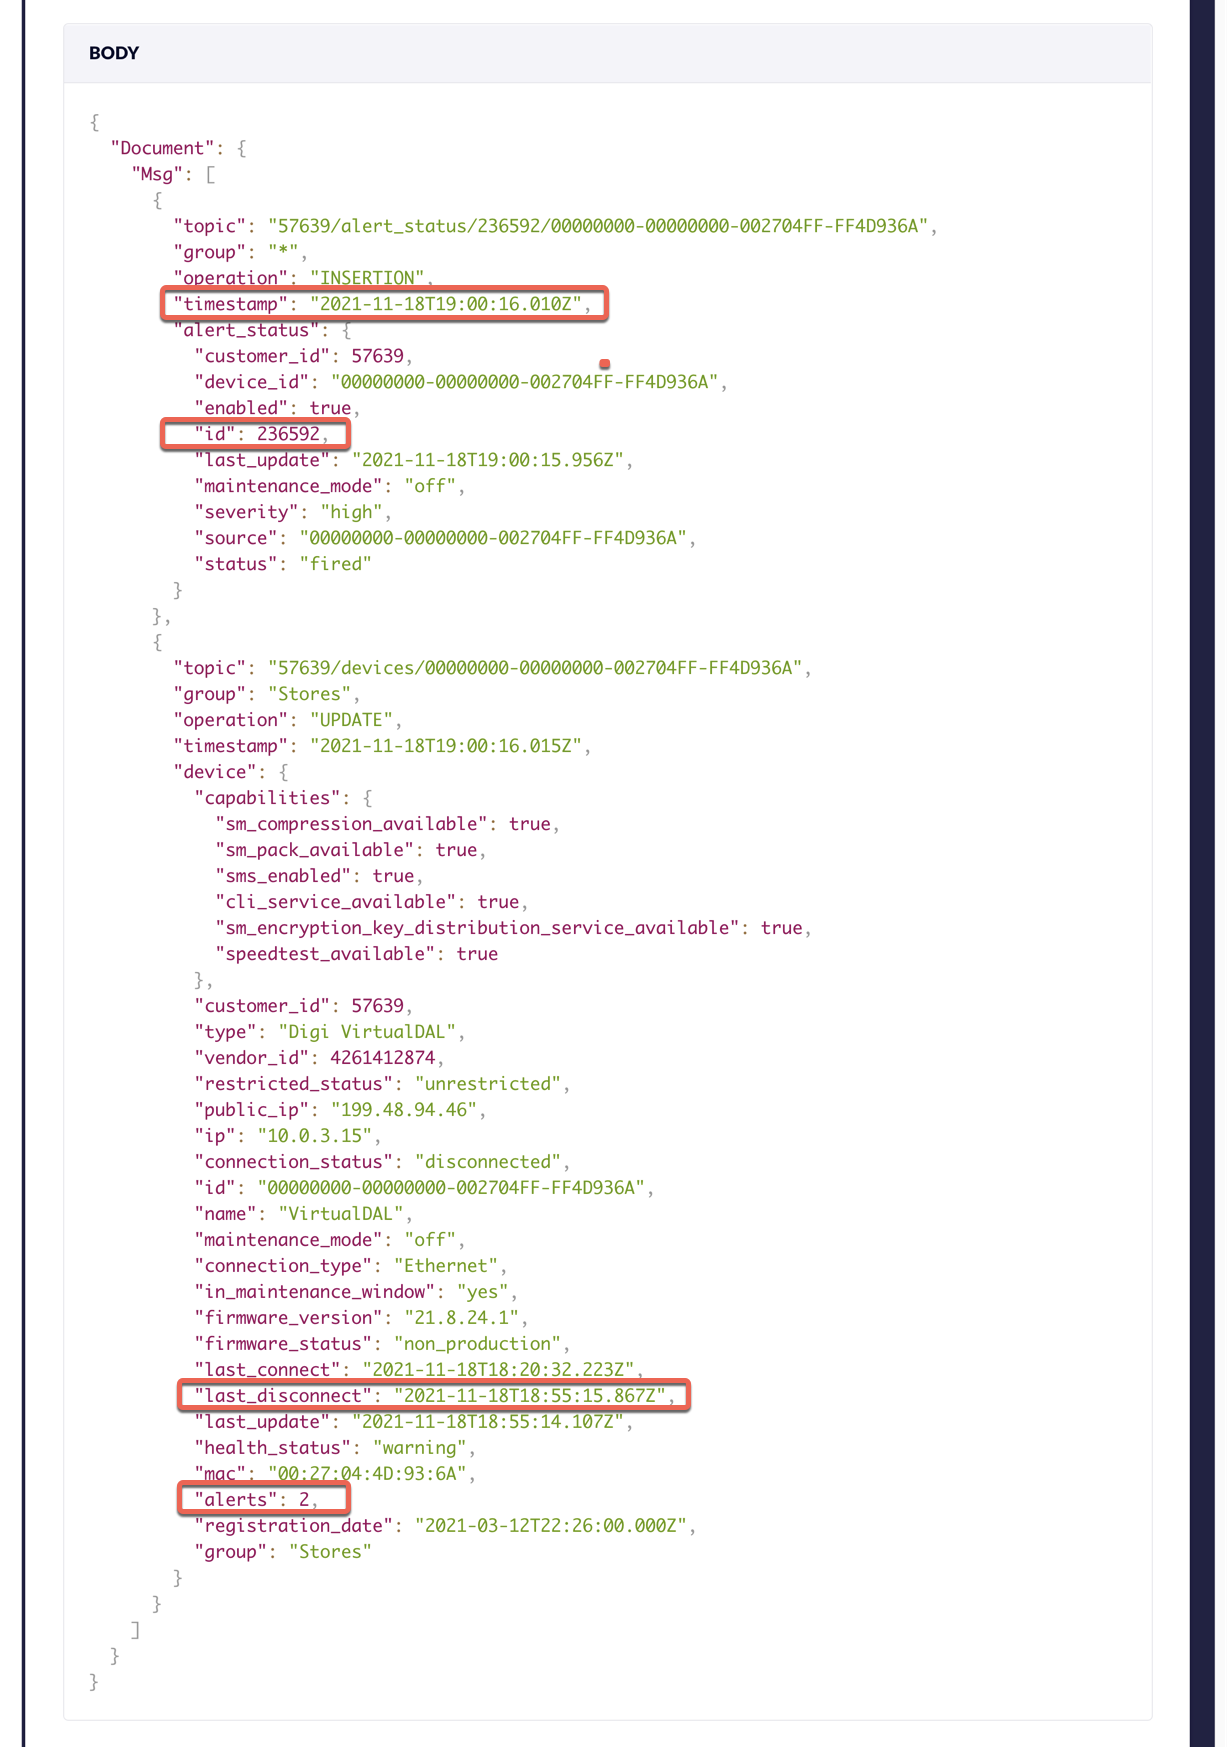
Monitor Payload: Device Offline alert_status
After disconnecting a device in the stores group, and waiting five minutes, the monitor receives another payload.
There are a couple of things going on in this payload. Since we have the monitor batch size set to 100 and the batch duration set to 10 seconds, we get to see both the device event and the alert at the same time.
Some interesting things that caused this payload:
- You can see by the device “last_disconnect” field, that the device disconnected at 18:55.
- You can see by the alert_status event timestamp field that the alert was fired at 19:00 (5 minutes later because of the alert configuration)
- The device is only included in this payload because at 19:00, the alert firing caused the number of alerts associated with the device to be bumped from 1 to 2 (refer back to a prior device payload where it was 1). That change caused a device status to occur so the “device” event was included in this payload too.
Clean up
We should be sure to delete the monitor and the alert so that we don’t create noise in our account or run up usage.
Delete the alert

Delete the monitor

Summary
This tutorial demonstrates how to use API explorer and HookBin to experiment with Remote Manager monitors and APIs.
Have fun!
Tutorial: Monitors with Templated Payloads
The monitor feature of Remote Manager supports templates that customize the format used to deliver events. This can be helpful when a service is not able to easily consume the built-in XML and JSON formats and a different schema is required by the target.
For additional background on monitors see Experimenting with Monitors where we took a look at the monitor feature in Remote Manager and how it can be used to aggregate and deliver events based on a list of subscribed topics.
Supplying a Template
For a Monitor
The monSchemaType and monSchemaData fields can be used to supply a template. For example, a query monitor can be created that includes a template with a POST to /ws/Monitor with a payload such as:
<Monitor>
    <monTopic>DataPoint/*/metrics/cellular</monTopic>
    <monTransportType>polling</monTransportType>
    <monSchemaType>handlebars</monSchemaType>
    <monSchemaData>
        [
        {{#each this}}
          {{#if @index}},{{/if}}
          { "{{DataPoint.streamId}}":{{DataPoint.data}} }
        {{/each}}
        ]
    </monSchemaData>
</Monitor>
Test with the History API
A monitor may be responsible for sending data to your production system and not be a good candidate for testing or experimenting.
Supplying a template to the monitory history API is a good way to rapidly test different templates without changing a monitor.
Retrieving the history of the query monitor with a GET to /ws/v1/monitors/history/<monId> shows the result of the template in the output field.
This example:
- Targets monitor 1772299
- Uses the
start_time parameter to start with data from 5 minutes ago
- Uses the
size parameter to limit the maximum data items to return to 10
- Uses the
schema parameter to supply a template
- Uses the httpIe command line tool to send the web request.
NOTE: In your own testing, you’ll have to be careful with escaping special characters (especially if you use the curl command line tool)
http remotemanager.digi.com/ws/v1/monitors/history/1772299 \
 start_time==-5m \
 size==10 \
 schema=='[
{{#eachFiltered this}}
  {{#if DataPoint.streamId}}
  {{#if @index}},{{/if}}
    {{json DataPoint.streamId}}
  {{/if}}
{{/eachFiltered}}]'
The result is the following:
Note:
- The output field has been formatted to show proper spaces and newlines.
- The device IDs have been changed to
00000000-00000000-00000000-00000000
{
    "count": 10,
    "cursor": "99084a20-b838-11ed-9b29-e2a950f87599",
    "next_uri": "/ws/v1/monitors/history/1772299?start_time=-5m&size=10&schema=%5B%0A%7B%7B%23eachFiltered+this%7D%7D%0A++%7B%7B%23if+DataPoint.streamId%7D%7D%0A++%7B%7B%23if+%40index%7D%7D%2C%7B%7B%2Fif%7D%7D%0A++++%7B%7Bjson+DataPoint.streamId%7D%7D%0A++%7B%7B%2Fif%7D%7D%0A%7B%7B%2FeachFiltered%7D%7D%5D&cursor=99084a20-b838-11ed-9b29-e2a950f87599",
    "output": "[
  "00000000-00000000-00000000-00000000/metrics/sys/mem/used",
  "00000000-00000000-00000000-00000000/metrics/sys/cpu/used",
  "00000000-00000000-00000000-00000000/metrics/sys/storage/config/used",
  "00000000-00000000-00000000-00000000/metrics/sys/storage/opt/used",
  "00000000-00000000-00000000-00000000/metrics/sys/storage/tmp/used",
  "00000000-00000000-00000000-00000000/metrics/sys/storage/var/used",
  "00000000-00000000-00000000-00000000/metrics/eth/1/rx/bytes",
  "00000000-00000000-00000000-00000000/metrics/sys/location",
  "00000000-00000000-00000000-00000000/metrics/eth/1/rx/packets",
  "00000000-00000000-00000000-00000000/metrics/eth/1/rx/overruns"
]",
    "polling_cursor": "99084a20-b838-11ed-9b29-e2a950f87599",
    "polling_uri": "/ws/v1/monitors/history/1772299?start_time=-5m&size=10&schema=%5B%0A%7B%7B%23eachFiltered+this%7D%7D%0A++%7B%7B%23if+DataPoint.streamId%7D%7D%0A++%7B%7B%23if+%40index%7D%7D%2C%7B%7B%2Fif%7D%7D%0A++++%7B%7Bjson+DataPoint.streamId%7D%7D%0A++%7B%7B%2Fif%7D%7D%0A%7B%7B%2FeachFiltered%7D%7D%5D&cursor=99084a20-b838-11ed-9b29-e2a950f87599",
    "size": 10
}
See Handlebars Template for details about the Handlebars template format.
Handlebars Playgrounds
There are playground environments online that let you quickly try out templates given a data model that you supply, such as https://handlebarsjs.com/playground.html . These playgrounds do not include the custom helpers Remote Manager provides. If you want to try out custom helpers in these environments you can paste the following into the box they have for custom helpers (captioned Preparation-Script in the above playground).
Note, these should be considered unsupported implementations of the custom helpers and are solely provided to experiment in the sandbox environments. The actual implementation of the helpers differs in Remote Manager.
Here are some experimental JavaScript Custom Helpers, this list does not include all the helpers provided by Remote Manager:
Handlebars.registerHelper('firstPathComponent', function(text) {
return text.split('/')[0];
});
Handlebars.registerHelper('remainingPathComponents', function(text) {
return text.split('/').splice(1).join('/');
});
Handlebars.registerHelper('formatTime', function(timestamp) {
return new Date(timestamp).toISOString();
});
Handlebars.registerHelper("endsWith", function(text, suffix, options) {
if (text.endsWith(suffix)) {
return options.fn(this);
} else {
return options.inverse(this);
}
});
Handlebars.registerHelper("eq", function(inputOne, inputTwo, options) {
if (inputOne === inputTwo) {
return options.fn(this);
} else {
return options.inverse(this);
}
});
Handlebars.registerHelper("eachFiltered", function(context, options) {
if (!options) {
throw new Exception('Must pass iterator to #each');
}
let fn = options.fn,
inverse = options.inverse,
i = 0,
ret = '',
data;
if (typeof context === 'function') {
context = context.call(this);
}
if (options.data) {
data = {};
for (let key in options.data) {
if (Object.prototype.hasOwnProperty.call(arguments[i], key)) {
data[key] = arguments[i][key];
}
}
data._parent = options.data;
}
function execIteration(field, index, last) {
if (data) {
data.key = field;
data.index = index;
data.first = index === 0;
}
let blockOutput = fn(context[field], {
data: data,
blockParams: [context[field], field]
});
if(blockOutput.trim()) {
ret = ret + blockOutput;
return true;
} else {
return false;
}
}
if (context && typeof context === 'object') {
if (context && typeof context === 'object'
? toString.call(context) === '[object Array]'
: false) {
let nonEmptyIndex = 0;
for (let j = context.length; i < j; i++) {
if (i in context) {
if(execIteration(i, nonEmptyIndex, i === context.length - 1)) {
nonEmptyIndex++;
}
}
}
} else if (global.Symbol && context[global.Symbol.iterator]) {
const newContext = [];
const iterator = context[global.Symbol.iterator]();
for (let it = iterator.next(); !it.done; it = iterator.next()) {
newContext.push(it.value);
}
context = newContext;
let nonEmptyIndex = 0;
for (let j = context.length; i < j; i++) {
if(execIteration(i, nonEmptyIndex, i === context.length - 1)) {
nonEmptyIndex++;
}
}
} else {
let priorKey;
let nonEmptyIndex = 0;
Object.keys(context).forEach(key => {
// We're running the iterations one step out of sync so we can detect
// the last iteration without have to scan the object twice and create
// an itermediate keys array.
if (priorKey !== undefined) {
if(execIteration(priorKey, nonEmptyIndex)) {
nonEmptyIndex++;
}
}
priorKey = key;
i++;
});
if (priorKey !== undefined) {
if(execIteration(priorKey, nonEmptyIndex++, true)) {
nonEmptyIndex++;
}
}
}
}
if (i === 0) {
ret = inverse(this);
}
return ret;
});
Handlebars.registerHelper('slice', function(context, sep, start, length, options) {
if (start === 0 || length < 1) {
throw new Exception('Bad start or length parameter');
}
const components = context.split(sep)
let end = false
if (start < 0) {
end = true
start = -start
}
start-=1
if (!end) {
return components.slice(start, start+length).join(sep)
}
else {
return components.slice(components.length-1-start, components.length-1-start+length).join(sep)
}
});
Handlebars.registerHelper('json', function(context, options) {
const dft = options.hash.default ? options.hash.default : null;
if (!context) {
return dft
}
const pretty = options.hash.pretty ? 2 : null;
const escapeHTML = !!options.hash.escapeHTML;
let json = JSON.stringify(context, null, pretty)
if (!escapeHTML) {
return json;
}
// Better techniques for escaping HTML are available using
// the DOM or jQuery, but this is a simple example with no
// dependencies
return json
.replace(/&/g, '&')
.replace(/</g, '<')
.replace(/>/g, '>')
.replace(/"/g, '"')
.replace(/'/g, ''');
});
Handlebars.registerHelper('replace', function(context) {
var current = context;
const options = arguments[arguments.length - 1];
if (current) {
let index=1;
while (index+1 < arguments.length-1) {
const match = arguments[index];
const replace = arguments[index+1];
current = current.replaceAll(match, replace);
index += 2
}
}
if (current !== context) {
console.log(`Replaced to ${current}`);
if (!options.data) {
options.data = {};
}
options.data.replaced = current;
return options.fn(this, options);
} else {
return options.inverse(this);
}
});
Building a Template
Data Model
The data model supplied to the template engine is the list of monitor events in their JSON representation. For example, a monitor subscribed to DataPoint events would have the following available to the template:
[
   {
      "topic":"1234/DataPoint/00000000-00000000-12341234-12341234/metrics/cellular/1/sim1/tx/bytes",
      "group":"somegroup",
      "operation":"INSERTION",
      "timestamp":"2021-12-07T20:07:08.563Z",
      "context": {
        "deviceType": "Default Simulated Device Type",
        "deviceName": "deviceA",
        "vendorId": "0"
      },
      "DataPoint":{
         "id":"41a1ac50-5799-11ec-afa9-f6681641504e",
         "streamId":"00000000-00000000-12341234-12341234/metrics/cellular/1/sim1/tx/bytes",
         "streamUnits":"",
         "streamType":"UNKNOWN",
         "description":"",
         "data":"64",
         "timestamp":1638907628437,
         "serverTimestamp":1638907628437,
         "quality":0,
         "cstId":1234
      }
   },
...
   {
      "topic":"1234/DataPoint/00000000-00000000-12341234-12341234/metrics/cellular/2/sim1/tx/bytes",
      "group":"somegroup",
      "operation":"INSERTION",
      "timestamp":"2021-12-07T20:15:44.125Z",
      "context": {
      "deviceType": "Default Simulated Device Type",
      "deviceName": "deviceA",
      "vendorId": "0"
      },
         "DataPoint":{
         "id":"74f1b360-579a-11ec-afa9-f6681641504e",
         "streamId":"00000000-00000000-12341234-12341234/metrics/cellular/2/sim1/tx/bytes",
         "streamUnits":"",
         "streamType":"UNKNOWN",
         "description":"",
         "data":"72",
         "previousData":"8",
         "timestamp":1638908144022,
         "serverTimestamp":1638908144022,
         "quality":0,
         "cstId":1234
      }
   }
]
Since the template is supplied a list of events you will typically need to iterate over the content of the data model using either the each or eachFiltered helpers.
Testing Your Template
It can take a few tries to get a template that has the desired output, so there are stages you can go through that can make it easier to experiment.
Getting the Data Model
First off, start by creating a query monitor that is subscribed to the topics you are interested in. Query monitors can be queried repeatedly without having to publish new data, so tweaks to your template can be seen quickly. See above for an example of creating a query monitor with a template.
Once you have a query monitor created, wait for some events and then retrieve the raw JSON representation of the events by doing a GET to /ws/v1/monitors/history/.json?ignore_schema=true&include_context=true. The items in the list field is what will be supplied to your template.
DataPoint Context
Published DataPoint events for use in templates will include a context that has the device name, device type, and vendor ID if they are defined for the device that sent the event. Examples of the data can be retrieved using the include_context parameter as mentioned in the previous section.
Handlebars Playgrounds
If you are just starting out with a template you might want to paste the content of the list field from above into a Handlebars Playground so that you can see a live representation of what your template would output.
Refinement through the Query Monitor
Once you are happy with the template, you can update the query monitor used to retrieve the data model with a PUT to /ws/Monitor/ with the updated template in the monSchemaData field, like below:
<Monitor>
  <monSchemaType>handlebars</monSchemaType>
  <monSchemaData>...updated template here</monSchemaData>
</Monitor>
After the monitor is updated you can query the output with a GET to /ws/v1/monitors/history/ to see if the format of the output field is correct.
HTTP Monitor Request Capturing and Inspection
Next, if you’re using an HTTP monitor you can create the HTTP monitor but target an endpoint that allows you to easily see what is being delivered from Remote Manager. An example site that allows capturing requests is https://requestbin.com/. You can point your HTTP monitor against a site like this and then look at the requests to see if the body of the request matches your expected template output.
Integrate Your Application
Finally, if you are planning to use an HTTP or TCP monitor you can now create the monitor with the desired monTransportType and and template and verify that it has the desired output when delivering events to your TCP monitor client or web server. The more rapid testing available with the playground and query monitor should result in a template that works quickly with the HTTP or TCP monitor, avoiding the overhead of having to wait for traffic and event delivery.
Batching
Templates do not have the ability to change how monitor events are batched, they are only allowed to determine the output that should be used for a given batch of events. If a monitor is configured to send events in batches of 1000, then a template will be supplied those 1000 events and expected to represent every event in the output.
It’s possible for a template to filter out events by choosing not to include anything for them in the output (perhaps using if or endsWith), but the monitor will still consider the event as having been processed even if a template chooses to not include anything from the event.
Common Patterns
JSON Output
A common use case is a template that generates JSON output. A starting pattern for such a template where the monitor is subscribed to DataPoint events is
[
{{#each this}}
  {{#if @index}},{{/if}}
  { "{{DataPoint.streamId}}":"{{DataPoint.data}}" }
{{/each}}
]
In this example square brackets are used to create a list in JSON and the each helper is used to iterate through each of the DataPoint events in the data model. For each event, curly braces add an object to the json output and we extract the DataPoint.streamId and DataPoint.data fields from the data model. We use the if helper along with the @index attribute from the each helper to ensure a comma delimiter is inserted between each object.
Filtered JSON Output
This use case is very similar to the JSON Output case, but there may be specific events in the data model that you want to skip. Special care needs to be taken in this case to ensure that the delimiters in your output don’t get doubled up for skipped events. An example of this is
[
{{#eachFiltered this}}
  {{#if @index}},{{/if}}
  {{#endsWith streamId 'ts1/bat'}}
  { "{{DataPoint.streamId}}":"{{DataPoint.data}}" }
  {{/endsWith}}
{{/eachFiltered}}
]
We’ve swapped the each helper for eachFiltered and added an endsWith helper to ensure only events that have a particular streamId are included. eachFiltered is necessary to ensure the @index attribute appropriately considers events we’ve filtered out…otherwise if the first event is filtered out we would still end up with a comma delimiter resulting in invalid JSON.
Handlebars Templates
Both the automations feature and the monitors feature of Remote Manager support templates that can be used to assign values to extract values and generate values.
-
The monitors feature uses templates to convert or generate the output of a monitor event. The template is used to convert a payload from the system into the expected payload that the target of the monitor wants to receive.
-
The automations feature uses templates to generate variables that can be used in the automation steps, to construct other variables or in if-then-else conditions.
The templating engine supported by Remote Manager is Handlebars. Handlebars.java is the specific implementation used which has a good support reference at https://jknack.github.io/handlebars.java/.
The JavaScript implementation of Handlebars (Handlebars Introduction is a bit more common and documentation for it should apply, though the output of templates may differ slightly from the JavaScript version, typically with regard to whitespace. Sandbox environments like https://handlebarsjs.com/playground.html can be helpful in testing out a template, though keep in mind they are based on the JavaScript version.
Helpers
The following built-in handlebars helpers are available for use in templates:
eachif,lookupunlesswith
These additional helpers are also available in Remote Manager.
addandcapitalizeFirstcapitalizedefaultIfEmpty,eachFilteredendsWitheqextractfirstPathComponentformatNumformatTimegtgte,joinjsonlowerltltemulneqnotnownumberorremainingPathComponentsreplacesliceslugifysubstringupperyesno
Descriptions of the built-in helpers can be found in the Handlebars documentation.
The additional helpers are Remote Manager specific and can be found below.
The model
The handlebars template language uses a model that defines input data and variables that are available
to the template.
-
For the monitors feature, the model contains the entire input payload of the monitor event. The payload syntax and type differs depending on the events flowing through the monitor. See Tutorial: Monitors with Templated Payloads for more information.
-
For the automations feature, the model contains the built-in variables and any user variables that have been defined in the automation.
- The automations built-in variables and example values are:
customer_id - The account ID of that the automation is running indebug_mode - true/false, is the device currently in debug modedevice_id - The device ID for the running automation, for example 00000000-00000000-123456FF-FF123456firmware_version - The firmware version of the device, for example 1.0.0.0group - The group that the device is in, for example group1input - When processing a variable step with multiple expressions, the 2nd through final expression receives the input variable in the model. The input variable receives the output of the previous expression. The input variable can be used for building up a final result from a series of expressions in a single variable step.last_result - The result of the last automation step, for example, the output of a CLI commandlocation - The value of the location field of a device, for example Rochester, MNmaintenance_window - true/false, is the device in a maintenance windowname - The device name, for example Bus0042run_count - The number of times the step has runtags - The tags associated with the device, for example: tag1,tag2type - The type of device the automation is running on, for exmaple: Digi TX64
Expansion
By default, handlebars escapes the output of the variable, but you can use triple braces to avoid escaping.
For a model with these fields
-
name with the value World!
-
greeting with It's an amazing
-
Template expression Hello, {{name}}! will expand to Hello, World!.
-
Template expression {{name}} will expand to World!.
-
Template expression {{{name}}} will expand to World!.
-
Template expression {{greeting}} {{name}} will expand to It's an amazing World!
-
Template expression {{{greeting}}} {{{name}}} will expand to It's an amazing World!
Using Helpers
Helper Blocks
When a helper has a block inside, the helper is invoked using the # character at the start tag and the / character at the end tag.
For example, in the following expression, the if helper contains blocks of other text, so we use #if to open and /if to close
the helper call. {{#if name}}Hello, {{name}}!{{else}}Hi!{{/if}} will output Hello, World! if the model contains a field name with the value World!.
A helper that does not contain a block can be used with no start and end tags, for example, {{and first_name last_name}} simply outputs true if both first_name and last_name are set.
Nesting
You can use parenthesis to nest helpers inside other helpers.
For example, the template expression {{capitalize (lower 'HELLO, WORLD!')}} uses the capitalize and lower helpers to output Hello, World!.
First the expansion converts the literal text to lowercase and then capitalizing the first letter of each word.
Helper Reference
add
Syntax: {{add input1 input2...}}
Add all the numbers together. The inputs can be numbers or strings that can be converted to numbers.
Expression {{add 1 2}} renders 3.0, while {{add input 2 3}} adds 5 to the value of input.
Note: Input numbers are converted to decimals and may be formatted with decimal points. Use the formatNum helper to control the format.
For example, {{formatNum '###0;-###0' (add 1 2)}} results in 3.
and
Syntax: {{#and input1 input2...}}output-if-true{{else}}output-if-false{{/and}}
The and operator determines if all inputs are truthy (true or not empty). Can be used with non-boolean values.
Supports an else section and multiple operators. For example, {{#and input1 input2 input3}}Yes{{else}}No{{/and}} will output Yes if all inputs are truthy, otherwise No.
Expression {{and input1 input2}} renders true or false directly.
Expression {{and input1 input2 yes='Result Yes' no='Result No'}} renders Result Yes or Result No directly.
capitalizeFirst
Syntax: {{capitalizeFirst input}}
Capitalizes the first letter of the input string.
capitalize
Syntax: {{capitalize input}}
Capitalizes the first letter of each word in the input string.
defaultIfEmpty
Syntax: {{defaultIfEmpty input default}}
Output the default value if the input value is empty or not set. For example: {{defaultIfEmpty test 'NotSet'}} will output NotSet if the variable test is not set in the model
eachFiltered
Syntax: {{#eachFiltered input}}output{{/eachFiltered}}
eachFiltered helps you iterate through input. eachFiltered operates very similarly to the built-in each helper. It differs by not updating the @first and @index attributes unless the nested block outputs something other than whitespace. This can be helpful when outputting delimiters when you may be filtering out content using if or endsWith. The @last attribute is not provided as the current block does not know whether the next will provide output or not.
A typical use case for this would be to iterate over something in the data model and then output delimiters between your content for entries that have not been filtered out.
The eachFiltered helper most often is used with an if helper to comma separate each of the generated objects when iterating over an array.
For example, if the data model contains the following:
{
  "units": [
    {
      "name": "unit1",
      "value": 1
    },
    {
      "name": "unit2",
      "value": 2
    }
  ]
}
Then the following template would output a comma separated list of the units:
{{#eachFiltered units}}{{#eachFiltered this}}{{#if @index}},{{/if}}
{{name}}
{{/eachFiltered}}
Will generate the following (some whitespace not included here):
endsWith
Syntax: {{#endsWith input1 input2}}output{{/endsWith}}
endsWith will optionally include a block if the first argument ends with the second argument.
A typical use for this would be to filter out stream ids unless they match a particular suffix.. For example, if streamId=00000000-00000000-123456FF-FF123456/ts1/bat in the data model then {{#endsWith streamId '/ts1/bat'}}battery{{/endsWith}} will output battery.
This helper is very similar to the built-in if helper and also provides else sections. An else section looks like {{#endsWith streamId '/ts1/bat'}}battery{{else}}notbattery{{/endsWith}} and would output notbattery if the streamId argument does not end with the supplied suffix.
eq
Syntax: {{#eq input1 input2}}output{{/eq}}
eq will optionally include a block if the first argument is equal to the second argument. The comparison is case sensitive.
This can be used in any situation where you want to check if something in the data model matches a particular value or if two parts of the data model are equal.. For example, if streamId=00000000-00000000-123456FF-FF123456/ts1/bat in the data model then {{#eq streamId '00000000-00000000-123456FF-FF123456/ts1/bat'}}battery{{/eq}} will output battery.
This helper is very similar to the built-in if helper and also provides else sections. An else section looks like {{#eq streamId '00000000-00000000-123456FF-FF123456/ts1/bat'}}battery{{else}}notbattery{{/eq}} and would output notbattery if the streamId argument is not equal to the supplied value.
Syntax: {{extract regular-expression input}}
Extract substring(s) using a regular expression.
The regular expression is evaluated using Google RE2 regular expression syntax.
The first match of the regular expression is found in the input text. If the regular expression doesn’t contain capture groups, then the match is returned as output. If the regular expression contains 1 or more capture groups, then the capture groups are concatenated together and returned as output.
For example, with the data model containing input=This is a RegularExpression extraction, the template expression {{extract 'Reg[a-zA-Z]+' input}} will output RegularExpression while the template expression {{extract '(?i)(this is ).*(extraction)' input}} will output This is extraction.
firstPathComponent
Syntax: {{firstPathComponent input}}
firstPathComponent outputs the first entry in a path.
A typical use for this would be to extract the device identifier from a stream ID. For example, if streamId=00000000-00000000-123456FF-FF123456/ts1/bat in the data model then {{firstPathComponent streamId}} will output 00000000-00000000-123456FF-FF123456.
Syntax: {{formatNum format input}}
Format a number or string that can be parsed as a number given a formatting string.
For example, {{formatNum '###0;-###0' 1234.567}} results in 1235, while {{formatNum '#,###.00;(#,###.00)' -1234.567}} results in (1,234.57).
Syntax: {{formatTime input}}
formatTime will output a date and time in ISO-8601 format. The input is expected to be a UNIX timestamp in milliseconds.
Millisecond timestamps are common in monitor events, so this helper is useful when an ISO-8601 time is preferred. For example, if timestamp=1637353224575 in the data model then {{formatTime timestamp}} will output 2021-11-19T20:20:24.575Z.
gt
Syntax: {{#gt input1 input2}}output-if-true{{else}}output-if-false{{/and}}
Compare input1 is greater than input2.
Supports an else section and multiple operators. For example, {{#gt input1 input2}}Yes{{else}}No{{/and}} will output Yes or No.
Expression {{gt input1 input2}} renders true or false directly.
Expression {{gt input1 input2 yes='Result Yes' no='Result No'}} renders Result Yes or Result No directly.
Note: Most elements are strings, even if they are extracted as digits from prior output or set as digits in a variable expression.
To compare numbers use the number helper to convert the strings to numbers first.
{{#gt (number input1) (number input2)}}output-if-true{{else}}output-if-false{{/and}}
gte
Syntax: {{#gte input1 input2}}output-if-true{{else}}output-if-false{{/and}}
Compare input1 is greater than or equal to input2.
Supports an else section and multiple operators. For example, {{#gt input1 input2}}Yes{{else}}No{{/and}} will output Yes or No.
Expression {{gte input1 input2}} renders true or false directly.
Expression {{gte input1 input2 yes='Result Yes' no='Result No'}} renders Result Yes or Result No directly.
Note: Most elements are strings, even if they are extracted as digits from prior output or set as digits in a variable expression.
To compare numbers use the number helper to convert the strings to numbers first.
{{#gte (number input1) (number input2)}}output-if-true{{else}}output-if-false{{/and}}
join
Syntax: {{join input(s) separator}}
Joins an array, iterator or iterable using a separator.
If the model contains input1=a, input2=b, expression {{join input1 input2 input3, 'c' ', '}} renders a, b, c.
json
Syntax: {{json input [pretty=true] [escapeHTML=true] [default="{}"]}}
json will generate correctly formatted json for the input object. An input value of this can be used to use the current object. The pretty parameter can be used to output the json in a more human readable format. The escapeHTML parameter can be used to escape HTML characters in the output. The default parameter can be used to specify a default value to output if the input is null or empty.
A typical use of this would be to output an object after some looping or filtering is done, for example inside an if, endsWith, eachFiltered expression, or other helper.
With a data model of:
[
  {"streamId":"00000000-00000000-123456FF-FF123456/ts1/notbat", "data": "0"},
  {"streamId":"00000000-00000000-123456FF-FF123456/ts1/bat", "data": "1"},
  {"streamId":"00000000-00000000-123456FF-FF123456/ts1/bat", "data": "2"}
]
The template:
[{{#eachFiltered this}}{{#if @index}},{{/if}}{{json this pretty=true}}{{/eachFiltered}}]
NOTE: You can use a template like this to always turn monitor payloads into a JSON formatted list of elements
even if there is only one element in the payload.
Will generate:
[{
  "streamId" : "00000000-00000000-123456FF-FF123456/ts1/notbat",
  "data" : "0"
},{
  "streamId" : "00000000-00000000-123456FF-FF123456/ts1/bat",
  "data" : "1"
},{
  "streamId" : "00000000-00000000-123456FF-FF123456/ts1/bat",
  "data" : "2"
}]
lower
Syntax: {{lower input}}
Convert the input string to lowercase.
Expression {{lower 'HELLO'}} renders hello.
lt
Syntax: {{#lt input1 input2}}output-if-true{{else}}output-if-false{{/and}}
Compare input1 is less than input2.
Supports an else section and multiple operators. For example, {{#lt input1 input2}}Yes{{else}}No{{/and}} will output Yes or No.
Expression {{lt input1 input2}} renders true or false directly.
Expression {{lt input1 input2 yes='Result Yes' no='Result No'}} renders Result Yes or Result No directly.
Note: Most elements are strings, even if they are extracted as digits from prior output or set as digits in a variable expression.
To compare numbers use the number helper to convert the strings to numbers first.
{{#lt (number input1) (number input2)}}output-if-true{{else}}output-if-false{{/and}}
lte
Syntax: {{#lte input1 input2}}output-if-true{{else}}output-if-false{{/and}}
Compare input1 is less than or equal to input2.
Supports an else section and multiple operators. For example, {{#lte input1 input2}}Yes{{else}}No{{/and}} will output Yes or No.
Expression {{lte input1 input2}} renders true or false directly.
Expression {{lte input1 input2 yes='Result Yes' no='Result No'}} renders Result Yes or Result No directly.
Note: Most elements are strings, even if they are extracted as digits from prior output or set as digits in a variable expression.
To compare numbers use the number helper to convert the strings to numbers first.
{{#lte (number input1) (number input2)}}output-if-true{{else}}output-if-false{{/and}}
mul
Syntax: {{mul input1 input2...}}
Multiply all the numbers together. The inputs can be numbers or strings that can be converted to numbers.
With a model value of input1=42, expression {{mul input1 2}} renders 84.0.
Note: Input numbers are converted to decimals and may be formatted with decimal points. Use the formatNum helper to control the format.
For example, with a model value of input1=42, expression {{formatNum '###0;-###0' (add input2 2)}} results in 84.
neq
Syntax: {{#neq input1 input2}}output-if-true{{else}}output-if-false{{/and}}
Compare input1 is not equal to input2.
Supports an else section and multiple operators. For example, {{#neq input1 input2}}Yes{{else}}No{{/and}} will output Yes or No.
Expression {{neq input1 input2}} renders true or false directly.
Expression {{neq input1 input2 yes='Result Yes' no='Result No'}} renders Result Yes or Result No directly.
Note: Most elements are strings, even if they are extracted as digits from prior output or set as digits in a variable expression.
To compare numbers use the number helper to convert the strings to numbers first.
{{#neq (number input1) (number input2)}}output-if-true{{else}}output-if-false{{/and}}
not
Syntax: {{#not input}}output-if-true{{else}}output-if-false{{/and}}
The not operator, determines if all inputs are falsy (false or empty). Can be used with non-boolean values.
Supports an else section and multiple operators. For example, {{#not input1}}Yes{{else}}No{{/and}} will output Yes or No.
Expression {{not input1}} renders true or false directly.
Expression {{not input1 yes='Result Yes' no='Result No'}} renders Result Yes or Result No directly.
now
Syntax: {{now [format] [tz=timezone|timeZoneId]}}
Generate a human-readable formatted current date or time.
The format parameter is a string that specifies the format of the output.
Format can be one of
full - for example Thursday, March 28, 2024long - for example, March 28, 2024medium - for example, Mar 28, 2024short - 3/28/24- Or a pattern matching the java DatetimeFormatter syntax.
The tz parameter is optional and specifies the timezone to use. If the tz parameter is not provided, the timezone of the system is used.
- Expression
{{now}} renders Mar 28, 2024
- Expression
{{now format='full' tz='America/Chicago'}} renders Thursday, March 28, 2024
- Expression
{{now format='full' tz='America/Chicago'}} renders 03/28/24
- Expression
{{now format='YYYY/MM/DD hh:mm:ss a' tz='America/Chicago'}} renders 2024/03/88 10:45:36 AM
- Expression
{{now format='YYYY/MM/DD HH:mm:ss z' tz='America/Chicago'}} renders 2024/03/88 10:45:36 AM
- Expression
{{now format='YYYY/MM/DD HH:mm:ss zzz' tz='America/Chicago'}} renders 2024/03/88 10:51:07 CDT
number
Syntax: {{number input}}
The input can be a number or string that can be converted to a number.
Used to convert a string to a number. Most useful for comparison helpers that require numeric comparison instead of text comparison or to change the formatting of an existing number using formatNum helper.
Expression {{formatNum '#,###;-#,###' (number '122342')}} renders 122,342.
or
Syntax: {{#or input1 input2...}}output-if-true{{else}}output-if-false{{/and}}
The or operator determines if any inputs are truthy (true or not empty). Can be used with non-boolean values.
Supports an else section and multiple operators. For example, {{#or input1 input2 input3}}Yes{{else}}No{{/and}} will output Yes if all inputs are truthy, otherwise No.
Expression {{or input1 input2}} renders true or false directly.
Expression {{or input1 input2 yes='Result Yes' no='Result No'}} renders Result Yes or Result No directly.
remainingPathComponents
Syntax: {{remainingPathComponents input}}
remainingPathComponents outputs all parts of a path beyond the first entry.
A typical use for this would be to skip the device identifier in a stream ID to output the common stream ID. For example, if streamId=00000000-00000000-123456FF-FF123456/ts1/bat in the data model then {{remainingPathComponents streamId}} will output ts1/bat.
replace
Syntax: {{#replace input match1 replacement1 [match2 replacement2 ...]}}{{@replaced}}{{/replace}}
replace combines an if statement with text replacement. It replaces the input string content. All occurrences of match text is replaced with replacement text, and the result is assigned the @replaced attribute. Multiple replacements can be specified by including additional pairs of match and replace parameters and the replacement occurs from left most parameters to rightmost.
For example, with field=abc in the data model, then {{#replace field "a" "z" "b" "z" "c" "z"}}{{@replaced}}{{/replace}} will output zzz.
A typical use for this might be to generate short device IDs by replacing the duplicate zero’s or generating names from streams.
For example, if streamId=00000000-00000000-123456FF-FF123456/ts1/bat in the data model then {{#replace streamId "00000000-00000000-123456FF-FF123456/" "" "ts1/bat" "Battery"}}{"{{@replaced}}": 99}{{/replaced}} will output {"Battery: 99}.
slice
Syntax: {{slice input separator start length}}
slice slice a string with separators into individual components given. slice first splits the string to a list using the separator, then uses the start and length parameters to select components of the list that are output. The output components are joined with the separator before being output.
- The start value is the 1-based index from the start of the list (1 is the first component)
- Use a negative start value to slice from the end of the list (-1 is the last component)
- Start must be non-zero and length must be greater than 0
- If the absolute value of the start parameter is greater than the number of components, then an empty string is output.
- If the length parameter is greater than the number of components remaining in the list, then all remaining components are output.
A typical use case for this might be to extract several path components from the end of a stream ID.
For example, if streamId=00000000-00000000-123456FF-FF123456/ts1/bat in the data model then {{slice streamId '/' -2 2}} will output ts1/bat.
Similarly, with streamId=00000000-00000000-123456FF-FF123456/metrics/sys/cpu/used in the data model then {{slice streamId '/' 3 2}} will output sys/cpu.
slugify
Syntax: {{slugify input}}
Generate a slug from the input string. A slug is a URL-friendly version of a string, typically used for URLs or filenames.
Converts to lowercase, removes any non-word characters and convers spaces to hyphens. Strips whitespace from the beginning and end of the string.
Expression {{slugify 'Hello, World!'}} renders hello-world.
substring
Syntax: {{substring input start-index end-index}}
Extracts a substring from the input string. The start-index is the 0-based index of the first character to include in the output. The end-index is the 0-based index and the output does not include the character at this index. The end-index is optional and if not provided, the substring will include all characters from the start-index to the end of the string.
Expression {{substring 'Hello, World!' 3 5}} renders lo.
Expression {{substring 'Hello, World!' 7}} renders World!.
upper
Syntax: {{upper input}}
Convert the input string to uppercase.
Expression {{upper 'Hello'}} renders HELLO.
yesno
Syntax: {{yesno booleanval [yes='YesValue'] [no='NoValue'] [maybe='MaybeValue']}}
Renders a yes, no or maybe value based on the input boolean value. If the input is not boolean this helper will fail.
If the input is true render the yes value, false render the no value, and if the input is null or unset render the maybe value.
For example, {{yesno true yes='True' no='False' maybe='Maybe'}} will output True.
NOTE: Convert the input to boolean using the and or or helper if needed.
For example, {{yesno (and 'inputstring') yes='True' no='False' maybe='Maybe'}} will output True.
Additional Examples
Filtering
For example, given the data model
[
  {"streamId":"00000000-00000000-123456FF-FF123456/ts1/notbat"},
  {"streamId":"00000000-00000000-123456FF-FF123456/ts1/bat"},
  {"streamId":"00000000-00000000-123456FF-FF123456/ts1/bat"}
]
and template
[
{{#eachFiltered this}}
  {{#if @index}},{{/if}}
  {{#endsWith streamId 'ts1/bat'}}
  {"battery":99}
  {{/endsWith}}
{{/eachFiltered}}
]
the eachFiltered helper would ensure that the @index attribute is not incremented after the first item is entirely filtered out which lets it be used to determine if a delimiter should be included in the output. In this case it allows for the template to output JSON with the correct comma placement, resulting in output of (some newlines not shown):
[
  {"battery":99}
  ,
  {"battery":99}
]
NOTE: Whitespace has been added to the template and removed from the output for clarity.
Filtering with replacement
For example, given the data model
[
  {"streamId":"00000000-00000000-123456FF-FF123456/ts1/notbat", "data": "0"},
  {"streamId":"00000000-00000000-123456FF-FF123456/ts1/bat", "data": "1"},
  {"streamId":"00000000-00000000-123456FF-FF123456/ts1/bat", "data": "2"}
]
and template
[
{{#eachFiltered this}}
  {{#replace (slice streamId "/" -2 2) "ts1/bat" "Battery" "cl2/cval" "Sensor"}}
  {{#if @index}},{{/if}}
  {
    "{{@replaced}}": {{data}}
  }
  {{/replace}}
{{/eachFiltered}}
]
The replace helper would ensure that only streams that are of interest are used, and, along with the
subexpression using the slice helper those streams are used to name the output data.
The output would be
[
  {
    "Battery": 1
  },
  {
    "Battery": 2
  }
]
NOTE: Whitespace has been added to the template and removed from the output for clarity.
Note the built-in each helper can generally be used instead if you are not filtering out entries while iterating.
Use Streams as item names
For example, given the data model
[
  {"streamId":"00000000-00000000-123456FF-FF123456/cl2/val", "data": "0"},
  {"streamId":"00000000-00000000-123456FF-FF123456/ts1/bat", "data": "1"},
  {"streamId":"00000000-00000000-123456FF-FF123456/cl1/cval", "data": "2"}
]
and template
[
{{#eachFiltered this}}
  {{#replace (slice streamId "/" -2 2) "/" "."}}
  {{#if @index}},{{/if}}
   {
    "{{@replaced}}": {{data}},
    "unit": "{{firstPathComponent streamId}}"
   }
  {{/replace}}
{{/eachFiltered}}
]
The combined use of the replace helper maps the stream name into a valid json name, and, along with the
subexpression using the slice helper those streams are used to name the output data.
The output would be
[
   {
    "cl2.val": 0,
    "unit": "00000000-00000000-123456FF-FF123456"
   },
   {
    "ts1.bat": 1,
    "unit": "00000000-00000000-123456FF-FF123456"
   },
   {
    "cl1.cval": 2,
    "unit": "00000000-00000000-123456FF-FF123456"
   }
]
NOTE: Whitespace has been added to the template and removed from the output for clarity.
v1
Use the v1/ API to get a list of all v1 APIs available to your account.
URI
| HTTP method |
Format |
Description |
Parameters |
| GET |
/ws/v1/ |
Get a summary of all v1 APIs for your account. |
|
v1/account
Use the v1/account API to retrieve information on the current account.
URI
https://<hostname>/ws/v1/account
| HTTP method |
Format |
Description |
Parameters |
| GET |
/ws/v1/account |
Get a summary of the accounts API. |
|
| GET |
/ws/v1/account/current |
Get a summary of the current account. |
|
| GET |
/ws/v1/account/services |
Get a list of the services available for the current account. |
|
| GET, PUT, DELETE |
/ws/v1/account/current/security |
Get, update, or delete the security settings for the current account. |
system_defaults |
Parameters
system_defaults
For a GET of the /ws/v1/account/current/security API, set the parameter system_defaults=true to retrieve
the system default password complexity.
Leaving the system_defaults parameter off or its default false ensures the API returns only
the current account’s active security settings.
Fields
API /ws/v1/account/current/security
Password complexity rules control what passwords can be set to for new users or
updated to for existing users.
customer_id
Unique customer ID for the Remote Manager account.
password_minimum_length
The minimum password length for users in the account. Defaults to 12 and cannot be set lower than 12
without contacting support.
This value can be increased by an account administrator.
password_require_lowercase
The password must contain at least one lowercase letter. Defaults to true.
This value can be disabled by an account administrator.
password_require_uppercase
The password must contain at least one uppercase letter. Defaults to true.
This value can be disabled by an account administrator.
password_require_number
The password must contain at least one number. Defaults to true.
This value can be disabled by an account administrator.
password_require_special
The password must contain at least one punctuation or special character. Defaults to true.
This value can be disabled by an account administrator.
password_check_bad_pass
Check user passwords against lists of bad passwords maintained by the system.
For example, common english words or NIST bad password lists.
See https://pages.nist.gov/800-63-3/sp800-63b.html for more information.
This value can be disabled by an account administrator.
v1/alerts
Use the v1/alerts API to create, update, list, and manage alerts for your account. For each alert, specify the alert, the scope for the alert, as well as rules for the alert to fire and reset. The alert scope and fire/reset rules vary depending on the alert type.
Info
In the classic Remote Manager interface and pre-v1 APIs, alerts are called alarms, and the two terms are synonymous. Going forward, Digi recommends you use the /v1/alerts API rather than the pre-v1 Alarm APIs to manage alerts.
URI
https://<hostname>/ws/v1/alerts
| HTTP method |
Format |
Description |
Parameters |
| GET |
/ws/v1/alerts |
Get a summary of the alerts API. |
|
| GET |
/ws/v1/alerts/summary |
Get a summary of alerts. |
query |
| GET |
/ws/v1/alerts/bulk |
List alerts in bulk CSV format. |
orderby query fields |
| GET |
/ws/v1/alerts/bulk/summary/ws/v1/alerts/bulk/status |
Export up to 20,000 rows of CSV data representing the summary or status of any alarm that has been fired and/or reset. |
orderby query fields |
| GET |
/ws/v1/alerts/inventory |
List alerts |
cursor orderby size query |
| POST |
/ws/v1/alerts/inventory |
Create one or more alerts |
None |
| GET, PUT, DELETE |
/ws/v1/alerts/inventory/{id} |
Get a specific alert, modify an existing alert, and delete an alert. |
|
| GET |
/ws/v1/alerts/history/{alert_id_source} |
Get history of fired alerts. |
cursor size start_time end_time order |
| GET |
/ws/v1/alerts/status |
Get current status for alerts. |
cursor orderby size query |
| GET |
/ws/v1/alerts/summary |
Get a summary of all alerts. |
cursor orderby size query |
Fields
id
System generated identifier for the alert.
name
String name of the alert.
description
String that describes the alert.
enabled
Boolean indicating if the alert is enabled. Default is true.
fire
The definition of the rule describing conditions for when the alert fires. Not all alerts require a fire rule.
fire.parameters
A map of parameter names and values indicating the conditions required for the alert to fire.
priority
String describing the priority assigned to the alert.
reset
The definition of the rule describing conditions for when the alert is reset. Not all alerts require a reset rule.
reset.enabled
Boolean indicating if the rule should automatically reset.
reset.parameters
A map of parameter names and values indicating the conditions required for the alert to reset.
scope
The definition of the scope defining how the alert is applied.
scope.type
What type of scope defines how the alert is applied.
- Device: The target of the alert is a specific device.
- Global: The target of the alert is global to the account.
- Group: The target of the alert is a group or all devices in a group.
- Resource: The target of the alert is a resource in the system.
- XBeeNode: The target of the alert is a specific XBee node.
scope.value
The value indicating the scope target depends on the scope.type setting.
| Scope Type |
Scope Value |
| Device |
The scope.value field is a device id. For example: 00000000-00000000-00000000-00000000 |
| Global |
The scope.value field is the empty string. |
| Group |
The scope.value field is a group name: For example: Regions/Northwest indicates any devices in the Northwest subgroup of the Regions group. |
| Resource |
The scope.value field is the resource identifier. For example a stream name: 00000000-00000000-00000000-00000000/metrics/sys/cpu/used. Can use the wildcard character (*) to include all path components of a stream name, for example */metrics/sys/cpu/used. |
| XBeeNode |
The scope.value field is an XBee node extended address. For example: 00:08:A2:A5:6E:4D:52:85 |
type
String that indicates the alert type.
- DataPoint On Change: Fires when a data point is uploaded containing a different value from the previous data point. The scope type of a DataPoint on Change alert is always Resource.
- DataPoint condition: Fires when a data point is uploaded containing a value that matches the specified criteria. The scope type of a DataPoint condition alert is always Resource.
- Device Excessive Disconnects: Fires when devices disconnect with a specified frequency. The scope type of a Device Excessive Disconnects alert is Group or Device.
- Device Name On Change: Fires when a devices name changes. The scope type of a Device Name On Change alert is Group or Device.
- Device Offline: Fires when devices disconnects for a specified time. The scope type of a Device Offline alert is Group or Device.
- Dia channel data point condition match: Fires when a DIA channel data point is uploaded containing a value that matches the specified criteria. The scope type of a Dia channel data point condition match is Group or Device.
- Missing DataPoint: Fires when a new data point is not uploaded for a specified time. The scope type of a Missing DataPoint alert is always Resource.
- Missing DiaChannel DataPoint: Fires when a new DIA channel data point is not uploaded for a specified time. The scope type of a Missing DiaChannel DataPoint alert is Group or Device.
- Missing Smart Energy DataPoint: Fires when a new Smart Energy data point is not uploaded for a specified time. The scope type of a Missing Smart Engergy DataPoint alert is Group, Device, or XBeeNode.
- Smart energy data point condition match: Fires when a Smart Energy data point is uploaded containing a value that matches the specified criteria. The scope type of a Smart energy data point condition match ialert s Group, Device, or XBeeNode.
- Subscription Usage: Fires when the account subscription usage matches the specified criteria. The scope type of a Subscription Usage alert is always Global.
- XBeeNode Excessive Deactivations: Fires when XBee nodes deactivate with a specified frequency. The scope type of an XBeeNode Excessive Deactivations alert is Group, Device ,or XBeeNode.
- XBeeNode Offline: Fires when an XBee node is offline for a specified time. The scope type of an XBeeNode Offline alert is Group, Device, or XBeeNode.
Datapoint Condition Alert
Example: Datapoint condition alert
The following example alert payload represents a DataPoint condition alert. This alert might be used to determine if action (replacing a battery) is needed for a device that is tracking voltage.
The alert fires when the value uploaded to the data stream */drivestats/voltage is less than 10 volts for 30 minutes. The alert resets when the voltage value is greater than or equal to 10 volts for 15 minutes (for example, the battery was replaced or charged).
The wildcard (*) character used in the scope.value field indicates that any device uploading this stream is the target for the alert (the Device ID is always the first component of a stream name and this alert targets data streams.
{
	"description": "Fires when a vehicle fleet battery needs replacing",
	"enabled": true,
	"fire": {
		"parameters": {
			"thresholdValue": "10",
			"type": "numeric",
			"operator": "<",
			"timeout": "30",
			"timeUnit": "minutes"
		}
	},
	"id": 150027,
	"name": "Low Voltage",
	"priority": "high",
	"reset": {
		"parameters": {
			"thresholdValue": "10",
			"type": "numeric",
			"operator": ">=",
			"timeout": "15",
			"timeUnit": "minutes"
		}
	},
	"scope": {
		"type": "Resource",
		"value": "*/drivestats/voltage"
	},
	"type": "DataPoint condition"
}
List Alerts
Use the GET v1/alerts/inventory web service to retrieve a list of alerts.
URI
https://<hostname>/ws/v1/alerts/inventory
API Usage
There is no request payload for the GET ws/v1/alerts/inventory API. Use the alert fields and queries to select alerts.
Parameters
| Name |
Type |
Description |
| cursor |
string |
Cursor to get the next page of alerts. Omit on initial call. |
| orderby |
string |
Return alerts ordered by the field given. The default is “name asc” |
| query |
string |
Use a query expression to target a specific list of alerts. The default is all alerts. |
| size |
integer |
Number of items to return. The maximum and default is 1000. |
Successful Response
Upon success, the list of alerts is returned.
{
  "count": 1,
  "size": 1000,
  "list": [
    {
      "description": "Detects when the office cellular backup network goes offline",
      "enabled": true,
      "fire": {
        "parameters": {
          "reconnectWindowDuration": "1"
        }
      },
      "id": 146639,
      "name": "Office Backup Offline",
      "priority": "high",
      "reset": {},
      "scope": {
        "type": "Device",
        "value": "00000000-00000000-00000000-00000000"
      },
      "type": "Device Offline"
    }
  ]
}
Error Response
An error response returns the error_status and error_message fields in the payload.
{
  "error_status": 400,
  "error_message": "error message"
}
Create alerts
Use the POST v1/alerts/inventory web service to create alerts for your account.
URI
https://<hostname>/ws/v1/alerts/inventory
API Usage
There are no parameters for the POST ws/v1/alerts/inventory API.
Specify an HTTP header of Content-Type: application/json and post json payload describing the alert or alerts.
Request Payload
To create multiple alerts, use a list syntax. For a single alert, the list syntax is not required.
[
	{ ...alert1 },
	{ ...alert2 },
	...
	{ ...alertN }
]
Successful Response
Upon success, the alert is returned. The returned alert may differ from the input alert because default values are supplied in the returned alert. A list response is returned whether the POST created single or multiple alerts.
{
	"count": N,
	"list" : [
		{ ...alert1 },
		{ ...alert2 },
		...
		{ ...alertN },
	]
}
Error Response
When creating multiple alerts, if any alert is successfully created, a response of 207 and error information for the failed responses are returned.
In the following example response payload, the second alert failed. The HTTP response is 207 because one alert (alert1) was created successfully, and the second item in the list has error values indicating the problem with the second alert (alert2).
{
	"count": N,
	"list": [
		{ ...alert1 },
		{
		"error_context": { ...alert2 },
		"error_message": "The error message",
		"error_status": 400
		},
		{ ...alertN }
	]
}
Sample Alert Definitions
The following sample payloads represent the different alert types.
DataPoint condition
DataPoint On Change
Device Excessive Disconnects
Device Name On Change
Device Offline
Dia channel data point condition match
Missing DataPoint
Missing DiaChannel DataPoint
Missing Smart Energy DataPoint
Smart energy data point condition match
Subscription Usage
XBeeNode Excessive Deactivations
XBeeNode Offline
Datapoint Condition
The following payload creates a DataPoint condition alert. This alert type fires when a data stream value matches the condition criteria.
Values:
-
scope.type: Always Resource.
-
scope.value: The stream with wildcard (*) for device id or path components.
-
timeout: Fire or reset if the value matches for this amount of time.
-
timeUnit: One of seconds, minutes, hours.
-
operator: One of <, <=, >, >=, =, <>.
-
type: One of string or numeric.
-
thresholdValue: The target value for the condition.
{
	"type": "DataPoint condition",
	"name": "Voltage check",
	"description": "Watch for low voltage on fleet vehicles",
	"scope": {
		"type": "Resource",
		"value": "*/drivestats/voltage"
	},
	"fire": {
		"parameters": {
		"operator": "<",
		"thresholdValue": "10",
		"timeUnit": "minutes",
		"timeout": "60",
		"type": "numeric"
		}
	},
	"reset": {
		"parameters": {
		"operator": ">=",
		"thresholdValue": "10",
		"timeUnit": "minutes",
		"timeout": "60",
		"type": "numeric"
		}
	}
}
Datapoint on Change
The following payload creates a DataPoint On Change alert. This alert type fires when a data stream value changes. Repeated uploads of the same value do not cause the alert to fire. This alert automatically resets when the data point value remains unchanged for 60 minutes.
The target data stream matches any device with a drivestats/voltage stream name.
Values:
-
scope.type: Always Resource.
-
scope.value: The stream with wildcard (*) for device id or path components.
-
timeout: Reset automatically if the value does not change for this amount of time.
-
timeUnit: One of seconds, minutes, hours.
{
	"type":"DataPoint On Change",
	"reset": {
		"parameters": {
			"timeout": "60",
			"timeUnit": "minutes"
		}
	},
	"scope": {
		"type":"Resource",
		"value":"*/drivestats/voltage"
	}
}
Device Excessive Disconnects
The following payload creates a Device Excessive Disconnects alert. This alert type fires when a device goes offline many times during a time period.
Values:
-
scope.type: One of Group or Device.
-
scope.value: If type is Group, then value is the full group path (with no leading slash). If type is Device, then value is the full device ID. If type is XBeeNode, then the value is the XBee node extended src address.
-
disconnectCount: Fires if the device disconnects more than this many times in the disconnectWindow
-
disconnectWindow: The period of time in minutes for which to count disconnects.
-
reconnectWindow: Resets when the device connects and stays connect for this number of minutes.
{
	"type":"Device Excessive Disconnects",
	"scope":{
		"type":"Device",
		"value":"00000000-00000000-000000FF-FF000000"
	},
	"fire":{
		"parameters":{
			"disconnectCount":"10",
			"disconnectWindow":"60"
		}
	},
	"reset":{
		"parameters":{
			"reconnectWindow":"30"
		}
	},
}
Device Name on Change
The following payload creates a Device Name on Change alert. This alert type fires when a device name changes. The alert does not fire when a device name is set on a device that has no name. The alert can reset automatically.
Values:
-
scope.type: One of Group or Device.
-
scope.value: If type is Group, then value is the full group path (with no leading slash). If type is Device, then value is the full device ID. If type is XBeeNode, then the value is the XBee node extended src address.
-
timeout: Reset automatically if the value does not change for this amount of time.
-
timeUnit: One of seconds, minutes, hours.
{
	"type":"Device Name On Change",
	"reset":{
		"parameters":{
			"timeout":"12",
			"timeUnit":"hours"
		}
	},
	"scope":{
		"type":"Group",
		"value":"Deployments/Europe/UK"
	}
}
Device Offline
The following payload creates a Device Offline alert. This alert type fires when a device disconnects for a period of time.
Values:
-
scope.type: One of Group or Device.
-
scope.value: If type is Group, then value is the full group path (with no leading slash). If type is Device, then value is the full device ID. If type is XBeeNode, then the value is the XBee node extended src address.
-
reconnectWindowDuration: Fires if the device does not reconnect within this number of minutes.
-
reset.disabled: Is set to true to cause this alert to not auto-reset. The default is false.
{
	"name":"Network offline",
	"type":"Device Offline",
	"description":"Detect if any midwest office networks are offline",
	"priority":"high",
	"fire":{
		"parameters":{
		"reconnectWindowDuration":"12"
		}
	},
	"reset": {
		"disabled": true
	},
	"scope": {
		"type":"Group",
		"value":"Stores/North America/Midwest"
	}
}
Dia Channel Datapoint Condition Match
The following payload creates a Dia channel data point condition match alert. This alert type fires when the value reported in a DIA channel matches the condition criteria.
Values:
-
scope.type: One of Group or Device.
-
scope.value: If type is Group, then value is the full group path (with no leading slash). If type is Device, then value is the full device ID. If type is XBeeNode, then the value is the XBee node extended src address.
-
channelName: The dia channel name or wildcard (*) for all channels.
-
instanceName: The dia channel instance name or wildcard (*) for all instances.
-
timeout: Fire or reset if the value matches for this amount of time.
-
timeUnit: One of seconds, minutes, hours.
-
operator: One of <, <=, >, >=, =, !=.
-
type: One of string or numeric.
-
thresholdValue: The target value for the condition.
{
	"type": "Dia channel data point condition match",
	"scope": {
		"type": "Group",
		"value": "New York/Sensors"
	},
	"fire": {
		"disabled": false,
		"parameters": {
			"channelName": "chan1",
			"instanceName": "stream",
			"operator": ">=",
			"thresholdValue": "25",
			"timeUnit": "seconds",
			"timeout": "30",
			"type": "numeric"
		}
	},
	"reset": {
		"disabled": false,
		"parameters": {
			"channelName": "chan1",
			"instanceName": "stream",
			"operator": "<",
			"thresholdValue": "25",
			"timeUnit": "seconds",
			"timeout": "30",
			"type": "numeric"
		}
	}
}
Missing Datapoint
The following payload creates a Missing DataPoint alert. This alert type fires when the interval between data point uploads or data point measurements exceeds the requested time. Devices may cache data uploads, uploading infrequently (for example 24 hours), but uploading many measurements (for example, 24 total measurements if sampling every hour).
This alert automatically resets when data is reported.
Values:
-
scope.type: Always Resource.
-
scope.value: The stream with wildcard (*) for device id or path components.
-
uploadInterval: Fire if the amount of time between uploads exceeds this interval.
-
uploadTimeUnit: The units of the uploadInterval value—seconds, minutes, hours.
-
readingInterval: Fire if the amount of time between individual samples/reading exceeds this interval.
readingInterval}} value—seconds, minutes, hours.
-
reset.disabled: Resets automatically when data is reported, you can disable this by specifying true.
{
	"name":"Fleet sensor not reporting",
	"type":"Missing DataPoint",
	"scope":{
		"type":"Resource",
		"value":"*/drivestats/voltage"
	},
	"fire":{
		"parameters":{
			"readingTimeUnit":"seconds",
			"uploadTimeUnit":"minutes",
			"uploadInterval":"1",
			"readingInterval":"5"
		}
	},
	"reset": {
		"disabled": true
	}
}
Missing Dia Channel Datapoint
The following payload creates a Missing DiaChannel DataPoint alert. This alert type fires when the interval between data point uploads or data point measurements exceeds the requested time. Devices may cache data uploads, uploading infrequently (for example 24 hours), but uploading many measurements (for example, 24 total measurements if sampling every hour).
This alert automatically resets when data is reported.
Values:
-
scope.type: One of Group or Device.
-
scope.value: If type is Group, then value is the full group path (with no leading slash). If type is Device, then value is the full device ID. If type is XBeeNode, then the value is the XBee node extended src address.
-
uploadInterval: Fire if the amount of time between uploads exceeds this interval.
-
uploadTimeUnit: The units of the uploadInterval value—seconds, minutes, hours.
-
readingInterval: Fire if the amount of time between individual samples/reading exceeds this interval.
readingInterval}} value—seconds, minutes, hours.
-
channelName: The dia channel name or wildcard (*) for all channels.
-
instanceName: The dia channel instance name or wildcard (*) for all instances.
-
reset.disabled: Resets automatically when data is reported, you can disable this by specifying true.
{
	"type": "Missing DiaChannel DataPoint",
	"scope": {
		"type": "Device",
		"value": "00000000-00000000-000000FF-FF000000"
	},
	"fire": {
		"parameters": {
			"channelName": "chan1",
			"instanceName": "*",
			"readingInterval": "10",
			"readingTimeUnit": "minutes",
			"uploadInterval": "1",
			"uploadTimeUnit": "hours"
		}
	}
}
Missing Smart Energy Datapoint
The following payload creates a Missing Smart Energy DataPoint alert. This alert type fires when the interval between data point uploads or data point measurements exceeds the requested time. Devices may cache data uploads, uploading infrequently (for example 24 hours), but uploading many measurements (for example, 24 total measurements if sampling every hour).
This alert automatically resets when data is reported.
Values:
-
scope.type: One of Group, Device, or XBeeNode.
-
scope.value: If type is Group, then value is the full group path (with no leading slash). If type is Device, then value is the full device ID. If type is XBeeNode, then the value is the XBee node extended src address.
-
uploadInterval: Fire if the amount of time between uploads exceeds this interval.
-
uploadTimeUnit: The units of the uploadInterval value—seconds, minutes, hours.
-
readingInterval: Fire if the amount of time between individual samples/reading exceeds this interval.
readingInterval}} value—seconds, minutes, hours.
-
attributeId: The XBee attribute id.
-
clusterId: The XBee cluster id.
-
clusterType: The XBee cluster type.
-
endpointId: The XBee endpoint id.
-
reset.disabled: Resets automatically when data is reported, you can disable this by specifying true.
{
	"type": "Missing Smart Energy DataPoint",
	"scope": {
		"type": "Group",
		"value": "New York/Sensors"
	},
	"fire": {
		"parameters": {
			"attributeId": "1",
			"clusterId": "1794",
			"clusterType": "0",
			"endpointId": "1",
			"readingInterval": "1",
			"readingTimeUnit": "hours",
			"uploadInterval": "24",
			"uploadTimeUnit": "hours"
		}
	},
}
Smart Energy Datapoint Condition Match
The following payload creates a Smart energy data point condition match alert. This alert type fires when the value reported in a DIA channel matches the condition criteria.
Values:
-
scope.type: One of Group, Device, or XBeeNode.
-
scope.value: If type is Group, then value is the full group path (with no leading slash). If type is Device, then value is the full device ID. If type is XBeeNode, then the value is the XBee node extended src address.
-
timeout: Fire or reset if the value matches for this amount of time.
-
timeUnit: One of seconds, minutes, hours.
-
operator: One of <, <=, >, >=, =, !=.
-
type: One of string or numeric.
-
thresholdValue: The target value for the condition.
-
attributeId: The XBee attribute id.
-
clusterId: The XBee cluster id.
-
clusterType: The XBee cluster type.
-
endpointId: The XBee endpoint id.
{
	"type": "Smart energy data point condition match",
	"scope": {
		"type": "Group",
		"value": ""
	},
	"fire": {
		"disabled": false,
		"parameters": {
			"attributeId": "1",
			"clusterId": "1794",
			"clusterType": "0",
			"endpointId": "1",
			"thresholdValue": "50",
			"timeUnit": "seconds",
			"timeout": "1",
			"type": "numeric"
		}
	},
	"reset": {
		"disabled": false,
		"parameters": {
			"attributeId": "1",
			"clusterId": "1794",
			"clusterType": "0",
			"endpointId": "1",
			"thresholdValue": "49",
			"timeUnit": "seconds",
			"timeout": "1",
			"type": "numeric"
		}
	}
}
Subscription Usage
The following payload creates a Subscription Usage alert. This alert type fires when the account uses 95 percent of the devices available for use based on the Remote Manager subscription.
There are a wide variety of values for the parameters of this alert. It is recommended that an alert is created with the Remote Manager Web UI, and you determine the acceptable values from a call to GET ws/v1/alerts/inventory.
Values:
-
scope.type: Always Global.
-
scope.value: Always empty string.
-
svcId: The service identifier.
-
unit: The unit being checked.
-
metric: The metric for the subscription data.
-
thresholdValue: The target value for the condition.
{
	"name":"Too many devices",
	"type":"Subscription Usage",
	"scope":{
		"type":"Global",
		"value":""
	},
	"fire":{
		"parameters":{
			"svcId":"3",
			"unit":"%",
			"metric":"devices",
			"thresholdValue":"90"
		}
	}
}
XbeeNode Excessive Deactivations
The following payload creates an XBeeNode Excessive Deactivations alert. This alert type fires when a device goes offline many times during a time period.
Values:
-
scope.type: One of Group, Device, or XBeeNode.
-
scope.value: If type is Group, then value is the full group path (with no leading slash). If type is Device, then value is the full device ID. If type is XBeeNode, then the value is the XBee node extended src address.
-
deactivationCount: Fires if the device deactivates more than this many times in the deactivationWindow
-
deactivationWindow: The period of time in minutes for which to count deactivations.
-
activationWindow: Resets when the Xbee node activates and stays activated for this number of minutes.
{
	"type":"XBeeNode Excessive Deactivations",
	"scope":{
		"type":"XbeeNode",
		"value":"00:00:00:00:00:00:00:00"
	},
	"fire":{
		"parameters":{
			"deactivationWindow":"5",
			"deactivationCount":"1"
		}
	},
	"reset":{
		"parameters":{
			"activationWindow":"1"
		}
	}
}
Xbeenode Offline
The following payload creates an XBeeNode Offline alert. This alert type fires when an XBee node is offline for a period of time.
Values:
-
scope.type: One of Group, Device, or XBeeNode.
-
scope.value: If type is Group, then value is the full group path (with no leading slash). If type is Device, then value is the full device ID. If type is XBeeNode, then the value is the XBee node extended src address.
-
reconnectWindowDuration: Fires if the device does not reconnect within this number of minutes.
-
reset.disabled: Is set to true to cause this alert to not auto-reset. The default is false.
{
	"type":"XBeeNode Offline",
	"scope":{
		"type":"Group",
		"value":"New York/Manhattan/Sensors"
	},
	"fire":{
		"parameters":{
			"reconnectWindowDuration":"1"
		}
	}
}
v1/api_keys
Use the v1/api_keys API to create, list, and delete API keys that are used to authenticate when calling APIs. For information on using an API key to authenticate see API Keys.
URI
https://<hostname>/ws/v1/api_keys
| HTTP method |
Format |
Description |
Parameters |
| GET |
/ws/v1/api_keys |
Get a summary of the API keys web service. |
|
| GET, POST |
/ws/v1/api_keys/inventory |
Get or create API keys. |
query, size, orderby, cursor |
| GET, DELETE |
/ws/v1/api_keys/inventory/{id} |
Get or delete the specified API key. |
|
No fields are required when creating an API key. A description is recommended and an optional lifetime in seconds can specified (defaults to 365 days).
{
    "description": "key for xyz",
    "lifetime": 31536000
}
The response to the create request will include the secret which must be securely stored as it will never be returned again:
{
	"id": "fbfdaacc8436875ed2b7136bdf3e64e5",
	"customer_id": 2,
	"secret": "fb137da612d892d8802e04b12ae819c73325b8f437988e82fd236eead2e6bca4",
	"username": "someuser",
	"description": "key for xyz",
	"expires": "2025-04-19T20:11:51.673Z",
	"created": "2024-04-19T20:11:51.844Z"
}
A typical API key entry looks like the following:
{
	"id": "f16034671e479552fc7c1721c6639d7c",
	"customer_id": 2,
	"username": "someuser",
	"description": "key for xyz",
	"expires": "2025-04-19T19:31:57.530Z",
	"created": "2024-04-19T19:31:57.623Z",
	"last_used": "2024-04-19T19:33:26.110Z"
}
API Key Data
Each API key has an id, the user the key is for and some metadata relating to its lifetime and usage.
The fields are displayed below.
id - The unique identifier for the key. Read-only, generated by the system.customer_id - The unique identifier for the customer account. Read-only, generated by the system.username - The name of the user that owns this key. Read-only, determined by the user that created the key.description - User supplied description for the key.expires - The time that the key will expire. Attempts to authenticate using the key after this time will fail. Read-only, generated by the system.created - The time that the key was created. Read-only, generated by the system.last_used - The time that the key was last used to successfully authenticate. There may be a short delay in this field updating after a successful authentication. This can be useful to when determining if a key is actively being used. Read-only, generated by the system.secret - The secret for the key. Returned only when the key is created. Read-only, generated by the system.lifetime - Number of seconds before this key expires. Only accepted when the key is created. Defaults to 31536000 (365 days).
v1/automations
Use the v1/automations API to create, update, list, and manage automations and automation run results.
Note that the v1/automations API handles Actor header but only allows a single account for the account-filter header.
URI
https://<hostname>/ws/v1/automations
| HTTP method |
Format |
Description |
Parameters |
| GET |
/ws/v1/automations |
Get a summary of the automations web service. |
|
| GET |
/ws/v1/automations/inventory |
Get a list of automations. |
|
| GET, PUT, DELETE |
/ws/v1/automations/inventory/{id} |
Get, update, or delete the specified automation. |
|
| POST |
/ws/v1/automations/run |
Run automations |
|
| POST |
/ws/v1/automations/runs/cancel/{id} |
Cancel the specified automation. |
|
| GET |
/ws/v1/automations/runs/inventory |
Get a list of all completed automations. |
|
| GET, DELETE |
/ws/v1/automations/runs/inventory/{id} |
Get or delete the specified automation run. |
|
| GET |
/ws/v1/automations/runs/results/{id}/{device_id} |
Get the run results for the specified automation by device ID. |
|
| GET |
/ws/v1/automations/runs/status/{id} |
Get the status for the specified automation. |
|
| GET |
/ws/v1/automations/runs/status/{id}/{device_id} |
Get the status for the specified target device in the specified run. |
|
| GET |
/ws/v1/automations/schedules |
Get a list of scheduled automations APIs. |
|
| GET |
/ws/v1/automations/schedules/inventory |
Get a list of scheduled automations. |
|
| GET, PUT, DELETE |
/ws/v1/automations/schedules/inventory/{id} |
Get, update, or delete a scheduled automation. |
|
Info
For an automation containing the reboot and firmware_update steps, the default value for the wait_for_reconnect parameter is true. Other step types default to false for wait_for_reconnect.
To delete a run or schedule:
Use the DELETE ws/v1/automations/inventory/{id} web service and specify “true” for either or both delete_runs or delete_schedules parameters to also delete any runs or schedules associated with an automation at the same time.
To update the end time for an automation after the start time has occurred use the PUT /ws/v1/automations/schedules/inventory/ with payload such as:
{
  "end_time": "2022-03-15T17:40:00.000Z"
}
To remove end_time from a schedule, set end_time to empty string.
Info
- Automation steps are referenced by 1-based indexing, so step 1 is the first step.
- The automation step for “sleep” can sleep (or pause) or a maximum of 3 days.
- The sleep step accepts a “value” parameter of the form “2s”, “2m”, “2h” or “2d” to sleep for 2 seconds, minutes, hours or days respectively. If no suffix character is used, the sleep value is interpreted as seconds.
- The device properties step allow a subset of device properties to be managed by Automations. Device properties that can be managed by Automations: tags, description, notes, maintenance_mode, and group.
v1/configs
Use the v1/configs API to create, update, or retrieve managed device configurations.
A managed configuration is a set of rules that define how devices are configured and how they are kept in compliance.
A managed configuration can be applied to groups of devices. The configuration is applied to all devices in the group
that match the type and vendor ID specified in the configuration.
A managed configuration can be applied to multiple groups, but a group can have only one active (enabled) configuration for a given type and vendor ID.
Scanning occurs when a device in the group is first connected to Remote Manager and when the configuration is scheduled to scan the device.
A scan can be done manually and other events in the system can also trigger a scan.
See the scan_frequency field for more information about conditions that trigger a scan.
See the Automations and Firmware APIs for more information about
creating and managing automations and firmware.
URI
https://<hostname>/ws/v1/configs
| HTTP method |
Format |
Description |
Parameters |
| GET |
/ws/v1/configs |
Get a summary of the /ws/v1/configs APIs. |
|
| GET |
/ws/v1/configs/compliance |
Get a summary of configuration compliance. |
group orderby cursor size query |
| GET |
/ws/v1/configs/compliance/{id} |
Get configuration compliance for a device. |
|
| GET, PUT, DELETE |
/ws/v1/configs/inventory/{id}/settings |
Get, update, or delete settings for a managed configuration. |
|
| GET, PUT, DELETE |
/ws/v1/configs/inventory/{id}/settings/device |
Get, update, or delete site-specific managed configuration settings for a device or all devices. |
device_id, device_name |
| GET, POST |
/ws/v1/configs/inventory/{id}/settings/device/bulk |
Get or update site-specific managed configuration settings for all devices. |
|
| GET, POST |
/ws/v1/configs/inventory |
Get or create a managed configuration. |
group orderby cursor size query |
| GET, PUT, DELETE |
/ws/v1/configs/inventory/{id} |
Get, update, or delete a managed configuration. |
|
| GET |
/ws/v1/configs/scan/bulk/history/{device_id} |
Get the managed configuration scan history for a device in CSV format. |
|
| GET, DELETE |
/ws/v1/configs/scan/history/{device_id} |
Get or clear the managed configuration scan history for a device. |
cursor size |
| POST |
/ws/v1/configs/scan_now |
Initiate a configuration scan. |
|
Configuration JSON Object
An example configuration is shown below.
{
    "alert": true,
    "created": "2023-06-21T17:39:20.290Z",
    "customer_id": 57639,
    "description": "Configuration for storefront cellular backup routers",
    "device_fileset": "configuration-6748-fileset",
    "enabled": true,
    "firmware_version": "23.6.1.46",
    "groups": [
        "Stores"
    ],
    "id": 6415,
    "images": [
        {
            "name": "Network Safety Scanner",
            "version": "1.0.0"
        }
    ],
    "last_scan": "2023-06-22T08:00:03.233Z",
    "last_update": "2023-06-21T17:43:18.163Z",
    "maintenance_window_handling": "cancel",
    "name": "Store Routers",
    "on_remediate": {
        "automation_name": "Set Update Tags",
        "reboot": true
    },
    "on_scan": {
        "automation_name": "Start LEDs Flashing"
    },
    "on_success": {
        "automation_name": "Stop LEDs Flashing"
    },
    "remediate": true,
    "scan_files": true,
    "scan_frequency": "daily",
    "scan_python": false,
    "scan_settings": true,
    "type": "Digi TX64",
    "vendor_id": 4261412874
}
Configuration Fields
alert
Indicates whether the managed configuration sends alerts when devices are detected as not in compliance.
created
Timestamp that indicates when the managed configuration was created.
customer_id
Unique customer ID for the Remote Manager customer.
description
Optional description of the managed configuration.
device_fileset
The name of the fileset used by the configuration to load files on to the scanned devices.
See the Files API for more information about creating, uploading and removing files from filesets.
enabled
Boolean that indicates whether the managed configuration is enabled.
firmware_version
Firmware version for the managed configuration.
flash_firmware_policy
This value is only valid if the configuration applies to XBee devices, more specifically, devices with the
XBee vendor ID (0xFE000006).
Whether the configuration should flash the firmware or not. It has three possible values:
- ‘always’: always flash firmware.
- ‘if_different’: flash firmware only if the device’s firmware version is different from the one in the
xbee_profile.
- ’never’: never flash firmware.
groups
The list of groups that the managed configuration applies to.
The configuration applies to all devices matching the type field in the groups specified.
id
Unique ID for the managed configuration.
images
The list of Digi Accelerated Linux (DAL) images that describe Digi containers that
should be initialized on the system. See the images fields below for more information.
last_scan
Timestamp that indicates when the managed configuration last scanned any devices.
last_update
Timestamp that indicates when the managed configuration was last updated.
maintenance_window_handling
Indicates how the managed configuration handles devices not being in maintenance windows.
Can be one of
- ‘allow’ - Allow the configuration scan to run normally for the devices that are currently in service (not in a maintenance window)
- ‘reject’ - Reject the configuration scan of the device immediately at the beginning. If the device transitions to in-service
(not in a maintenance window) during the scan, allow the scan to continue.
- ‘cancel’ - Cancel the configuration scan at any time when the device transitions to in-service during the scan.
modem_firmware_versions
The list of Modem Firmware information for the managed configuration.
name
Name of the managed configuration.
Set of actions to take if the scan detects a device that is not in compliance and makes it compliant.
See the On Remediate Actions section below for more information.
on_scan
The set of actions to take at the beginning of a configuration scan for a device.
See the On Scan Actions section below for more information.
on_success
The set of actions to take after a configuration scan for a device is successful. A successful
scan occurs if the device is already in compliance or if the scan successfully makes the device compliant.
See the On Success Actions section below for more information.
Boolean that indicates if the configuration should remediate (bring into compliance) devices that are detected as non-compliant.
scan_files
Boolean that indicates the configuration should scan files in the device fileset for compliance.
scan_frequency
The frequency at which the configuration scans devices for compliance.
- manual - Scanning happens manually or if new devices or existing devices move into groups managed by the configuration.
- daily - Approximately every 24 hours
- weekly - Approximately every week
- monthly - Approximately every month
If the value is ‘manual’ or any other value, devices are scanned by the system
under these conditions:
- The user selects the ‘Scan Now’ option for a device in the UI or uses the scan_now API
- A device is first connected identified in a group managed by a configuration
- A device is moved to a new group managed by a different configuration than the original
If the value is ‘daily’, ‘weekly’, or ‘monthly’, devices are also scanned by the system
under these conditions:
- By the configurations schedule.
- The device transitions from in-service into maintenance mode
- The device transitions from debug mode to not in debug mode
- The devices name changes and there are site-specific settings associated with the new or old name
scan_python
Boolean that indicates if python is not installed on the Digi Accelerated Linux (DAL) device
that the default python for the target firmware version should be installed and made available.
scan_settings
Boolean that indicates that the configuration should scan device settings for compliance
type
Device type for devices that are managed by configuration.
vendor_id
Unique vendor ID for devices that are managed by a configuration.
xbee_profile
This value is only valid if the configuration applies to XBee devices, more specifically, devices with the
XBee vendor ID (0xFE000006).
The name of the fileset used by the configuration to load the XBee profile(s) on devices that support XBee profiles.
See the Files API for more information about creating, uploading and removing files from filesets.
The XBee profile is snapshot of a specific radio firmware configuration, including firmware,
setting values, file system and other configuration information.
Images Fields
The images field in the configuration is a list of Digi Accelerated Linux (DAL) images that describe Digi containers that should be scanned on the device.
For example:
{
  "images": [
    {
      "name": "digi-iot-dal",
      "version": "1.0.0"
    }
  ]
}
name
The name of the Digi Containers image to use.
version
The optional version of the Digi Containers image to use.
Modem Firmware Fields
The list that describes which firmware should be installed for modems on the target devices.
Some modem’s require firmware specific to the carrier, other modems support generic firmware across carriers.
You can use the Remote Manager firmware UI or API to get a list of supported firmware for a modem.
For example:
{
  "modem_firmware_versions": [
    {
      "model": "EG25_G",
      "name": "modem",
      "versions": [
        {
          "version": "EG25GGBR07A07M2G_01.001.01.001"
        }
      ]
    }
  ]
}
or
{
  "modem_firmware_versions": [
    {
      "model": "EM7411",
      "name": "wwan1",
      "versions": [
        {
          "carrier": "GENERIC",
          "version": "01.14.13.00_GENERIC_002.048_000"
        },
        {
          "carrier": "ATT",
          "version": "01.14.13.00_ATT_002.062_000"
        }
      ]
    },
    {
      "model": "EM7411",
      "name": "wwan2",
      "versions": [
        {
          "carrier": "GENERIC",
          "version": "01.14.13.00_GENERIC_002.048_000"
        },
        {
          "carrier": "ATT",
          "version": "01.14.13.00_ATT_002.062_000"
        }
      ]
    }
  ]
}
name
The name of the modem to apply the modem firmware on
model
The model of the modem matching the firmware to apply
versions
The list of objects with version field and optional carrier field of the firmware(s) to apply to the target modem.
At the end of a configuration scan that detects a device that is not in compliance and makes it compliant you can reboot the device or run an automation.
This step occurs before any On Success actions.
automation_name
The automation to run at the end of the scan that remediated the device. The scan waits for the automation to complete. If the automation fails the scan fails as well.
The automation for the remediate action is run after the device is rebooted, if the reboot field is true.
reboot
Boolean that indicates if the device should be rebooted after the scan that remediated the device. The reboot occurs before any On Success actions. Note that a firmware update may also reboot the device, by specifying this field you can reboot again, later in the scan.
For example, after the firmware update occurs, and the device reconnects, some configuration changes or installing applications or containers may require a reboot to take effect.
The reboot occurs before any automation specified in the remediate action
On Scan Action Fields
At the start of a configuration scan you can run an automation. The automation could, for example, run a CLI command on the device to flash the LEDs so that you can identify the device in a rack or set a tag on the device to indicate an update is in progress.
automation_name
The automation to run at the beginning of the scan. The scan waits for the automation to complete. If the automation fails the scan fails as well.
On Successful Scan Action Fields
At the successful completion of a configuration scan you can run an automation. The automation could, for example, run a CLI command on the device to turn off the flasshing LEDs or set a tag on the device to indicate an update was completed.
Successful completion occurs if the device is already in compliance or if the scan successfully makes the device compliant.
This step occurs after any On Remediate actions.
automation_name
The automation to run at the successful completion of the scan. The scan waits for the automation to complete. If the automation fails the scan fails as well.
Settings
Each configuration can manage common settings and site-specific settings for devices in the fleet.
- Common settings are those settings that have the same value applied to all devices managed by the configuration. An example of a common setting might be a timeout value for connections. All devices managed by the configuration use the same timeout value.
- Site-specific settings vary in value across devices managed by the configuration. An example of a site-specific setting might be an IP address. The IP address assigned to each device differs so all devices can work on the same network.
Site-specific settings can be marked as required or optional.
- The configuration scan fails when required site specific settings are not present.
- If optional site-specific settings are not present the common setting is applied for that value.
Warning
The Remote Manager UI uses its own conventions when updating configurations and settings. Using different conventions might
cause your configuration or settings not to work with the UI. The recommended approach is to use the UI or API to manage your configurations and settings, but not both.
Some conventions of the UI include but are not limited to:
- A specific naming for the
device_fileset setting that allows the UI to separately manage files referenced by the configuration
- Using optional settings attributes like
@managed at every level of the configuration instead of utilizing the hierarchical nature of those values.
- Leaving values out of the settings payload that are unset instead of setting them to an empty string or spaces.
Info
For historical reasons, an API payload describes each setting using a scope value.
The scope of a setting is common, mixed, and matched. You can think of it as if the scope value describes where the setting comes from when being applied to a device.
- common - The setting is applied from only the common value
- mixed - Allow a site-specific setting. The setting is applied based on either the common or the site-specific value. If both are present, the site-specific value takes precedence. I.e. The site-specific value is optional.
- matched - Require a site-specific setting. The setting is applied based only on the site-specific value. The scan fails for a device if the setting is not present in the site-specific settings for a device.
Configuration common settings
Settings are managed by using GET, PUT, DELETE methods of the /ws/v1/configs/inventory/{id}/settings API where {id} is the configuration ID.
Info
The payload for common settings is complex and its structure and valid values depends on the type of device.
A good strategy for creating common settings payloads is to use the Remote Manager user interface to create a configuration by importing settings from a device into the configuration. Once you have a configuration, use the GET API to retrieve the settings. Continue to use the UI to experiment with the settings and their values for the type of devices you are managing.
GET Common settings
Consider a GET call to the /ws/v1/configs/inventory/6415/settings API. The API might return the following payload.
NOTE: Only 5 of the system settings are shown here, the full configuration settings contains hundreds of entries.
{
    "id": 6415,
    "customer_id": 57639,
    "system": {
      "#entries": [
        {
          "name": {
            "@managed": true,
            "@scope": "common",
            "#value": "TX64"
          },
          "contact": {
            "@managed": true,
            "@scope": "matched"
          },
          "location": {
            "@managed": true,
            "@scope": "mixed",
            "#value": "Rochester, MN"
          },
          "description": {
            "@managed": true,
            "@scope": "mixed"
          },
          "banner": {
            "@managed": false,
            "@scope": "common",
            "#value": "Welcome to the TX64"
          },
...etc...
Common settings payload elements
All entries in the settings tree follow the same format. The following table describes the elements of the settings payload shown above.
-
The system group represents a single group that contains a variety of different settings in the #entries list.
-
Each of those settings is marked @managed: true, which indicates that the setting is managed by the configuration. Set @managed to false so that the configuration does not manage/update the setting on the device. The ‘@managed’ setting is hierarchically applied by the system. If the @managed setting is set to false for a group, all settings in that group are set to false as well. If the @managed setting is set to true for a group, all settings in that group are set to true as well.
-
The name and banner settings are common. All devices in a scan will receive the same value for those settings, TX64 and Welcome to the TX64 respectively.
-
The contact setting is @scope: matched indicating it is a required site-specific setting. The value of the setting is determined by the value of the /system/1/contact site-specific setting. If the contact site-specific setting is not present in the site-specific, the configuration scan fails for the device missing the setting. See Site specific settings for more information about how to set site-specific settings.
-
The location setting is @scope: mixed indicating that it’s value is not required and can be a mix of either the value of the /system/1/location site-specific setting or the value in the associated #value field. See Site specific settings for more information about how to set site-specific settings.
-
Similarly, the description setting is @scope: mixed indicating that it’s value is not required and can be a mix of either the value of the /system/1/description site-specific setting or no value (since the associated #value field is absent).
PUT Common settings
A PUT to the /ws/v1/configs/inventory/{id}/settings API replaces the entire tree of existing settings with the new settings. The PUT payload is the same as the GET payload. Be sure to include all settings in the PUT payload, not just the settings you want to change.
Site specific settings
The Settings section described how to manage common settings for a configuration
and how individual settings are marked as site-specific by setting the @scope property to mixed or matched
In the example below, we see that there are 3 settings marked as site-specific settings.
/system/1/contact - A required setting that must be present in the device’s site-specific settings/system/1/location - An optional setting that can be present in the device’s site-specific settings. If not present the value Rochester, MN is used./system/1/description - An optional setting that can be present in the device’s site-specific settings. If not present the value used is empty
{
    "id": 6415,
    "customer_id": 57639,
    "system": {
      "#entries": [
        {
          "name": {
            "@managed": true,
            "@scope": "common",
            "#value": "TX64"
          },
          "contact": {
            "@managed": true,
            "@scope": "matched"
          },
          "location": {
            "@managed": true,
            "@scope": "mixed",
            "#value": "Rochester, MN"
          },
          "description": {
            "@managed": true,
            "@scope": "mixed"
          },
          "banner": {
            "@managed": false,
            "@scope": "common",
            "#value": "Welcome to the TX64"
          },
...etc...
GET Site-specific settings
Retrieve site-specific settings for a device in one of two formats.
In the following example there are 2 devices that have site-specific settings specified.
The first device is identified by device_id 00000000-00000000-0040FFFF-FF8001B0 and sets the contact and description settings to Fred and Store Router respectively. Only that device receives those settings, the location setting is unset and therefore the common value of Rochester, MN is used.
The second device is identified by the device name. When the configuration scan encounters a device named Bus23, the contact, description, and location settings are set to Bob, Home Router, and Hopkins, MN respectively.
Retrieve site-specific settings for all devices that have site-specific settings in either JSON format using the GET method
of the /ws/v1/configs/inventory/6415/settings/device API.
{
    "count": 2,
    "list": [
        {
            "customer_id": 57639,
            "id": 6415,
            "key_type": "device_id",
            "key_value": "00000000-00000000-0040FFFF-FF8001B0",
            "settings": {
                "system/1/contact": "Fred",
                "system/1/description": "Store Router"
            }
        },
        {
            "customer_id": 57639,
            "id": 6415,
            "key_type": "device_name",
            "key_value": "Bus23",
            "settings": {
                "system/1/contact": "Bob",
                "system/1/description": "Home Router",
                "system/1/location": "Hopkins, MN"
            }
        }
    ],
    "size": 1000
}
Retrieve site-specific settings for all devices that have site-specific settings in either CSV format using the /ws/v1/configs/inventory/6415/settings/device/bulk API.
key_type,key_value,system/1/contact,system/1/description,system/1/location
device_id,"00000000-00000000-0040FFFF-FF8001B0",Fred,"Store Router",
device_name,Bus23,Bob,"Home Router","Hopkins, MN"
GET Site-specific settings for a specific device
Retrieve site-specific settings for a specific device using the GET method and specifying either the device_name or the device_id parameter.
If there are no site-specific settings currently set for the device, the result is an HTTP 404 error.
For example the result of the GET method of the /ws/v1/configs/inventory/6415/settings/device?device_id=00000000-00000000-0040FFFF-FF8001B0 API results in the following json.
{
    "customer_id": 57639,
    "id": 6415,
    "key_type": "device_id",
    "key_value": "00000000-00000000-0040FFFF-FF8001B0",
    "settings": {
        "system/1/contact": "Fred",
        "system/1/description": "Store Router"
    }
}
The result of the GET method of the /ws/v1/configs/inventory/6415/settings/device?device_name=Bus23 API results in the following json.
{
    "customer_id": 57639,
    "id": 6415,
    "key_type": "device_name",
    "key_value": "Bus23",
    "settings": {
        "system/1/contact": "Bob",
        "system/1/description": "Home Router",
        "system/1/location": "Hopkins, MN"
    }
}
Put site-specific settings
To update site specific settings for all devices, POST a multipart/form payload with a CSV file to the /ws/v1/configs/inventory/6415/settings/device/bulk API.
This payload replaced all existing site-specific settings for all devices with the settings for those devices
specified in the CSV file. Devices that are not in the new settings file have their site-specific settings removed.
key_type,key_value,system/1/contact,system/1/description,system/1/location
device_id,"00000000-00000000-0040FFFF-FF8001B0",Fred,"Store Router",
device_name,Bus23,Bob,"Home Router","Hopkins, MN"
device_name,Bus42,Bill,"Shop Router","Byron, MN"
device_name,Bus99,Chris,"Store Router","Lewiston, MN"
Put site-specific settings for a specific device
To update site specific settings for a specific device, PUT a json payload to the /ws/v1/configs/inventory/6415/settings/device API using a device_id or device_name parameter.
This payload replaces all existing site-specific settings for the specified device with the settings specified in the payload. For example, POST the following payload to /ws/v1/configs/inventory/6415/settings/device?device_name=Bus99 will replace all site-specific settings for the Bus99 device.
{
    "settings": {
        "system/1/contact": "Chris",
        "system/1/description": "Store Router",
        "system/1/location": "Lewiston, MN"
    }
}
Delete site-specific settings for a specific device
To delete site specific settings for a specific device, DELETE to the /ws/v1/configs/inventory/6415/settings/device API using a device_id or device_name parameter.
For example, DELETE to /ws/v1/configs/inventory/6415/settings/device?device_name=Bus99 will delete all site-specific settings for the Bus99 device.
v1/containers
Use the v1/containers API to create, update, or list containers available for devices in your account.
URI
http://<hostname>/ws/v1/containers
| HTTP method |
Format |
Description |
Parameters |
| GET |
/ws/v1/containers |
Get summary of the containers APIs. |
|
| GET |
/ws/v1/containers/images/inventory |
Get a list of all containers for your account. |
orderby, cursor, size, query |
| GET |
/ws/v1/containers/images/inventory/{imageId} |
Download a container. |
|
| GET |
/ws/v1/containers/download/{device_type}/{firmware_version}/{image_name}[/{image_version}]/{filename} |
Download a container. |
|
| POST |
/ws/v1/containers/images/inventory |
Upload a container. |
name, version, type, vendor_id, device_type, firmware_version, sha3_512 |
| PUT |
/ws/v1/containers/images/inventory/{imageId} |
Update image attributes. |
|
| DELETE |
/ws/v1/containers/images/inventory/{imageId} |
Remove a container. |
|
v1/device_logs
Use the v1/device_logs API to retrieve logs uploaded from devices in your account.
On a DAL (Digi Accelerated Linux) device, the device log uploads must be enabled using
Monitoring -> Device event logs -> Enable event log uploads.
URI
http://<hostname>/ws/v1/device_logs
| HTTP method |
Format |
Description |
Parameters |
| GET |
/ws/v1/device_logs |
Get summary of the device_logs APIs. |
|
| GET |
/ws/v1/device_logs/history/events/{device_id} |
Get a device_log for a device. |
cursor, size, query, start_time, end_time |
| DELETE |
/ws/v1/device_logs/history/events/{device_id} |
Remove a device_log. |
|
v1/devices
Use the v1/devices API to create, modify, delete, or get devices. The API also includes options for getting data (channel), management, and metrics data streams.
URI
http://<hostname>/ws/v1/devices
| HTTP method |
Format |
Description |
Parameters |
| GET |
/ws/v1/devices |
Get summary of the device APIs. |
None |
| GET |
/ws/v1/devices/bulk |
Get a list of all devices in CSV format. |
group child_groups orderby tag type address name query fields |
| POST |
/ws/v1/devices/bulk |
Create a batch of users. |
Update |
| GET |
/ws/v1/devices/channel/{id} |
Get a list of data channels for a device. |
None |
| GET |
/ws/v1/devices/channel/{id}/{name} |
Get a specific data channel for a device. |
None |
| GET |
/ws/v1/devices/inventory |
List devices. |
group child_groups size cursor order orderby tag type address name query |
| GET |
/ws/v1/devices/inventory/config/{configId} |
List devices managed by a config. |
group child_groups size cursor order orderby tag type address name query |
| POST |
/ws/v1/devices/inventory |
Create or modify devices. |
bundle_device |
| DELETE |
/ws/v1/devices/inventory |
Delete devices. |
tag, type, address, name |
| GET, DELETE |
/ws/v1/devices/inventory/{id} |
Get or delete a specific device. |
|
| PUT |
/ws/v1/devices/inventory/{id} |
Update a specific device. |
update_only allow_swap |
| GET |
/ws/v1/devices/management/{id} |
Get a list of management streams for a device. |
None |
| GET |
/ws/v1/devices/management/{id}/{name} |
Get a specific management stream for a device. |
None |
| GET |
/ws/v1/devices/metrics/{id} |
Get a list of health metrics for a device. |
None |
| GET |
/ws/v1/devices/metrics/{id}/{name} |
Get a specific health metric for a device. |
None |
| GET |
/ws/v1/devices/types |
Get a list of device types. |
None |
Device fields
address
Device address supplied by the device.
alerts
Total number of fired alerts for the device.
capabilities
Capabilities to enable for the device (write-only):
| Capability |
Description |
| sm_compression_available |
Allow compression to be used for SM requests: true or false. |
| sm_pack_available |
Allow pack commands to be sent to the device (multiple commands in a single datagram): true or false. |
| sm_battery_operated |
Send requests to the device in battery-operated mode: true or false. |
| sm_udp_enabled |
Enable SM/UDP for the device: true or false. |
channels_uri
Full path to channel data.
carrier/carrier2
The reported network carrier for the primary and 2nd cellular signals.
connection_status
Keyword that indicates the connection status of the device: connected or disconnected.
description
String that describes the device.
extended_address
XBee radio EUI64 extended address for the device.
firmware_version
String that indicates the firmware version of the device.
group
Group path for the device.
id
System-generated identifier for the device.
install_code
Installation code for the device. An installation code is required for any device manufactured with an associated installation code.
- If you attempt to add a device that requires an installation code with a missing or incorrect code, you receive an HTTP status 400 error code along with a message describing the error.
- If you are adding multiple devices and one or more of the device installation code is missing or incorrect, you receive an HTTP status 207 error along with a message describing the error.
ip
Local IP address of the device.
last_connect
Date and time the device last connected to Remote Manager in ISO 8601 format.
last_disconnect
Date and time the device last disconnected from Remote Manager in ISO 8601 format.
last_disconnect_reason
Reason the device last disconnected from Remote Manager, if known.
last_update
Date and time the device was last updated in ISO ISO 8601 format.
mac
MAC address of the device.
management_uri
Full path to management data.
metrics_uri
Full path to metrics data.
notes
String that provide notes for the device (formerly user meta data).
parent
System-generated identifier for the parent device.
password
Password for the device (write-only).
provider/provider2
The reported SIM provider for the primary and 2nd cellular SIMs
public_ip
Public IP address of device (formerly called global IP).
restricted_status
Keyword that indicates the restriction status of the device: unrestricted, disabled, restricted, or untrusted.
serial_number
Serial number of the device.
signal_percent
Percent of the primary cellular signal.
signal_percent2
Percent of the 2nd cellular signal.
signal_quality
Signal quality of the primary cellular signal.
signal_quality2
Signal quality of the 2nd cellular signal.
signal_strength
Signal strenth of the primary cellular signal.
signal_strenth2
Signal strength of the 2nd cellular signal.
An array of tags associated with the device.
type
String that indicates the device type for the device.
vendor_id
Vendor identifier assigned to the device.
Channel, management, and metric fields
id
System-generated identifier for the device.
name
Name for the data channel.
value
Current value of the channel.
units
Units for the channel value.
timestamp
Time the current value was reported (ISO 8601 standard format).
history_uri
URI to the history of channel values (in streams).
customer_id
Identifier for the customer that owns the data.
Parameters
| Name |
Type |
Description |
Notes |
| tag |
string |
Query devices with matching tags. |
(tag | type | address) Use only one per request. |
| type |
string |
Query devices by type. |
|
| address |
string |
Query devices by address. |
|
| cursor |
string |
Cursor to get the next page of devices. Omit on initial call. |
|
| fields |
string |
Comma-separated list of fields to return for bulk API |
|
| size |
integer |
Number of itmes to return. The maximum and default is 1000. |
|
List All Devices
The following example shows how to list all devices in your inventory.
Request
GET /ws/v1/devices/inventory
Response
{
  "count" : 2,
  "size" : 1000,
  "start" : 0,
  "total" : 2,
  "list" : [
  {
    "channels_uri": "/ws/v1/devices/channels/00000000-00000000-0040FFFF-FF8001B0",
    "metrics_uri": "/ws/v1/devices/metrics/00000000-00000000-0040FFFF-FF8001B0",
    "capabilities": {
        "sm_compression_available": true,
        "sm_pack_available": true,
        "sms_enabled": true,
        "cli_service_available": true,
        "sm_encryption_key_distribution_service_available": true,
        "speedtest_available": true,
        "modem_firmware_update_available": true
    },
    "geoposition": {
        "type": "Point",
        "coordinates": [
            -92.505,
            44.066
        ]
    },
    "customer_id": 42,
    "type": "Digi TX64",
    "name": "DeadPool",
    "vendor_id": 4261412874,
    "public_ip": "199.1.2.3",
    "ip": "192.1.2.3",
    "connection_status": "connected",
    "id": "00000000-00000000-0040FFFF-FF8001B0",
    "restricted_status": "unrestricted",
    "serial_number": "WR64-000049",
    "contact": "Ryan Reynolds",
    "description": "Home Router",
    "location": "Rochester, MN",
    "sku": "WR64-A121",
    "firmware_version": "22.5.50.46",
    "firmware_status": "low",
    "last_connect": "2022-07-12T05:20:30.843Z",
    "last_disconnect": "2022-07-12T05:07:14.020Z",
    "last_update": "2022-07-12T14:32:31.167Z",
    "health_status": "normal",
    "carrier": "Verizon",
    "signal_strength": -94,
    "signal_percent": 32,
    "network": "4g",
    "maintenance_mode": "off",
    "compliant": "yes",
    "last_compliant": "2022-05-25T09:49:59.730Z",
    "last_noncompliant": "2022-04-13T04:00:08.793Z",
    "last_noncompliant_reason": "1 settings are not compliant: system/1/banner",
    "connection_type": "Ethernet",
    "cellular_modem_version": "24.01.526",
    "in_maintenance_window": "no",
    "mac": "02:00:00:00:04:00",
    "alerts": 1,
    "registration_date": "2022-03-17T18:09:00.000Z",
    "group": "Stores",
    "management_uri": "/ws/v1/devices/management/00000000-00000000-0040FFFF-FF8001B0"
  },
  {
    "id" : "F9F967B4-33804DCE-2BDC4702-45053B1C",
    "vendor_id" : 4261412871,
    "type" : "DIA Device",
    "restricted_status" : "untrusted",
    "connection_status" : "disconnected",
    "description" : "Thermostat",
    "tags" : ["tstat"],
    "group" : "Primary",
    "address" : "dia/00000000-00000000-00409DFF-FF298D0E/sensor0",
    "parent" : "00000000-00000000-00409DFF-FF298D0E"
  }
 ]
}
List Devices Using Query by Tag
The following example shows how to list all devices that are tagged with a specific tag.
Request
GET /ws/v1/devices/inventory?query=tags='myTag'
Response
{
  "count" : 3,
  "size" : 1000,
  "list" : [
  {
    "channels_uri" : "/ws/v1/devices/channels/8C1C080F-A8214448-2674ED16-B9196C0E",
    "metrics_uri" : "/ws/v1/devices/metrics/8C1C080F-A8214448-2674ED16-B9196C0E",
    "group" : "",
    "management_uri" : "/ws/v1/devices/management/8C1C080F-A8214448-2674ED16-B9196C0E",
    "type" : " ",
    "connection_status" : "disconnected",
    "id" : "8C1C080F-A8214448-2674ED16-B9196C0E",
    "restricted_status" : "unrestricted",
    "tags" : [ "myTag" ],
    "health_status" : "unknown",
    "maintenance_mode" : "off"
  },
  {
    "channels_uri" : "/ws/v1/devices/channels/BD2EA7BE-60DF46A6-EBBF5052-5B9217FC",
    "metrics_uri" : "/ws/v1/devices/metrics/BD2EA7BE-60DF46A6-EBBF5052-5B9217FC",
    "group" : "",
    "management_uri" : "/ws/v1/devices/management/BD2EA7BE-60DF46A6-EBBF5052-5B9217FC",
    "type" : " ",
    "connection_status" : "disconnected",
    "id" : "BD2EA7BE-60DF46A6-EBBF5052-5B9217FC",
    "restricted_status" : "unrestricted",
    "tags" : [ "myTag" ],
    "health_status" : "unknown",
    "maintenance_mode" : "off"
  },
  {
    "channels_uri" : "/ws/v1/devices/channels/BF652035-B3BA464A-B5C95C90-770A4838",
    "metrics_uri" : "/ws/v1/devices/metrics/BF652035-B3BA464A-B5C95C90-770A4838",
    "group" : "",
    "management_uri" : "/ws/v1/devices/management/BF652035-B3BA464A-B5C95C90-770A4838",
    "type" : " ",
    "connection_status" : "disconnected",
    "id" : "BF652035-B3BA464A-B5C95C90-770A4838",
    "restricted_status" : "unrestricted",
    "notes" : "yo",
    "tags" : [ "myTag" ],
    "health_status" : "unknown",
    "maintenance_mode" : "off"
  } ]
}
Get Single Device
The following example shows how to get details for a single device with an ID of 00000000-00000000-0040FFFF-FF8001B0.
Request
GET /ws/v1/devices/inventory/00000000-00000000-0040FFFF-FF8001B0
Response
{
    "alerts": 1,
    "capabilities": {
        "cli_service_available": true,
        "modem_firmware_update_available": true,
        "sm_compression_available": true,
        "sm_encryption_key_distribution_service_available": true,
        "sm_pack_available": true,
        "sms_enabled": true,
        "speedtest_available": true
    },
    "carrier": "Verizon",
    "cellular_modem_version": "24.01.526",
    "channels_uri": "/ws/v1/devices/channels/00000000-00000000-0040FFFF-FF8001B0",
    "compliant": "yes",
    "connection_status": "disconnected",
    "connection_type": "Ethernet",
    "contact": "Ryan Reynolds",
    "customer_id": 57639,
    "description": "Home Router",
    "firmware_status": "up_to_date",
    "firmware_version": "22.5.50.62",
    "geoposition": {
        "coordinates": [
            -90,
            45
        ],
        "type": "Point"
    },
    "group": "ExampleGroup",
    "health_status": "normal",
    "id": "00000000-00000000-0040FFFF-FF8001B0",
    "in_maintenance_window": "no",
    "ip": "192.168.1.183",
    "last_compliant": "2022-05-25T09:49:59.730Z",
    "last_connect": "2022-07-14T03:14:59.497Z",
    "last_disconnect": "2022-07-14T14:28:59.100Z",
    "last_noncompliant": "2022-04-13T04:00:08.793Z",
    "last_noncompliant_reason": "1 settings are not compliant: system/1/banner",
    "last_update": "2022-07-14T14:26:53.187Z",
    "location": "Rochester, MN",
    "mac": "02:00:00:00:04:00",
    "maintenance_mode": "off",
    "management_uri": "/ws/v1/devices/management/00000000-00000000-0040FFFF-FF8001B0",
    "metrics_uri": "/ws/v1/devices/metrics/00000000-00000000-0040FFFF-FF8001B0",
    "name": "DeadPool",
    "network": "4g",
    "public_ip": "9.9.9.9",
    "registration_date": "2022-03-17T18:09:00.000Z",
    "restricted_status": "unrestricted",
    "serial_number": "WR64-000049",
    "signal_percent": 32,
    "signal_strength": -94,
    "sku": "WR64-A121",
    "type": "Digi TX64",
    "vendor_id": 4261412874
}
Create Single Device
Use the following API to create or update one or more devices. Almost all devices require specifying an install_code field. The install code field is the secure password printed on the device label. If you don’t have the install code, the device cannot be registered to your account.
The initial step of adding the device to your account is commonly called “provisioning” or “to provision” a device.
The request payload can include a single device or multiple devices. Multiple devices must be wrapped in an array for JSON. The response always returns the devices as a list.
The following sample JSON request creates a device with various settings. Most of the settings available in the Get Single Device page can be specified.
Request
POST /ws/v1/devices/inventory?bundle_device=true
Payload:
{
  "id": "00000000-00000000-0040FFFF-FF8001B0",
  "install_code": "device-default-password-from-label",
  "name": "Deadpool",
  "tags" : ["Marvel","AntiHero"],
  "group": "ExampleGroup",
}
Response
{
    "count": 1,
    "list": [
        {
            "channels_uri": "/ws/v1/devices/channels/00000000-00000000-0040FFFF-FF8001B0",
            "connection_status": "disconnected",
            "customer_id": 57639,
            "firmware_status": "not_identified",
            "group": "ExampleGroup",
            "health_status": "unknown",
            "id": "00000000-00000000-0040FFFF-FF8001B0",
            "in_maintenance_window": "yes",
            "mac": "00:40:FF:80:01:B1",
            "maintenance_mode": "off",
            "management_uri": "/ws/v1/devices/management/00000000-00000000-0040FFFF-FF8001B0",
            "metrics_uri": "/ws/v1/devices/metrics/00000000-00000000-0040FFFF-FF8001B0",
            "name": "Deadpool",
            "restricted_status": "unrestricted",
            "tags": [
                "Marvel",
                "AntiHero"
            ],
            "type": " "
        }
    ]
}
About the bundle_device parameter
bundle_device=true causes the API to register a device as a Digi 360 device (also known as Lifecycle Assurance). The device is provisioned into your Remote Manager account and registered in Digi’s ERP systems. You should use this option unless you have good reason not to. One direct benefit is that the your Remote Manager device limit will never prevent you from provisioning this device if it is a 360/LCA device. Adding devices through the Remote Manager web interface uses this same behavior.
Specifying your reseller
You can optionally add a reseller field in the HTTP body payload. The value of that field must be numerical. This will help Digi bill renewals through your reseller. You can find your reseller’s numerical ID by using the following API:
GET /ws/v1/billing/partners
Create Multiple Devices
The following sample JSON request creates two devices with various settings. Most of the settings available in the Get Single Device page can be specified.
Request
POST /ws/v1/devices/inventory
Payload
[
  {
    "id": "00000000-00000000-0040FFFF-FF8001B1",
    "install_code": "device-default-password-from-label",
    "name": "Deadpool2",
    "tags" : ["Marvel","AntiHero"],
    "group": "ExampleGroup"
  },
 {
    "id": "00000000-00000000-0040FFFF-FF8001B2",
    "install_code": "device-default-password-from-label",
    "name": "Superman",
    "tags" : ["DC","Hero"],
    "group": "ExampleGroup"
  }
]
Response
{
    "count": 2,
    "list": [
        {
            "alerts": 0,
            "carrier": "AT&T",
            "channels_uri": "/ws/v1/devices/channels/00000000-00000000-0040FFFF-FF8001B1",
            "connection_status": "disconnected",
            "customer_id": 7493,
            "firmware_status": "not_identified",
            "firmware_version": "22.5.0.0",
            "group": "ExampleGroup",
            "health_status": "unknown",
            "id": "00000000-00000000-0040FFFF-FF8001B1",
            "in_maintenance_window": "yes",
            "last_update": "2022-07-19T19:05:10.870Z",
            "mac": "00:40:FF:80:01:B1",
            "maintenance_mode": "off",
            "management_uri": "/ws/v1/devices/management/00000000-00000000-0040FFFF-FF8001B1",
            "metrics_uri": "/ws/v1/devices/metrics/00000000-00000000-0040FFFF-FF8001B1",
            "name": "Deadpool2",
            "registration_date": "2022-06-16T21:03:00.000Z",
            "restricted_status": "unrestricted",
            "tags": [
                "Marvel",
                "AntiHero"
            ],
            "type": "Digi TX64"
        },
        {
            "channels_uri": "/ws/v1/devices/channels/00000000-00000000-0040FFFF-FF8001B2",
            "connection_status": "disconnected",
            "customer_id": 7493,
            "firmware_status": "not_identified",
            "group": "ExampleGroup",
            "health_status": "unknown",
            "id": "00000000-00000000-0040FFFF-FF8001B2",
            "in_maintenance_window": "yes",
            "mac": "00:40:FF:80:01:B2",
            "maintenance_mode": "off",
            "management_uri": "/ws/v1/devices/management/00000000-00000000-0040FFFF-FF8001B2",
            "metrics_uri": "/ws/v1/devices/metrics/00000000-00000000-0040FFFF-FF8001B2",
            "name": "Superman",
            "restricted_status": "unrestricted",
            "tags": [
                "DC",
                "Hero"
            ],
            "type": " "
        }
    ]
}
Edit Device
The following examples shows how to edit various fields including the tags list, group, contact name and geoposition of a device.
Request
PUT ws/v1/devices/inventory/00000000-00000000-0040FFFF-FF8001B1
Payload
{
  "tags" : ["bad"],
  "group": "NewGroup",
  "contact": "Ryan Reynolds",
  "location": "Rochester, MN",
  "description": "Home Router",
  "geoposition": {
     "coordinates": [
        -90,
         45
     ],
     "type": "Point"
  }
}
Response
{
    "alerts": 0,
    "carrier": "AT&T",
    "channels_uri": "/ws/v1/devices/channels/00000000-00000000-0040FFFF-FF8001B1",
    "connection_status": "disconnected",
    "contact": "Ryan Reynolds",
    "customer_id": 7493,
    "description": "Home Router",
    "firmware_status": "not_identified",
    "firmware_version": "22.5.0.0",
    "geoposition": {
        "coordinates": [
            -90.0,
            45.0
        ],
        "type": "Point"
    },
    "group": "NewGroup",
    "health_status": "unknown",
    "id": "00000000-00000000-0040FFFF-FF8001B1",
    "in_maintenance_window": "yes",
    "last_update": "2022-07-19T19:05:10.870Z",
    "location": "Rochester, MN",
    "mac": "00:40:FF:80:01:B1",
    "maintenance_mode": "off",
    "management_uri": "/ws/v1/devices/management/00000000-00000000-0040FFFF-FF8001B1",
    "metrics_uri": "/ws/v1/devices/metrics/00000000-00000000-0040FFFF-FF8001B1",
    "name": "Deadpool",
    "registration_date": "2022-06-16T21:03:00.000Z",
    "restricted_status": "unrestricted",
    "tags": [
        "bad"
    ],
    "type": "Digi TX64"
}
List device metric streams
The following examples shows how to list the metric streams being reported by a device. A device can have many metric streams, or data channels.
Request
GET ws/v1/devices/metrics/00000000-00000000-0040FFFF-FF8001B0
Response
{
    "count": 98,
    "list": [
        {
            "customer_id": 57639,
            "history_uri": "/ws/v1/streams/history/00000000-00000000-0040FFFF-FF8001B0/metrics/sys/uptime",
            "id": "00000000-00000000-0040FFFF-FF8001B0",
            "name": "metrics/sys/uptime",
            "timestamp": "2022-07-18T22:45:00.000Z",
            "units": "seconds",
            "value": "3600"
        },
        {
            "customer_id": 57639,
            "history_uri": "/ws/v1/streams/history/00000000-00000000-0040FFFF-FF8001B0/metrics/sys/cpu/used",
            "id": "00000000-00000000-0040FFFF-FF8001B0",
            "name": "metrics/sys/cpu/used",
            "timestamp": "2022-07-18T22:45:00.000Z",
            "units": "%",
            "value": "9.350000"
        },
        {
            "customer_id": 57639,
            "history_uri": "/ws/v1/streams/history/00000000-00000000-0040FFFF-FF8001B0/metrics/sys/storage/var/used",
            "id": "00000000-00000000-0040FFFF-FF8001B0",
            "name": "metrics/sys/storage/var/used",
            "timestamp": "2022-07-18T22:45:00.000Z",
            "units": "%",
            "value": "3.000000"
        },
        {
            "customer_id": 57639,
            "history_uri": "/ws/v1/streams/history/00000000-00000000-0040FFFF-FF8001B0/metrics/sys/storage/tmp/used",
            "id": "00000000-00000000-0040FFFF-FF8001B0",
            "name": "metrics/sys/storage/tmp/used",
            "timestamp": "2022-07-18T22:45:00.000Z",
            "units": "%",
            "value": "0.000000"
        },
        {
            "customer_id": 57639,
            "history_uri": "/ws/v1/streams/history/00000000-00000000-0040FFFF-FF8001B0/metrics/sys/storage/opt/used",
            "id": "00000000-00000000-0040FFFF-FF8001B0",
            "name": "metrics/sys/storage/opt/used",
            "timestamp": "2022-07-18T22:45:00.000Z",
            "units": "%",
            "value": "4.000000"
        },
        {
            "customer_id": 57639,
            "history_uri": "/ws/v1/streams/history/00000000-00000000-0040FFFF-FF8001B0/metrics/sys/reboots",
            "id": "00000000-00000000-0040FFFF-FF8001B0",
            "name": "metrics/sys/reboots",
            "timestamp": "2022-07-18T22:45:00.000Z",
            "units": "occurrences",
            "value": "0"
        },
        {
            "customer_id": 57639,
            "history_uri": "/ws/v1/streams/history/00000000-00000000-0040FFFF-FF8001B0/metrics/sys/mem/used",
            "id": "00000000-00000000-0040FFFF-FF8001B0",
            "name": "metrics/sys/mem/used",
            "timestamp": "2022-07-18T22:45:00.000Z",
            "units": "%",
            "value": "5.980000"
        },
        {
            "customer_id": 57639,
            "history_uri": "/ws/v1/streams/history/00000000-00000000-0040FFFF-FF8001B0/metrics/sys/location",
            "id": "00000000-00000000-0040FFFF-FF8001B0",
            "name": "metrics/sys/location",
            "timestamp": "2022-07-18T22:45:00.000Z",
            "units": "json",
            "value": "{\"type\":\"Feature\",\"geometry\":{\"type\":\"Point\",\"coordinates\": [0.000000, 0.000000, 0.0] }}"
        },
        ...etc...
    ]
}
Delete a Device
The following example shows how to delete a device from your inventory.
DELETE /ws/v1/devices/inventory/00000000-00000000-0040FFFF-FF8001B0
No response is returned unless there is an error.
The “Deleted-Count” header is set to “1” in the HTTP response indicating a successful deletion.
v1/esims
The v1/esims API allows you to view eSIMs being reported by the devices in your account.
Digi Remote Manager only shows eSIMs that are provided by Digi and registered for your device.
If a device reports an eSIM that is not allowed in the system, it will not be shown.
The bulk API returns at most 20,000 records and sets the Truncated HTTP header if the data is truncated.
Use the query parameter to limit the data returned.
URI
https://<hostname>/ws/v1/esims
| HTTP method |
Format |
Description |
Parameters |
| GET |
/ws/v1/esims |
Get a summary of the eSIM APIs. |
None |
| GET |
/ws/v1/esims/inventory/{eid} |
Retrieve an eSIM by EID |
None |
| GET |
/ws/v1/esims/bulk |
Retrieve eSIMs for the current user’s account in CSV format. |
fields size query orderby |
| GET |
/ws/v1/esims/inventory |
Retrieve eSIMs for the current user’s account. |
cursor size query orderby |
eSIM Data
customer_id - The account in which the eSIM is loadeddevice_id - The device ID of the device that reported the eSIMeid - The eSIM profile’s EID.
Parameters
| Name |
Type |
Description |
| cursor |
string |
If a full page is returned and more eSIMs are available a cursor value is returned in the full page. The cursor parameter can be used to continue with the same query parameters and fetch the next page. For example, cursor=d7eec0d4-557a-11e9-ab8e-d20bcc91db8a |
| fields |
string |
Comma-separated list of fields to return for bulk API |
| orderby |
string |
A field in the eSIM code to sort by. Specify “asc field” or “desc field” to change the sort order |
| query |
string |
The Remote Manager query language query condition used to filter results |
| size |
integer |
Number of items to return. The maximum and default is 1000. |
v1/esim_activation_codes
The v1/esim_activation_codes API allows you to register and manage eSIM activation codes in
Digi Remote Manager. Once an eSIM activation code, and secret is registered, it can be automatically
applied to devices using the web UI, programmatically via the API, or using automations
or configuration templates.
You receive activation codes from Digi or your cellular network carrier or provider.
After activation codes have been downloaded to a device, they will be automatically removed
from the system after some period of time. The removal of a downloaded activation code will not affect
the device that they have been downloaded to.
The bulk API returns at most 20,000 records and sets the Truncated HTTP header if the data is truncated.
Use the query parameter to limit the data returned.
Warning: Be careful in specifying the Service Provider Network SPN in the carrier field. An eSIM profile
may not report the same SPN as the full name from the supplier of the activation code.
For example, the carrier providing an activation code might be “Fred’s Fast Wireless Service”,
but the SPN reported by the eSIM profile might be “Mobile”.
This discrepancy could cause confusion in your API and UI usage.
If you try to activate “Fred’s Fast Wireless Service” profile on a device
but the system sees only “Mobile” being reported, it may attempt to activate another profile.
URI
https://<hostname>/ws/v1/esim_activation_codes
| HTTP method |
Format |
Description |
Parameters |
| GET |
/ws/v1/esim_activation_codes |
Get a summary of the esim_activation_codes APIs. |
None |
| GET |
/ws/v1/esim_activation_codes/inventory/{iccid} |
Retrieve an activation code by ICCID. |
None |
| GET |
/ws/v1/esim_activation_codes/bulk |
Retrieve activation codes for the current user’s account in CSV format. |
fields size query orderby |
| GET |
/ws/v1/esim_activation_codes/inventory |
Retrieve activation codes for the current user’s account. |
cursor size query orderby |
| POST |
/ws/v1/esim_activation_codes/inventory |
Register a new eSIM activation code. |
None |
| POST |
/ws/v1/esim_activation_codes/bulk |
Register multiple eSIM activation codes. |
None |
| PUT |
/ws/v1/esim_activation_codes/inventory/{iccid} |
Modify an activation code by ICCID. |
None |
| DELETE |
/ws/v1/esim_activation_codes/{iccid} |
Delete an activation code by ICCID. |
None |
Activation Code Data
Each activation code stores a variety of information about an eSIM profile available to be activated on a device,
or the device and operation that applied the operation.
activation_code - The activation code secret (required for a create operation, input only)carrier - The service provider network (SPN) of the eSIM profile (required for a create operation)completed - The date and time the activation code operation was completed (optional)customer_id - The account in which the activation code is loadeddownloaded_by - The user or system task that downloaded the activation code (optional)downloaded_device_id - The device ID of the device that downloaded the activation code (optional)downloaded_eid - The eSIM profile’s EID (optional)downloaded - The date and time the activation code was downloaded (optional)eid - The eSIM profile’s EID (optional) if the activation code is downloaded or available only for that EID.iccid - The ICCID of the eSIM profile associated with the activation code (required for a create operation)name - A user-friendly name of the eSIM profile associated with the activation code (optional)normalized_carrier - The normalized service provider network (SPN) of the eSIM profile (output only, created by the system for display and matching purposes)status - The status of the activation code operation. Output only. Possible values are available, downloading, downloaded, failed.tx - The transaction ID of the activation code download operation (optional). The transaction can be used in the /ws/v1/esim_profile/progress API to monitor the progress of the download operation
Parameters
Parameters for the v1/esim_activation_codes/inventory and v1/esim_activation_codes/bulk APIs include the following:
| Name |
Type |
Description |
| cursor |
string |
If a full page is returned and more activation codes are available a cursor value is returned in the full page. The cursor parameter can be used to continue with the same query parameters and fetch the next page. For example, cursor=d7eec0d4-557a-11e9-ab8e-d20bcc91db8a |
| fields |
string |
Comma-separated list of fields to return for bulk API |
| orderby |
string |
A field in the activation code to sort by. Specify “asc field” or “desc field” to change the sort order |
| query |
string |
The Remote Manager query language query condition used to filter results |
| size |
integer |
Number of items to return. The maximum and default is 1000. |
v1/esim_profiles
The v1/esim_profiles API is the basis for most of the eSIM actions and information available
by the system.
-
An eSIM profile (ICCID) is downloaded to a device using an activation code. After the activation code
secret is validated by the carrier and eSIM provder, the profile is installed on the device.
-
Once downloaded, an eSIM profile can be enabled to start using cellular service via the profile.
-
Although the API separates the download, and enable actions, the UI will often call the
combination of these two actions an activate request.
-
eSIM profiles are created or deleted in the system only when the device reports successful profile actions
-
eSIM profile actions are generally processed asynchronously and make take 3-10 minutes for
the devices eSIM to contact the profile server (SM-DP+) and the eSIM registry (EIS).
The APIs for delete, disable, download and enable return a transaction ID that can be used
to monitor the progress of the action.
-
eSIM profile multistep operations combine actions like download and enable into a single API call.
Additionally, the multistep operation will wait for the device to successfully report the profiles after
contacting the profile server and EIS. The multistep operation is most commonly used via an automation
or template or the UI. A multistep operation may have multiple transactions.
The bulk API returns at most 20,000 records and sets the Truncated HTTP header if the data is truncated.
Use the query parameter to limit the data returned.
Warning: Be careful in specifying the Service Provider Network SPN in the carrier field. An eSIM profile
may not report the same SPN as the full name from the supplier of the activation code.
For example, the carrier providing an activation code might be “Fred’s Fast Wireless Service”,
but the SPN reported by the eSIM profile might be “Mobile”.
This discrepancy could cause confusion in your API and UI usage.
If you try to activate “Fred’s Fast Wireless Service” profile on a device
but the system sees only “Mobile” being reported, it may attempt to activate another profile.
URI
https://<hostname>/ws/v1/esim_profiles
| HTTP method |
Format |
Description |
Parameters |
| GET |
/ws/v1/esim_profiles |
Get a summary of the esim_profiles APIs. |
None |
| GET |
/ws/v1/esim_profiles/inventory/{iccid} |
Retrieve an eSIM profile by ICCID. |
None |
| GET |
/ws/v1/esim_profiles/bulk |
Retrieve eSIM profiles for the current user’s account in CSV format. |
fields size query orderby |
| GET |
/ws/v1/esim_profiles/inventory |
Retrieve eSIM profiles for the current user’s account. |
cursor size query orderby |
| HTTP method |
Format |
Description |
Parameters |
| GET |
/ws/v1/esim_profiles/progress/{tx} |
Monitor the progress of an eSIM profile action. |
None |
| GET |
/ws/v1/esim_profiles/transactions/inventory |
Monitor the progress of an eSIM profile action. |
cursor size query orderby |
| POST |
/ws/v1/esim_profiles/delete |
Delete an eSIM profile from a device |
None |
| POST |
/ws/v1/esim_profiles/disable |
Disable an active eSIM profile on a device |
None |
| POST |
/ws/v1/esim_profiles/download |
Download an eSIM profile to a device using an activation code |
None |
| POST |
/ws/v1/esim_profiles/enable |
Enable an already downloaded eSIM profile on a device |
None |
| HTTP method |
Format |
Description |
Parameters |
| GET |
/ws/v1/esim_profiles/operations/inventory |
Retrive the status multi-step eSIM profile operations. |
cursor size query orderby |
| GET |
/ws/v1/esim_profiles/operations/inventory/{id} |
Retrieve the status of a multi-step eSIM profile operation. |
cursor size query orderby |
| POST |
/ws/v1/esim_profiles/operations/inventory |
Start a multi-step eSIM profile operation |
None |
eSIM Profile Data
carrier - The service provider network (SPN) of the eSIM profilecustomer_id - The account in which the eSIM profile is reporteddevice_id - The device ID of the device that reported the eSIM profileeid - The eSIM’s EID.iccid - The ICCID of the eSIM profileid - The profile’s id number within the eSIMnormalized_carrier - The normalized service provider network (SPN) of the eSIM profile (output only, created by the system for display and matching purposes)status - The status of the eSIM profile. Output only. Possible values are active, inactive.type - The type of eSIM profile, set by the service provider. Some possible values are operational, bootstrap, test.
eSIM Action Data
When requesting a download, enable, disable or delete action, specify the following payload:
device_id - The device ID of the device that the action is applied toeid - The eSIM’s EID.iccid - Required for enable, disable and delete actions. If the activation code is registered with the system, then required for download.activation_code - The activation code secret. Only required if the activation code is not already registered with the system. If the activation code is already registered with the system, then use the iccid for download.
eSIM Profile Transaction Data
eSIM transaction statuses are checked when a progress API is called. The system intermittently
checks the status of in-progress actions as well, marking those transactions as completed as appropriate.
action - The action performed by the system on the device. Possible values are download, enable, disable, delete.created - The date and time the transaction was createdcustomer_id - The account in which the eSIM profile is reporteddevice_id - The device ID of the device that the action is applied toeid - The eSIM’s EID.iccid - The ICCID of the eSIM profilemessage_code - A short summary code describing the transaction messagemessage - A message describing the status of the transaction from the system or profile server (SM-DP+) or eSIM registry (EIS)status - The status of the eSIM profile action. Possible values are in_progress, complete, failed, unknown.transaction - The unique identifier for the transaction.updated - The date and time the transaction was last updated
eSIM Multistep Operation Data
As the system processes multistep eSIM profile operations, it records debug and diagnostic information
about the steps and progress.
The system uses the service provider network (carrier) field to find an identify an appropriate activation code or
profile to take action on.
carrier - The requested service provider network (SPN) of the eSIM operation. Used to find a matching activation code or existing profile on the device.cause_id - The cause identifier like the automation ID or template ID.cause - The cause of the operation. Possible values are request, automation, template.created_by - The user or system service that initiated the operationcreated - The date and time the operation was createdcustomer_id - The account in which the multistep operation is createddevice_id - The device ID of the device that the action is applied todownload_tx - The transaction ID for the download operation.eid - The eSIM’s EID.enable_tx - The transaction ID for the enable operation.iccid - The ICCID of the eSIM profile requested.id - The identifier for the multistep operationjob_id - The Remote Manager system job ID for the operation.message_code - A short summary code describing the transaction messagemessage - A message describing the status of the transaction from the system or profile server (SM-DP+) or eSIM registry (EIS)operation - The operation being performed. Possible values are activate, download, enablesource - The source API or system service that originated the requeststatus - The overall status of the multistep operation. Possible values are starting, download, download_verify, enable, enable_verify, failed, successful.updated - The date and time the operation was last updated`
Parameters
Parameters for the v1/esim_profiles/inventory and v1/esim_profiles/bulk APIs include the following:
| Name |
Type |
Description |
| cursor |
string |
If a full page is returned and more activation codes are available a cursor value is returned in the full page. The cursor parameter can be used to continue with the same query parameters and fetch the next page. For example, cursor=d7eec0d4-557a-11e9-ab8e-d20bcc91db8a |
| fields |
string |
Comma-separated list of fields to return for bulk API |
| orderby |
string |
A field in the activation code to sort by. Specify “asc field” or “desc field” to change the sort order |
| query |
string |
The Remote Manager query language query condition used to filter results |
| size |
integer |
Number of items to return. The maximum and default is 1000. |
v1/events
The v1/events/inventory and v1/events/bulk APIs show the current event log. The event log stores audit records and other operations that have occurred in the system.
URI
http://<hostname>/ws/v1/events
| HTTP method |
Format |
Description |
Parameters |
| GET |
/ws/v1/events |
Get a summary of the events APIs. |
None |
| GET |
/ws/v1/events/bulk |
Retrieve events for the current user’s account in CSV format. |
cursor end_time query size start_time fields |
| GET |
/ws/v1/events/inventory |
Retrieve events for the current user’s account. |
cursor end_time query size start_time |
Event Data
Each event stores a variety of information about the operation. The fields are displayed below. Depending on the type of the operation some fields may be missing, have default values, or other fields may be present.
count - The count associated with the operation, if anycustomer_id - The account in which the event occurreddetails - The detail string describing the event. For example: “ui login authenticated”, “connected using protocol TLSv1.2 with cipher TLS_RSA_WITH_AES_128_CBC_SHA and no client cert” or “RCI Facility,send_message”duration - The number of milliseconds an operation tookend_time - The time the operation endedfacility - The Remote Manager facility that the operation is a part of. For example: AUTHENTICATION, COMMANDid - The ID of the event. For example: d6cb13a3-2216-11ed-842b-0a6c5efc4b7cip - The IP address associated with the operationjobs - The list of job IDs associated with the operation, if anymodification_type - The type of change associated with the operation. For example: CREATE, UPDATE, DELETEprotocol - The protocol describing how the operation occurred. For example: HTTP, EDP, KAFKA.request_size - The size of the request payload associated with the operationresponse_size - The size of the response payload associated with the operationsource - The source of the operation. For example: /ws/scistart_time - The time the operation startedsuccess - Boolean indicating if the operation was successfultarget - The target object for the operation. For example: a device ID like 00000000-00000000-0040FFFF-FF8001B0target_type - The type of object for the target of the operation. For example: DEVICEuser - The user (or device) that did the operation
Parameters
Parameters for the v1/events/inventory and v1/events/bulk APIs include the following:
Unlike other APIs, the orderby parameter cannot be specified. The event logs are strictly ordered from newest to oldest in the event log storage engine. Sort the events on the client side after retrieving the pagest of events.
| Name |
Type |
Description |
| cursor |
string |
If a full page is returned and more events are available a cursor value is returned in the full page. The cursor parameter can be used to continue with the same query parameters and fetch the next page. For example, cursor=d7eec0d4-557a-11e9-ab8e-d20bcc91db8a |
| end_time |
timestamp or relative time |
Retrieve events occurring only before the specified time |
| fields |
string |
Comma-separated list of fields to return for bulk API |
| query |
string |
The Remote Manager query language query condition used to filter results |
| size |
integer |
Number of items to return. The maximum and default is 1000. |
| start_time |
timestamp or relative time |
Retrieve events occurring only after the specified time |
Time parameters
The start_time and end_time parameters can be one of:
- A timestamp specified as an ISO time format in UTC. For example:
2019-01-29T13:48:49Z
- A timestamp value specified in milliseconds since the epoc in UTC. For example: 2019-01-29T13:48:49Z is specified as
1548769729000
- A timestamp specified using a relative time shortcut as described below. For example, to see events between 1 and 2 hours ago, specify
start_time=-2h and end_time=-1h
Relative timestamp shortcuts
A timestamp shortcut can be used to specify a time in the past relative to the time when the API is called. For example -1h represents objects from 1 hour ago. The relative times are not adjusted for the timezones or daylight saving time they represent. For example -1d is always exactly 24 hours ago.
-30s - 30 seconds ago-15m - 15 minutes ago-4h - 4 hours ago-3d - 3 days ago (exactly 72 hours)-2w - 2 weeks ago (exactly 14 days)+30s - 30 seconds from now+15m - 15 minutes from now
v1/files
Use the v1/files API to manage files.
URI
https://<hostname>/ws/v1/files
| HTTP method |
Format |
Description |
Parameters |
| GET |
/ws/v1/files |
Get a summary of the /ws/v1/files APIs. |
|
| GET |
/ws/v1/files/bulk/{fileset} |
Export file data in CVS format for the specified fileset. |
|
| GET, POST, DELETE |
/ws/v1/files/inventory/{fileset}/{filepath} |
Create, get, or delete files. |
|
| GET |
/ws/v1/files/sets/bulk |
Export a list of files in CVS format. |
|
| GET |
/ws/v1/files/sets/inventory |
|
|
| DELETE |
/ws/v1/files/sets/inventory/{fileset} |
|
|
| GET, POST |
/ws/v1/files/inventory/{fileset} |
|
|
v1/firmware
Use the v1/firmware API to list, search, and download Digi device firmware and modem firmware.
You can also use the v1/firmware API to create, list, update or remove custom firmware.
This can be useful in products where Digi does not provide firmware or if you want to provide your own firmware and use it the same way as other Digi firmware, even in Automations or Configurations.
Info
Each user can store up to 10 GB of custom firmware. After reaching this limit, you will not be allowed to upload more custom firmware until you delete any image. If you need more space, please contact a Digi representative.
Some notes about these APIs:
- Some of these APIs are available to an un-authenticated caller, other APIs require authentication or have features which require authentication. For example, setting the
include_non_production parameter to true, requires that you have the permission to view non-production firmware, so an authenticated call is required.
- These APIs are also available using the
firmware.devicecloud.com hostname. It is recommended you use the firmware.devicecloud.com hostname to access these APIS. Using this hostname will isolate you from future changes in firmware hosting infrastructure.
- The APIs for fetching firmware often redirect to another location. You should follow the redirect to get the firmware image.
- The APIs for listing firmware often return a secure, signed and expiring link. You can safely share this link to download the firmware image, but the link will usually expire in 24 hours.
URI
https://<hostname>/ws/v1/firmware
| HTTP method |
Format |
Description |
Authentication Required |
Required Parameter |
Parameters |
| GET |
/ws/v1/firmware |
Get summary of the device APIs. |
Yes |
|
|
| GET |
/ws/v1/firmware/download/{model_name}/{firmware_version}/{filename} |
Download the firmware image. |
No |
|
|
| GET |
/ws/v1/firmware/inventory |
List Digi device firmware, custom firmware or modem firmware. |
Yes |
|
size query cursor orderby firmware_type device_filtered |
| GET |
/ws/v1/firmware/inventory/{vendor_id} |
List firmware of the given internal device type |
No |
device_type_internal |
size query cursor orderby firmware_type device_filtered device_type_internal firmware_version artifact_id get_all_artifacts include_non_production include_deprecated production deprecated filename information_link security_related sha_512 sha3_512 shared |
| GET, POST, PUT, DELETE |
/ws/v1/firmware/inventory/{vendor_id}/{device_type} |
List firmware and create, update or delete custom firmware. |
No |
Various depending on method |
firmware_version artifact_id get_all_artifacts include_non_production include_deprecated device_type_internal production deprecated filename information_link security_related sha_512 sha3_512 shared |
| POST |
/ws/v1/firmware/inventory_with_list |
List firmware of the given vendor IDs and device types. |
No |
|
size cursor include_non_production include_deprecated |
| GET |
/ws/v1/firmware/list |
List only the firmware version numbers available for the model |
No |
model_name |
production deprecated |
| GET |
/ws/v1/firmware/{version} |
Get firmware information for a specific version and model name. |
No |
model_name |
|
| GET |
/ws/v1/firmware/{version}/firmware_url |
Return a limited set of info about firmware, including the URL |
No |
model_name |
|
Payloads
The inventory_with_list API accepts a payload to filter the returned list. Specify one or more vendor IDs and device types to filter the list. The payload is a JSON array of objects with the following fields:
[{
    "vendor_id": "FE00000A",
    "device_type": "Digi EX15"
},
{
  "vendor_id": "FE00000A",
  "device_type": "Digi TX64"
}]
Path Parameters
These parameters are required in the URL path of some API calls.
| Name |
Type |
Description |
| device_type |
string |
The device type of the firmware. Requires encoding special characters (link blanks) correctly. |
| filename |
string |
Usually optional, but might be required for the client calling the API so that the file can be saved locally. |
| model_name |
string |
Usually the same as the device type, but requires representing blanks as a slash (/) character, creating a new URL path component. For example: GET https://firmware.devicecloud.com/ws/v1/firmware/download/Digi/EX15/22.11.48.10/test.bin where Digi EX15 is the model name |
| vendor_id |
string |
The vendor ID of the firmware in hex. For example, Devices running DAL OS usually have a vendor ID of FE00000A, so the list request is GET https://firmware.devicecloud.com/ws/v1/firmware/inventory/FE00000A/Digi%20TX64 |
Parameters
| Name |
Type |
Description |
| size |
integer |
Number of items to return. The maximum and default is 1000. |
| query |
string |
The Remote Manager query language query condition used to filter results. See v1 API Query Language. |
| cursor |
string |
Cursor to get the next page of devices. Omit on initial call. |
| orderby |
string |
Specify any field described in the query parameter syntax. Optionally add asc or desc to control the sort order. For example, to order with most recently created jobs first, specify orderby=id desc. Note The default sort order is desc (descending). |
| firmware_type |
string |
Specify the type of the firmware to get: device (Digi device firmware), custom (customer uploaded firmware) or modem (modem firmware). If no type is provided, it defaults to device. |
| device_type_internal |
string |
The hex value representing the XBee hardware version. Usually this is just the upper byte of the hardware version |
| device_filtered |
boolean |
true to only get firmware that match the vendor ID and device type of the devices added to your account, false to get all firmware. It defaults to false. |
| firmware_version |
string |
The version of the firmware following the format X.X.X.X (X between 0 and 255). |
| artifact_id |
string |
The artifact ID of the firmware. Do not specify the artifact ID for the main firmware image, that is, the image that will be sent to the device. |
| get_all_artifacts |
boolean |
true to get all artifacts for each firmware version, false to only get the main image. It defaults to false. |
| include_non_production |
boolean |
true to include non-production firmware in the list, false to only get production firmware. It defaults to false. Your account must be enabled to view non-production (pre-release) firmware. Contact customer support for more info. |
| include_deprecated |
boolean |
true to include deprecated firmware in the list, false to only get non-deprecated firmware. It defaults to false. Your account must be enabled to view deprecated (removed from public) firmware. Contact customer support for more info. |
| device_type_internal |
integer |
The device type internal (hardware version) of the firmware, from 0x00 to 0xFF. Only applicable for XBee firmware. |
| production |
boolean |
true to mark the firmware as production, false to mark it as non-production. It defaults to true. |
| deprecated |
boolean |
true to mark the firmware as deprecated, false to mark it as non-deprecated. It defaults to false. |
| filename |
string |
The filename of the firmware. If no filename is provided, <device_type>-<firmware_version>.bin is used. |
| information_link |
string |
URL of the firmware release notes. |
| security_related |
string |
The CVSS score of the firmware: not-identified, none, low, medium, high or critical. |
| sha_512 |
string |
The SHA-512 of the firmware. If no SHA-512 is provided, it is calculated automatically. |
| sha3_512 |
string |
The SHA3-512 of the firmware. If no SHA3-512 is provided, it is calculated automatically. |
| shared |
string |
A comma-separated list of subaccount customer IDs to share the custom firmware with. It can also be all to share the firmware with all subaccounts. If no shared is provided, the firmware is not shared with any subaccount. |
Create custom firmware
The following sample request creates a new custom firmware that can be used later to update any devices in your account that match the firmware’s vendor ID and device type.
Request
POST /ws/v1/firmware/inventory/{vendor_id}/{device_type}?firmware_version={firmware_version}&information_link={information_link}&security_related={security_related}
Parameters
| Name |
Type |
Mandatory |
Description |
| vendor_id |
hex string |
Yes |
The vendor ID of the firmware (for example: FE00000A). It must be one of the Digi system vendor IDs or the custom vendor ID registered in your account. |
| device_type |
string |
Yes |
The device type of the firmware. |
| firmware_version |
string |
Yes |
The version of the firmware following the format X.X.X.X (X between 0 and 255). |
| information_link |
string |
Yes |
URL of the firmware release notes. |
| security_related |
string |
Yes |
The CVSS score of the firmware: not-identified, none, low, medium, high or critical. |
| artifact_id |
string |
No |
The artifact ID of the firmware. Do not specify the artifact ID for the main firmware image, that is, the image that will be sent to the device. |
| device_type_internal |
integer |
No |
The device type internal (hardware version) of the firmware, from 0x00 to 0xFF. Only applicable for XBee firmware. |
| production |
boolean |
No |
true to mark the firmware as production, false to mark it as non-production. It defaults to true. |
| deprecated |
boolean |
No |
true to mark the firmware as deprecated, false to mark it as non-deprecated. It defaults to false. |
| filename |
string |
No |
The filename of the firmware. If no filename is provided, <device_type>-<firmware_version>.bin is used. |
| sha_512 |
string |
No |
The SHA-512 of the firmware. If no SHA-512 is provided, it is calculated automatically. |
| sha3_512 |
string |
No |
The SHA3-512 of the firmware. If no SHA3-512 is provided, it is calculated automatically. |
| shared |
string |
No |
A comma-separated list of subaccount customer IDs to share the custom firmware with. It can also be all to share the firmware with all subaccounts. If no shared is provided, the firmware is not shared with any subaccount. |
| download_allowed |
boolean |
No |
true to allow subaccounts to download the firmware, false to disallow it. It defaults to true. This option is used to restrict the download, not the use to update devices. The firmware must be shared with at least one subaccount to use it. |
Payload
The request body must be the firmware binary file (setting the Content-Type header to application/octet-stream) or the firmware content encoded in base64.
Response
{
    "location": "https://remotemanager.digi.com/ws/v1/firmware/image/343236313933373135350a444559206465766963650a38333838363038300a0a0a0a313638313733353137313638380a32",
    "vendor_id": 4261937155,
    "type": "DEY device",
    "firmware_version": "5.0.0.0",
    "file_size": 45223,
    "production": true,
    "deprecated": false,
    "filename": "DEYdevice-5.0.0.0.bin",
    "information_link": "https://www.digi.com",
    "security_related": "none",
    "sha_512": "861844d6704e8573fec34d967e20bcfef3d424cf48be04e6dc08f2bd58c729743371015ead891cc3cf1c9d34b49264b510751b1ff9e537937bc46b5d6ff4ecc8",
    "sha3_512": "32400b5e89822de254e8d5d94252c52bdcb27a3562ca593e980364d9848b8041b98eabe16c1a6797484941d2376864a1b0e248b0f7af8b1555a778c336a5bf48",
    "firmware_status": "up_to_date",
    "customer_id": 2
}
List custom firmware
The following sample request lists all firmware for the provided vendor ID and device type.
Note that this request includes both Digi device firmware and custom device firmware. Custom firmware includes the customer_id parameter in the response, while Digi firmware does not.
Request
GET /ws/v1/firmware/inventory/{vendor_id}/{device_type}
Parameters
| Name |
Type |
Mandatory |
Description |
| vendor_id |
hex string |
Yes |
The vendor ID of the firmware (for example: FE00000A). |
| device_type |
string |
Yes |
The device type of the firmware. |
| firmware_version |
string |
No |
The version of the firmware. |
| artifact_id |
string |
No |
The artifact ID of the firmware. Do not specify the artifact ID for the main firmware image, that is, the image that will be sent to the device. |
| get_all_artifacts |
boolean |
No |
true to get all artifacts for each firmware version, false to only get the main image. It defaults to false. |
| include_non_production |
boolean |
No |
true to include non-production firmware in the list, false to only get production firmware. It defaults to false. |
| include_deprecated |
boolean |
No |
true to include deprecated firmware in the list, false to only get non-deprecated firmware. It defaults to false. |
Response
{
    "count": 2,
    "size": 2,
    "list": [
        {
            "location": "https://com-digi-drm-filedata-prod.s3.amazonaws.com/Forever/prdMy/2/firmware/fe080003-DEY.device-1.0.0.1.3c0eed65-02d8-4096-891f-29cbec8c42e1?response-content-disposition=attachment%3B%20filename%3D%221.0.0.1.swu%22&X-Amz-Algorithm=AWS4-HMAC-SHA256&X-Amz-Date=20230417T145942Z&X-Amz-SignedHeaders=host&X-Amz-Expires=86399&X-Amz-Credential=AKIAIOSFODNN7EXAMPLE%2F20230417%2Fus-east-1%2Fs3%2Faws4_request&X-Amz-Signature=d6973c3e58f51841a4039bb5bfb2d8e5a589cbcd4586c869a3e2ec0547232740",
            "vendor_id": 4261937155,
            "type": "DEY device",
            "firmware_version": "1.0.0.1",
            "file_size": 45456,
            "production": true,
            "deprecated": false,
            "filename": "1.0.0.1.swu",
            "information_link": "https://www.digi.com",
            "security_related": "none",
            "sha_512": "861844d6704e8573fec34d967e20bcfef3d424cf48be04e6dc08f2bd58c729743371015ead891cc3cf1c9d34b49264b510751b1ff9e537937bc46b5d6ff4ecc8",
            "sha3_512": "32400b5e89822de254e8d5d94252c52bdcb27a3562ca593e980364d9848b8041b98eabe16c1a6797484941d2376864a1b0e248b0f7af8b1555a778c336a5bf48",
            "firmware_status": "high",
            "customer_id": 2,
            "shared": "all"
        },
        {
            "location": "https://com-digi-drm-filedata-prod.s3.amazonaws.com/Forever/prdMy/2/firmware/fe080003-DEY.device-1.0.0.0.b1508b02-5158-459b-a4e8-cd9502fd062d?response-content-disposition=attachment%3B%20filename%3D%221.0.0.0.swu%22&X-Amz-Algorithm=AWS4-HMAC-SHA256&X-Amz-Date=20230417T145942Z&X-Amz-SignedHeaders=host&X-Amz-Expires=86399&X-Amz-Credential=AKIAIOSFODNN7EXAMPLE%2F20230417%2Fus-east-1%2Fs3%2Faws4_request&X-Amz-Signature=10f99537672f184b53037d63dfdb976c96f38b481fd94d898e8fa95782a80c2f",
            "vendor_id": 4261937155,
            "type": "DEY device",
            "firmware_version": "1.0.0.0",
            "file_size": 407887,
            "production": true,
            "deprecated": false,
            "filename": "1.0.0.0.swu",
            "information_link": "https://www.digi.com",
            "security_related": "none",
            "sha_512": "861844d6704e8573fec34d967e20bcfef3d424cf48be04e6dc08f2bd58c729743371015ead891cc3cf1c9d34b49264b510751b1ff9e537937bc46b5d6ff4ecc8",
            "sha3_512": "32400b5e89822de254e8d5d94252c52bdcb27a3562ca593e980364d9848b8041b98eabe16c1a6797484941d2376864a1b0e248b0f7af8b1555a778c336a5bf48",
            "firmware_status": "none"
        }
    ]
}
Update custom firmware
The following sample JSON request updates different parameters of a custom firmware.
Request
PUT /ws/v1/firmware/inventory/{vendor_id}/{device_type}?firmware_version={firmware_version}
Parameters
| Name |
Type |
Mandatory |
Description |
| vendor_id |
hex string |
Yes |
The vendor ID of the firmware (for example: FE00000A). |
| device_type |
string |
Yes |
The device type of the firmware. |
| firmware_version |
string |
Yes |
The version of the firmware. |
| artifact_id |
string |
No |
The artifact ID of the firmware. Do not specify the artifact ID for the main firmware image, that is, the image that will be sent to the device. |
| device_type_internal |
integer |
No |
The device type internal (hardware version) of the firmware. Only applicable for XBee firmware. |
Payload
The following parameters are the only ones that can be updated for existing custom firmware. You can use one or several in the same request.
{
    "production": true,
    "deprecated": false,
    "information_link": "https://www.digi.com",
    "security_related": "not-identified",
    "shared": "1532,1533,1534",
    "download_allowed": "true"
}
| Name |
Type |
Description |
| production |
boolean |
true to mark the firmware as production, false to mark it as non-production. |
| deprecated |
boolean |
true to mark the firmware as deprecated, false to mark it as non-deprecated. |
| information_link |
string |
URL of the firmware release notes. |
| security_related |
string |
The CVSS score of the firmware: not-identified, none, low, medium, high or critical. |
| shared |
string |
A comma-separated list of subaccount customer IDs to share the custom firmware with. It can also be all to share the firmware with all subaccounts. If no shared is provided, the firmware is not shared with any subaccount. |
| download_allowed |
boolean |
true to allow subaccounts to download the firmware, false to disallow it. It defaults to true. This option is used to restrict the download, not the use to update devices. The firmware must be shared with at least one subaccount to use it. |
Response
{
    "location": "https://com-digi-drm-filedata-prod.s3.amazonaws.com/Forever/prdMy/2/firmware/fe080003-DEY.device-5.0.0.0.b1508b02-5158-459b-a4e8-cd9502fd062d?response-content-disposition=attachment%3B%20filename%3D%225.0.0.0.swu%22&X-Amz-Algorithm=AWS4-HMAC-SHA256&X-Amz-Date=20230417T145942Z&X-Amz-SignedHeaders=host&X-Amz-Expires=86399&X-Amz-Credential=AKIAIOSFODNN7EXAMPLE%2F20230417%2Fus-east-1%2Fs3%2Faws4_request&X-Amz-Signature=10f99537672f184b53037d63dfdb976c96f38b481fd94d898e8fa95782a80c2f",
    "vendor_id": 4261937155,
    "type": "DEY device",
    "firmware_version": "5.0.0.0",
    "file_size": 45223,
    "production": true,
    "deprecated": false,
    "filename": "DEYdevice-5.0.0.0.bin",
    "information_link": "https://www.digi.com",
    "security_related": "not-identified",
    "sha_512": "861844d6704e8573fec34d967e20bcfef3d424cf48be04e6dc08f2bd58c729743371015ead891cc3cf1c9d34b49264b510751b1ff9e537937bc46b5d6ff4ecc8",
    "sha3_512": "32400b5e89822de254e8d5d94252c52bdcb27a3562ca593e980364d9848b8041b98eabe16c1a6797484941d2376864a1b0e248b0f7af8b1555a778c336a5bf48",
    "firmware_status": "up_to_date",
    "customer_id": 2,
    "shared": "1532,1533,1534",
    "download_allowed": "true"
}
Delete custom firmware
The following sample request deletes a custom firmware.
Request
DELETE /ws/v1/firmware/inventory/{vendor_id}/{device_type}?firmware_version={firmware_version}
Parameters
| Name |
Type |
Mandatory |
Description |
| vendor_id |
hex string |
Yes |
The vendor ID of the firmware (for example: FE00000A). |
| device_type |
string |
Yes |
The device type of the firmware. |
| firmware_version |
string |
Yes |
The version of the firmware. |
| artifact_id |
string |
No |
The artifact ID of the firmware. Do not specify the artifact ID for the main firmware image, that is, the image that will be sent to the device. |
Response
This request does not return a response unless there is an error.
Firmware Security
Use the v1/firmware/security API to analyze your custom firmware for CVE vulnerabilities and get security reports.
Info
The Firmware Security API applies only to Digi ConnectCore firmware. To use it, you need a subscription to Digi ConnectCore Security Services. For more details and available plans, see the ConnectCore Security Services page.
URI
https://<hostname>/ws/v1/firmware/security
| HTTP method |
Format |
Description |
Parameters |
Body |
| POST |
/ws/v1/firmware/security/inventory/{vendor_id}/ {device_type}/{firmware_version} |
Creates an SBOM for the given firmware version |
scan_frequency production email_notification |
SBOM manifest package binary file as ‘application/octet-stream’ |
| GET |
/ws/v1/firmware/security/inventory |
Gets a list of all firmware SBOMs |
size query cursor orderby |
|
| GET |
/ws/v1/firmware/security/inventory/{vendor_id}/ {device_type}/{firmware_version} |
Gets the SBOM for the given firmware version |
|
|
| PUT |
/ws/v1/firmware/security/inventory/{vendor_id}/ {device_type}/{firmware_version} |
Updates the SBOM for the given firmware version |
|
JSON with one or multiple of: ‘scan_frequency’, ‘production’, ’email_notification’ |
| DELETE |
/ws/v1/firmware/security/inventory/{vendor_id}/ {device_type}/{firmware_version} |
Deletes the SBOM for the given firmware version |
|
|
| POST |
/ws/v1/firmware/security/scans/inventory/ {vendor_id}/{device_type}/{firmware_version} |
Scans the given firmware version for vulnerabilities |
|
|
| GET |
/ws/v1/firmware/security/scans/inventory/ {vendor_id}/{device_type}/{firmware_version} |
Gets a list of all scans for the given firmware version |
size query cursor orderby |
|
| GET |
/ws/v1/firmware/security/report/{vendor_id}/ {device_type}/{firmware_version}/{latest | scan_id} |
Gets the latest (or specific) security report for the given firmware version |
format |
|
| GET |
/ws/v1/firmware/security/subscription |
Gets the current subscription details and remaining scans |
|
|
| GET |
/ws/v1/firmware/security/cve/inventory |
Gets a list of all custom CVE statuses |
size query cursor orderby |
|
| GET |
/ws/v1/firmware/security/cve/inventory/ {vendor_id}/{device_type}/{cve_id}/{package} |
Gets the latest custom status for the given CVE and package |
|
|
| POST |
/ws/v1/firmware/security/cve/inventory/ {vendor_id}/{device_type}/{cve_id}/{package} |
Creates or updates a custom status for the given CVE and package |
|
JSON with ‘scan_id’ and one or multiple of: ‘status’, ‘score’, ‘additional_details’ |
| GET |
/ws/v1/firmware/security/cve/history/ {vendor_id}/{device_type}/{cve_id}/{package} |
Gets the history of custom statuses for the given CVE and package |
size query cursor orderby |
|
Path Parameters
These parameters are required in the URL path of some API calls.
| Name |
Type |
Description |
| vendor_id |
string |
The vendor ID of the firmware in hex. For example, ConnectCore devices usually have a vendor ID of FE080003. |
| device_type |
string |
The device type of the firmware. Requires encoding special characters (link blanks) correctly. |
| firmware_version |
string |
The version of the firmware in dotted format (XX.XX.XX.XX) |
| latest | scan_id |
string |
Use latest to get the latest report, or provide a specific scan ID to get that report. |
| cve_id |
string |
The CVE identifier, e.g., CVE-2023-12345. |
| package |
string |
The package name affected by the CVE, e.g., libssl. |
Parameters
| Name |
Type |
Description |
| size |
integer |
Number of items to return. The maximum and default is 1000. |
| query |
string |
The Remote Manager query language query condition used to filter results. See v1 API Query Language. |
| cursor |
string |
Cursor to get the next page of devices. Omit on initial call. |
| orderby |
string |
Specify any field described in the query parameter syntax. Optionally add asc or desc to control the sort order. For example, to order with most recently created jobs first, specify orderby=id desc. Note The default sort order is desc (descending). |
| scan_frequency |
string |
How often to scan the firmware for vulnerabilities. One of: weekly, monthly, quarterly or manual. Default is manual. |
| production |
boolean |
Whether this firmware is used in production. If true, the SBOM cannot be overwritten. Default is false. |
| email_notification |
boolean |
Whether to send an email notification when a scan is completed. Default is false. |
| format |
string |
The format of the security report. So far, only pdf is available. If not specified, the report is returned in JSON format. |
| status |
string |
The custom status for the CVE. One of: fixed, resolved with pedigree, affected, in triage, false positive or not_affected. |
| score |
decimal |
The custom CVE score (0.0 - 10.0). |
| additional_details |
string |
Additional details about the custom CVE status. |
v1/firmware_updates
Use the v1/firmware_updates API to update the firmware of your devices and check their status.
URI
https://<hostname>/ws/v1/firmware_updates
| HTTP method |
Format |
Description |
Parameters |
| GET |
/ws/v1/firmware_updates |
Get a summary of the /ws/v1/firmware_updates APIs. |
|
| GET, POST |
/ws/v1/firmware_updates/inventory |
Get a list of latest firmware updates for all devices or run a new firmware update. |
orderby cursor size query |
| GET |
/ws/v1/firmware_updates/inventory/{device_id} |
Get the latest firmware update for a device. |
|
| GET, DELETE |
/ws/v1/firmware_updates/history/{device_id} |
Get a list of all firmware updates for a device or delete them. |
cursor size |
| GET |
/ws/v1/firmware_updates/progress/{device_id} |
Get the progress information of the latest firmware update for a device. |
|
| POST |
/ws/v1/firmware_updates/cancel/{device_id} |
Cancel the current firmware update for a device. |
|
Parameters
| Name |
Type |
Description |
| size |
integer |
Number of items to return. The maximum and default is 1000. |
| query |
string |
The Remote Manager query language query condition used to filter results. See v1 API Query Language. |
| cursor |
string |
Cursor to get the next page of devices. Omit on initial call. |
| orderby |
string |
Specify any field described in the query parameter syntax. Optionally add asc or desc to control the sort order. For example, to order with most recently created jobs first, specify orderby=id desc. Note The default sort order is desc (descending). |
List firmware update
The following sample request obtains the details of the latest firmware update of a device.
Request
GET /ws/v1/firmware_updates/inventory/00000000-00000000-0040FFFF-FF654321
Response
{
    "id": 1,
    "device_id": "00000000-00000000-0040FFFF-FF654321",
    "customer_id": 1977,
    "start_time": "2021-02-22T09:58:40.070Z",
    "end_time": "2021-02-22T10:02:54.020Z",
    "status": "failed",
    "version": "17.4.1.7",
    "error_message": "Device Not Connected"
}
The response contains the following properties:
- id - Unique identifier of the firmware update.
- device_id - Unique identifier of the device associated to the firmware update.
- custormer_id - Unique customer ID for the Remote Manager customer.
- start_time - Time at which the firmware update started.
- end_time - Time at which the firmware update ended.
- status - The status of the firmware update process. One of:
- active
- waiting
- successful
- failed
- canceled
- starting
- version - Firmware version being applied in the firmware update process.
- file - File used to update the device in case a file was used instead of a version.
- error_message - If the status of the firmware update is failed or canceled, this field contains information about the error.
Run firmware update
Single Device
The following sample request executes a firmware update on the provided device.
Request
POST /ws/v1/firmware_updates/inventory
Payload
{
    "targets": {
        "devices": [
            "00000000-00000000-0040FFFF-FF123456"
        ]
    },
    "version": "17.4.1.7"
}
Single Group
The following sample request executes a firmware update on the provided group.
Request
POST /ws/v1/firmware_updates/inventory
Payload
{
    "targets": {
        "groups": [
            "group1"
        ]
    },
    "version": "17.4.1.7"
}
Request payload
To execute a new firmware update, include the following elements in the body of your POST request:
- targets - Specifies the devices to be updated. If multiple elements are provided, they are combined using an OR operation. This means that if you include both tags and groups, devices that belong to the specified group OR have the specified tag will be updated.
They can be specified with the following elements:
- devices - List with the IDs of the devices to update.
- tags - List with the tag names the devices to update are labeled with.
- groups - List with the name of the groups containing the devices to update.
- version - The firmware version to use for the update.
- file - The name of the file from a fileset to use for the update.
Info
You can mix devices, tags and groups elements in the same request, but only one of version or file must be specified.
Response
{
    "count": 3,
    "size": 1000,
    "list": [
        {
            "device_id": "00000000-00000000-0040FFFF-FF123456",
            "error": "Invalid target. Device not found"
        },
        {
            "device_id": "00000000-00000000-0040FFFF-FF654321",
            "id": 1
        },
        {
            "device_id": "00000000-00000000-0040FFFF-FF112233",
            "id": 2
        }
    ]
}
Get firmware update progress
The following sample request gets the update progress of the latest firmware update of a device.
Request
GET /ws/v1/firmware_updates/progress/00000000-00000000-0040FFFF-FF112233
Response
{
    "id": 2,
    "customer_id": 1977,
    "device_id": "00000000-00000000-0040FFFF-FF112233",
    "progress": [
        {
            "status": 0,
            "time": "2021-02-22T09:58:40.070Z",
            "message": "Getting Target Info"
        },
        {
            "status": 0,
            "time": "2021-02-22T09:58:41.070Z",
            "message": "Sending Download Request"
        },
        {
            "status": 5,
            "time": "2021-02-22T09:58:42.070Z",
            "message": "Sending Data: 23552 out of 461657 bytes sent"
        },
        {
            "status": 10,
            "time": "2021-02-22T09:58:59.070Z",
            "message": "Sending Data: 47104 out of 461657 bytes sent"
        }
    ]
}
The response contains the following properties:
- id - Unique identifier of the firmware update progress.
- custormer_id - Unique customer ID for the Remote Manager customer.
- device_id - Unique identifier of the device associated to the firmware update progress.
- progress - List containing the different progress entries of the firmware update. Each entry is defined by the following elements:
- status - Total update progress percentage completed with the entry.
- time - Date at which the progress entry was generated.
- message - Message containing progress entry information.
Cancel firmware update
The following sample request cancels the firmware update running on a device.
Request
POST /ws/v1/firmware_updates/cancel/00000000-00000000-0040FFFF-FF112233
Response
This request does not return a response unless there is an error.
v1/groups
Use the v1/groups API to create, update, list, or remove groups.
URI
http://<hostname>/ws/v1/groups
| HTTP method |
Format |
Description |
Parameters |
| GET |
/ws/v1/groups |
Get summary of the groups APIs. |
None |
| GET |
/ws/v1/groups/inventory |
Get a list of groups. |
orderby query |
| POST |
/ws/v1/groups/inventory/path |
Create a new group. |
path description |
| PUT |
/ws/v1/groups/inventory/path |
Change the name of a group. |
None |
| DELETE |
/ws/v1/groups/inventory/path |
Remove one or more groups and subgroubs. |
move_devices remove_subgroups |
Parameters
path
Full path for the group, including the group name.
description
Text description of the group.
move_devices
Specify whether to remove devices in the group being deleted. If you do not remove devices, any existing devices within the removed group are moved to the root group. If you delete devices, devices in removed groups are removed from your device inventory. The default is no.Text description of the group.
v1/health_configs
Use the v1/health_configs API to get a list of health configurations for your account, as well as modify or delete a health configuration.
URI
http://<hostname>/ws/v1/health_configs
| HTTP Method |
Format |
Description |
| GET |
/ws/v1/health_configs |
Get a summary of the health_configs APIs. |
| GET |
/ws/v1/health_configs/inventory |
Get a list of all health configurations in your inventory. |
| GET, PUT, DELETE |
/ws/v1/health_configs/inventory/{id} |
Get, modify, or delete a named health configuration. |
Fields
id
System-generated identifier for the device type to which the health_config applies.
Parameters
| Name |
Type |
Description |
| cursor |
string |
Cursor to get the next page of health configurations. Omit on initial call. |
| size |
integer |
Number of items to return. The maximum and default is 1000. |
| replace |
boolean |
Boolean value that indicates whether to replace the current report configuration.True or Yes: Replace the current report configuration.False or No: Update the existing report configuration with changes. |
List Health Configurations
The following example shows how to get a list of all health configurations for your account.
Request
/ws/v1/health_configs/inventory
Response
Note Because each device health configuration applies to a single device type and itself, defines many rules and thresholds for multiple health metrics, the full output is not shown here. To see the full output, go to Documentation > API Explorer and send the v1/health_configs/List all health configs to see details for all health configurations and corresponding metrics on your system.
{
    "count": 8,
    "list": [
        {
            "customer_id": 57639,
            "enabled": true,
            "id": "FE00000A/DIGI TX64",
            "last_modified": "2022-04-06T23:21:23.246Z",
            "rules": [
                {
                    "categories": [
                        "Device"
                    ],
                    "description": "Internal temperature of system CPU core (Celsius) during the sample period",
                    "enabled": true,
                    "name": "Temperature (Core)",
                    "stream": "DataPoint/*/metrics/sys/core_temperature",
                    "threshold": {
                        "error": {
                            "ranges": [
                                {
                                    "lower": 70,
                                    "lower_bound_type": "CLOSED",
                                    "upper_bound_type": "CLOSED"
                                }
                            ]
                        },
                        "normal": {
                            "ranges": [
                                {
                                    "lower_bound_type": "CLOSED",
                                    "upper": 60,
                                    "upper_bound_type": "CLOSED"
                                }
                            ]
                        },
                        "warning": {
                            "ranges": [
                                {
                                    "lower": 60,
                                    "lower_bound_type": "OPEN",
                                    "upper": 70,
                                    "upper_bound_type": "OPEN"
                                }
                            ]
                        }
                    },
                    "type": "FLOAT",
                    "units": "Celsius"
                },
                {
                    "categories": [
                        "Device"
                    ],
                    "description": "Percentage of CPU used during the sample period",
                    "enabled": true,
                    "name": "CPU used",
                    "stream": "DataPoint/*/metrics/sys/cpu/used",
                    "threshold": {
                        "error": {
                            "ranges": [
                                {
                                    "lower": 95,
                                    "lower_bound_type": "CLOSED",
                                    "upper_bound_type": "CLOSED"
                                }
                            ]
                        },
                        "normal": {
                            "ranges": [
                                {
                                    "lower_bound_type": "CLOSED",
                                    "upper": 90,
                                    "upper_bound_type": "CLOSED"
                                }
                            ]
                        },
                        "warning": {
                            "ranges": [
                                {
                                    "lower": 90,
                                    "lower_bound_type": "OPEN",
                                    "upper": 95,
                                    "upper_bound_type": "OPEN"
                                }
                            ]
                        }
                    },
                    "type": "FLOAT",
                    "units": "%"
                },
                {
                    "categories": [
                        "Device"
                    ],
                    "description": "Percentage of memory used during the sample period",
                    "enabled": true,
                    "name": "Memory used",
                    "stream": "DataPoint/*/metrics/sys/mem/used",
                    "threshold": {
                        "error": {
                            "ranges": [
                                {
                                    "lower": 95,
                                    "lower_bound_type": "CLOSED",
                                    "upper_bound_type": "CLOSED"
                                }
                            ]
                        },
                        "normal": {
                            "ranges": [
                                {
                                    "lower_bound_type": "CLOSED",
                                    "upper": 90,
                                    "upper_bound_type": "CLOSED"
                                }
                            ]
                        },
                        "warning": {
                            "ranges": [
                                {
                                    "lower": 90,
                                    "lower_bound_type": "OPEN",
                                    "upper": 95,
                                    "upper_bound_type": "OPEN"
                                }
                            ]
                        }
                    },
                    "type": "FLOAT",
                    "units": "%"
                }
                ...etc..
            ]
        },
      ...etc...
    ],
    "size": 1000
}
Get a Single Health Config
The following example shows how to get the health configuration FE00000A/Digi TX64 :
/ws/v1/health_configs/inventory/FE000002/Digi%20TX64
Response
{
    "customer_id": 57639,
    "enabled": true,
    "id": "FE00000A/DIGI TX64",
    "last_modified": "2022-04-06T23:21:23.246Z",
    "rules": [
        {
            "categories": [
                "mobile rx/tx"
            ],
            "description": "Mobile Network: number of bytes received on all interfaces during the sample period",
            "enabled": false,
            "name": "All mobile bytes received",
            "stream": "DataPoint/*/metrics/all/cellular/rx/bytes",
            "threshold": {
                "error": {
                    "ranges": [
                        {
                            "lower": 129600000000,
                            "lower_bound_type": "CLOSED",
                            "upper_bound_type": "CLOSED"
                        }
                    ]
                },
                "normal": {
                    "ranges": [
                        {
                            "lower_bound_type": "CLOSED",
                            "upper": 115200000000,
                            "upper_bound_type": "CLOSED"
                        }
                    ]
                },
                "warning": {
                    "ranges": [
                        {
                            "lower": 115200000000,
                            "lower_bound_type": "OPEN",
                            "upper": 129600000000,
                            "upper_bound_type": "OPEN"
                        }
                    ]
                }
            },
            "type": "LONG",
            "units": "bytes"
        },
      ...etc...
    ]
}
Disable Health Config
Using the HTTP PUT method, the following example shows how to disable the health configuration FE00000A/Digi TX64.
Request
/ws/v1/health_configs/inventory/FE00000A/Digi%20TX64
Payload
Edit a Health Config
The following example shows how to change an existing Transport WR11 health configuration.
Request
/ws/v1/health_configs/inventory/FE000002/TRANSPORT WR11
{
  "id": "FE000002/TRANSPORT WR11",
  "enabled": true,
  "rules":[
    {
      "enabled":true,
      "stream":"DataPoint/*/metrics/sys/mem/free",
      "threshold":{
        "error":{
          "ranges":[
            {
              "upper":150000
            }
          ]
        },
        "warning":{
          "ranges":[
            {
              "lower":150000,
              "upper":700000,
              "lower_bound_type":"OPEN",
              "upper_bound_type":"OPEN"
            }
          ]
        },
        "normal":{
          "ranges":[
            {
              "lower":700000
            }
          ]
        }
      }
    }
  ]
}
Response
Note Because each device health configuration defines thresholds for multiple health metrics, the output is not shown here. To see sample output, go to Documentation > API Explorer and send the v1/health_configs/Change a health config to see sample results.
v1/jobs
Use the v1/jobs API to list, cancel, or delete jobs in an account.
URI
http://<hostname>/ws/v1/jobs
| Method |
Formats |
Description |
| GET |
/ws/v1/jobs |
Get a summary of the jobs API. |
| GET |
/ws/v1/jobs/inventory |
Get a list of all jobs. |
| GET |
/ws/v1/jobs/inventory.xml |
Get a list of all jobs in XML format. |
| GET |
/ws/v1/jobs/bulk |
Retrieve a list of jobs in CSV format. |
| GET |
/ws/v1/jobs/{job_id} |
Retrieve a job |
| PUT |
/ws/v1/jobs/cancel{job_id} |
Cancel one or more jobs. |
| PUT |
/ws/v1/jobs/inventory/cancel?query=username=’{username}' |
Cancel one or more jobs for a user. |
| DELETE |
/ws/v1/jobs/inventory/{id} |
Delete a job. |
| DELETE |
/ws/v1/jobs/cancel?query=job_type=’{job_type}' |
Delete one or more jobs by job type. |
Parameters
| Name |
Description |
| orderby |
Specify any field described in the query parameter syntax. Optionally add ‘asc’ or ‘desc’ to control the sort order. For example, to order with most recently created jobs first, specify orderby=id desc.Note The default sort order is desc (descending). |
| fields |
Comma-separated list of fields to return for bulk API |
| query |
Specify the jobs query to evaluate. See v1 API Query Language. |
| cursor |
|
| size |
|
Query fields
- carrier/carrier2—the current provider of the primary or secondary cellular service
- connection_status—one of ‘connected’ or ‘disconnected’
- contact—any user contact information
- description—any description associated with the device
- firmware_version—the firmware level
- health_status—one of ’normal’, ‘warning’, ’error’ or ‘unknown’
- id—the device ID
- ip—the last known IP address of the device
- last_connect—last connect time of the device
- last_disconnect—last disconnect time of the device
- last_update—last update time of the device
- location—the device location
- mac - the MAC address
- name - the device name
- network/network2—the current network (for example LTE) of the primary or secondary cellular service
- notes—device notes, also sometimes referred to as user meta data)
- public_ip—the last known global IP address of the device
- restricted_status—one of ‘unrestricted’, ‘restricted’, ‘disabled’, ‘untrusted’
- serial_number—the device serial number
- signal_percent/signal_percent2—the percent of signal strength from 0 to 100 primary or secondary cellular service
- signal_quality/signal_quality2—the signal quality of the primary or secondary cellular service
- signal_strength/signal_strength2—the signal strength of the primary or secondary cellular service
- type—the device type
- vendor_id—the vendor ID value of the device
Query operators
- =, <>—Equality comparisons, used on any numeric, group, tag, text or enumerated fields
- <, <=, >, >=—Relative comparisons, used on any numeric or text fields. Not used for group, tag or enumerated fields
- startsWith, endsWith, contains—Used on any group, tag or text matching fields. Not used for numeric fields
Timestamp field comparisons are not supported.
Query examples
query=group startsWith '/NorthWest' and (connection_status = 'disconnected' or signal_percent < 20)
Find any devices in the /Northwest group and any subgroups that are either disconnected or have a low signal strength.
query=tags = 'important' and (health_status = 'error' or health_status = 'warning')
Find any devices that have the ‘important’ tag and are in an error or warning health status.
Query full group path, so matches any device in group ‘/test’ and ignores any subgroups.
query=group startsWith 'test/'
Query full group path, so matches any device in the test root group and any subgroups.
query=group startsWith 'test'
Query full group path, so matches any device in any root group whose name starts with ’test’ and all subgroups.
query=group endsWith '/leaf'
Query full group path, so matches any device in any path that ends with the group name ’leaf’.
Matches any device having a tag ‘sensor’.
Matches any device having no tag ‘sensor’.
Matches any device having any tag containing ’ns’.
query=tags startsWith 'sens'
Matches any device having any tag that starts with ‘sens’.
Matches any device having any tag that ends with ‘or’.
v1/location_services
Use the v1/location_services API to retrieve Enhanced Location Services data reported
by the device. A device uploads Enhanced Location Services data only if the
device is subscribed to the service.
The bulk/history API returns at most 20,000 records and sets the Truncated HTTP header if the data is truncated.
Use the start_time and end_time parameters to limit the data returned.
URI
http://<hostname>/ws/v1/location_services
| Method |
Format |
Description |
Parameters |
| GET |
/ws/v1/location_services |
Get a summary of the location_services APIs. |
None |
| GET |
/ws/v1/location_services/bulk/history/{device_id} |
Get historical data for a device in CSV format. |
order start_time end_time timeline fields |
| GET |
/ws/v1/location_services/history/{device_id} |
Get the history for a device. |
order cursor size start_time end_time timeline |
Location Services Fields
id
The location data point identifier
device_id
The device ID
customer_id
The customer ID of the account owning the data
timestamp
Date and time the current value was set.
server_timestamp
Date and time the current value was received.
system_uptime
The device uptime at the time of the data
latitude
The device latitude at the time of the data point
longitude
The device longitude at the time of the data point
altitude
The device altitude at the time of the data point
gps_satellites
The number of GPS satellites used to determine the location
gps_quality
The GPS quality indicator
gps_hdop
The GPS horizontal dilution of precision
modem_name
The first modem’s name
modem_state
The first modem’s state
modem_active_sim
The first modem’s active SIM
modem_bars
The first modem’s bars
modem_band
The first modem’s band
modem_network_technology
The first modem’s network technology
modem_apn
The first modem’s APN
The first modem’s RSSI
modem_rsrq
The first modem’s RSRQ
modem2_name
The second modem’s name (if present)
modem2_state
The second modem’s state (if present)
modem2_active_sim
The second modem’s active SIM (if present)
modem2_bars
The second modem’s bars (if present)
modem2_band
The second modem’s band (if present)
modem2_network_technology
The second modem’s network technology (if present)
modem2_apn
The second modem’s APN (if present)
The second modem’s RSSI (if present)
modem2_rsrq
The second modem’s RSRQ (if present)
Parameters
| Name |
Type |
Description |
| cursor |
string |
Cursor to get the next page of data. Omit on initial call. |
| end_time |
timestamp |
End time (exclusive) in ISO 8601 or epoch (long). |
| fields |
string |
Comma-separated list of fields to return for bulk API |
| order |
string |
Return data ordered by time (asc | desc). The default is ascending (asc). |
| size |
integer |
Number of items to return. The maximum and default is 1000 |
| start_time |
timestamp |
Start time (inclusive) in ISO 8601 or epoch (long). |
| timeline |
string |
Timestamps to use in the request: client or server. The default is client. |
v1/metadata
Use the v1/metadata API to retrieve device descriptors.
URI
https://<hostname>/ws/v1/metadata
| HTTP method |
Format |
Description |
Parameters |
| GET |
/ws/v1/metadata |
Get a summary of the /ws/v1/metatdata APIs. |
|
| GET |
/ws/v1/metadata/device/descriptors/settings/{vendorId}/{deviceType}/{firmwareVersion:.} |
Retrieves (GET) the query_settings descriptor data for a vendor, device type/firmware version. |
product_idfirmware_id |
| GET |
/ws/v1/metadata/device/descriptors/state/{vendorId}/{deviceType}/{firmwareVersion:.} |
Retrieves (GET) the query_state descriptor data for a vendor, device type/firmware version. |
product_idfirmware_id |
| GET |
/ws/v1/metadata/device/descriptors/ui/{vendorId}/{deviceType}/{firmwareVersion:.} |
Retrieves (GET) ui descriptor data for a vendor, device type/firmware version. |
product_idfirmware_idallow_fallback |
v1/monitors
Use the v1/monitors API to monitor Remote Manager activity and push notifications to a client application. Each configured monitor specifies the Remote Manager events or activities to monitor, the notification mechanism, and the transport type (tcp, http or polling).
For a practical tutorial with monitors, see Tutorial: Experimenting with Remote Manager Monitors
Note The tutorial uses the XML based APIs. The concepts are identical to the json APIs described here.
Monitored events can include
- Data: Data pushed into Remote Manager from remote gateways in the form of DataPoints (directly or through DIA or Smart Energy), FileData, and so on.
- Status: General status updates such as connection status, remote device availability, and so on.
- Alarms: Alarm status updates, such as when alarms are triggered or reset.
FileData and FileDataCore events are not published when the file size is larger than 120K. Delete operations for FileData events are never published.
The Monitor web service is available only for Remote Manager accounts with a subscription to the Push Monitor service.
History
Use the v1/monitors/history API to retrieve saved push events that may have been sent or have yet to be sent to push monitors. This feature is available for customers who are subscribed to the Push Monitor service.
Not all monitors save push events. Monitors that support saving of push events (sometimes called persistent monitors) can have those events replayed on restart and the history can be retrieved. When a monitor is updated to change the topics that are being monitored, existing saved push events are not affected. Regardless of when the events are generated, event timestamps are saved using the server timestamp. Queries using this API with start_time or end_time parameters restrict the returned events based on the server timestamps of those events. Queries using this API with a cursor or when receiving more than one push event, enable the return of a polling cursor.
Polling cursor
In addition to the normal paged output options for version 1 web services (for example, count, size, cursor and next_uri), the monitors/history API supports polling for subsequent results by returning a polling cursor (result elements polling_cursor and polling_uri). The polling cursor is returned for every monitors/history query that has returned any results or has received a cursor as input, allowing a continuation of that query at a later time.
You can always use a polling_cursor to poll for any added push events (which are ordered by timestamp) that were saved by the monitor since the last call that returned the polling_cursor. If the API is paging through a large set of existing results, the polling cursor and the traditional cursor are both be set to an identical value. However, if all results have been returned for a continued query, no traditional cursor is set because all pages of existing results have been returned. Those results will still receive a polling_cursor element, allowing further continuation of those queries. The polling_cursor avoids having to manually calculate the required timestamp and add the start_time parameter to subsequent queries: use the polling_cursor or the polling_uri directly to retrieve subsequent data.
URI
https://<hostname>/ws/v1/monitors
| Method |
Formats |
Description |
Parameters |
| GET |
/ws/v1/monitors |
Get a summary of the /v1/monitors web service. |
|
| GET, PUT, DELETE |
/ws/v1/monitors/inventory/{monitorId} |
Get, Update or delete an individual monitor |
|
| POST |
/ws/v1/monitors/inventory |
Create a new monitor |
cursor, orderby size, query |
| POST |
/ws/v1/monitors/inventory/{monitorId}/reset |
Restart a stuck Push monitor. |
clear_persistence |
| GET |
/ws/v1/monitors/history/{monitorId} |
Get a list of saved push events. |
cursor, end_time, ignore_schema, include_context, size, schema, schema_type, schema, start_time. Only valid on a persistent monitor. |
Parameters
| Name |
Type |
Description |
| clear_persistence |
boolean |
When resetting a monitor, it is ok to clear persisted events as part of the reset operation. Some events may not be delivered until the reset is complete. The default is false. |
| cursor |
string |
Cursor to get the next page of objects. Omit on initial call. |
| end_time |
timestamp |
Specify the end time (exclusive) in ISO 8601 or epoch (long). The default value is the current last saved event. |
| ignore_schema |
boolean |
Ignore any predefined schema on the monitor and retrieve raw json content |
| include_context |
boolean |
Show the schema context information for each event returned. The default is false. |
| schema |
string |
The template language that specifies a conversion from the Remote Manager event schema to your desired external schema |
| schema_type |
string |
If the schema parameter is specified, you can specify the type of the schema. The current default and only allowed value is ‘handlebars’ |
| size |
integer |
Specify the maximum number of saved push events to return. |
| start_time |
timestamp |
Specify the start time (inclusive) in ISO 8601 or epoch (long). The default value is the first saved event. |
Elements
acknowledgement
For TCP monitors only. Indicates whether the client will explicitly acknowledge TCP push events or allow Remote Manager to automatically acknowledge events when sent. Options include: explicit or off. The default is off.
Accepted only in the monitor update (PUT) request.
For HTTP monitors only. A list of HTTP header names and values to add to the monitor.
The headers specified here replace any existing headers of the same name.
Use the following format:
[
  "header-name: header-value",
  "header-name-2: header-value-2"
]
See the headers and remove_headers fields for related information.
auth_token
For HTTP monitors only. Credentials for basic authentication in the following format:
username:password
Use the headers field to specify the Authorization or other proprietary header to use an authentication model other than Basic.
The auth_token field and header values are never exposed once set.
auth_token_set
For HTTP monitors only. If the auth_token is set for the monitor, this field is set to true.
If the auth_token is not set for the monitor, this field is not present or set to false.
batch_duration
Specifies an upper bound on the number of seconds messages are aggregated before sending. The default is 10.
batch_size
For HTTP and TCP monitors. Specifies an upper bound on how many messages are aggregated before sending a batch. The default is 100.
compression
Keyword that specifies the method used to compress messages. Options include: zlib or none. The default is none. For zlib, the deflate algorithm is used to compress the data; use inflate to decompress the data.
connect_timeout
For HTTP monitors only. Time in milliseconds Remote Manager waits when attempting to connect to the destination http server. A value of 0 means use the system default of 5000 (5 seconds). Most monitors do not need to configure this setting.
customer_id
Remote Manager identifier for the customer.
description
Optional text field used to label or describe the monitor.
Only used for http or tcp monitors, indicates the format of the delivered data.
For HTTP monitors only. A list of HTTP header names and values in the following format:
[
  "header-name: header-value",
  "header-name-2: header-value-2"
]
Returned in the GET response only as a comma separated list of header names.
The auth_token field and header values are never exposed once set.
For example:
[
  "header-name",
  "header-name-2"
]
See the add_headers and remove_headers fields for related information.
id
System-generated identifier for the monitor.
last_connect
Returned in the GET response. Specifies last connection time to the client application.
last_sent
Returned in the GET response. Specifies the timestamp of the last message pushed to the client application.
last_sent_uuid
The UUID of the last sent event. The UUIDs of events can be used to uniquely track delivered events if necessary.
method
For HTTP monitors only. HTTP method to use for sending data: PUT or POST. The default is PUT.
persistent
Boolean value that specifies whether Remote Manager replays any missed published events before any new published events are forwarded. A value of true indicates missed published events are replayed. False indicates missed published events are not replayed. The default is false. In /ws/Monitor API, this field corresponds to the monAutoReplayOnConnect field.
response_timeout
For HTTP monitors only. Time in milliseconds Remote Manager waits for a response for pushed events from the http server. A value of 0 means use the system default of 5000 (5 seconds). Most monitors do not need to configure this setting.
Accepted only in the monitor update (PUT) request.
For HTTP monitors only. A list of HTTP header names to remove from the monitor
Use the following format:
[
  "header-name",
  "header-name-2"
]
See the headers and add_headers fields for related information.
schema
Monitors can use a templating language to transform from the Remote Manager data schema to an external schema. The schema language is Handlebars.
See Tutorial: Monitors with Templated Payloads for more details.
For example, a translation schema for a monitor using the DataPoint/00000000-00000000-00000000-00000000/metrics/sys/* topic:
[{{#eachFiltered this}}{{#if @index}},{{/if}}
  {
    "timestamp": "{{formatTime DataPoint.timestamp}}",
    "stream": "{{DataPoint.streamId}}",
    "value": "{{DataPoint.data}}",
    "device": "{{firstPathComponent DataPoint.streamId}}"
  }{{/eachFiltered}}
]
Generates output to the HTTP target (or in the ws/v1/monitors/history query) that looks like this (Note that only two events are shown):
[
  {
    "timestamp": "2022-09-12T21:39:00.000Z",
    "stream": "00000000-00000000-00000000-00000000/metrics/sys/cpu/used",
    "value": "57.490000",
    "device": "00000000-00000000-00000000-00000000"
  },
  {
    "timestamp": "2022-09-12T21:39:00.000Z",
    "stream": "00000000-00000000-00000000-00000000/metrics/sys/mem/used",
    "value": "42.900000",
    "device": "00000000-00000000-00000000-00000000"
  }
]
For the above schema translation, the original Remote Manager DataPoint data looks like the following. This is the data that is delivered from a monitor that does not use a schema template.
Note: In this example, the context data is shown. The context data is used only by the schema language template. It is not sent to HTTP or TCP monitors. See the include_context parameter on the v1/monitors/history API.
[
  {
    "DataPoint": {
      "cstId": 42,
      "data": "57.200000",
      "description": "",
      "id": "5007ca81-32e3-11ed-81ca-0ab18c42f584",
      "previousData": "57.490000",
      "quality": 0,
      "serverTimestamp": 1663018827801,
      "streamId": "00000000-00000000-00000000-00000000/metrics/sys/cpu/used",
      "streamType": "FLOAT",
      "streamUnits": "%",
      "timestamp": 1663018740000
    },
    "context": {
        "deviceName": "Fury",
        "deviceType": "Digi ConnectIT4",
        "groupPath": "/42_Digi_International/Stores/",
        "groupPathV1": "Stores/",
        "vendorId": "4261412874"
    },
    "group": "Stores",
    "operation": "INSERTION",
    "timestamp": "2022-09-12T21:40:27.905Z",
    "topic": "42/DataPoint/00000000-00000000-00000000-00000000/metrics/sys/cpu/used"
  },
  {
    "DataPoint": {
      "cstId": 42,
      "data": "42.910000",
      "description": "",
      "id": "5007ca82-32e3-11ed-81ca-0ab18c42f584",
      "previousData": "42.900000",
      "quality": 0,
      "serverTimestamp": 1663018827801,
      "streamId": "00000000-00000000-00000000-00000000/metrics/sys/mem/used",
      "streamType": "FLOAT",
      "streamUnits": "%",
      "timestamp": 1663018740000
    },
    "context": {
        "deviceName": "Fury",
        "deviceType": "Digi ConnectIT4",
        "groupPath": "/42_Digi_International/Stores/",
        "groupPathV1": "Stores/",
        "vendorId": "4261412874"
    },
    "group": "Stores",
    "operation": "INSERTION",
    "timestamp": "2022-09-12T21:40:27.905Z",
    "topic": "42/DataPoint/00000000-00000000-00000000-00000000/metrics/sys/mem/used"
  }
]
schema_type
If a schema is specified, the schema_type of handlebars must be specified.
status
Returned in the GET response. Specifies the current connection status to the client application.
| Status |
Description |
| connecting |
For HTTP monitors only. Remote Manager is attempting to connect to the configured HTTP server. Once connected, the state changes to active. |
| active |
Monitor is connected and saving and/or publishing events. |
| inactive |
Monitor is not connected and events are not published or recorded. |
| suspended |
For monitors with persistent = true, the monitor has disconnected, but publish events are recorded for later replay. |
| disabled |
For HTTP monitors only. If a monitor has not connected for 24 hours, the state is set to disabled, and publish events are not recorded for later retrieval or replay. A disabled monitor must be reconfigured via the v1/monitors web service. A PUT request to update the monitor will re-enable it. |
| disconnect |
Monitor is currently disconnecting, and events are not being published. For monitors with persistent = true, events are recorded for later retrieval or replay. (Dashboard shows status as Disconnecting.) |
Any PUT request to a monitor resets the monitor state.
topics
A list of one or more topics to monitor.
For example:
[
    "devices",
    "DataPoint"
]
Supported monitor topics include:
- alert_status
- devices
- firmware_updates
- firmware_updates_progress
- jobs
- Alarm
- AlarmStatus
- CLIEvent
- DataPoint
- DataStream
- DeviceCore
- FileData
- FileDataCore
- Job
- JobResult
- XbeeCore
The following monitor topics have been deprecated and should not be used: DiaChannelDataFull, XbeeAttributeDataCore, XbeeEventDataCore.
FileData and FileDataCore events are not published when the file size is larger than 120K. Delete operations for FileData events are not published.
DataStream updates publish changes to DataStream attributes only, not currentValues. To get changes for currentValue, monitor the DataPoint topic to get changes to the current value as they arrive.
| To monitor |
Specify |
| general topic |
Resource name only. For example:DataPoint monitors all DataPoint events. |
| specific resource |
Resource name followed by the resource ID using standard REST slash conventions. For example:DataPoint/00000000-00000000-00000000-00000000 monitors DataPoint events reported by the specific device. You can determine the specific resource ID by first using the general topic and examining the delivered payload. |
| scope by type of operation |
By default, all operations for the specified monitor topic are monitored. To limit the monitor topic to specific operations, prefix the monitor topic with the operation qualifier. Valid operations are C for create, U for any update, D for delete. For example, to monitor update operations only for devices:[operation=U]devices. To monitor create and update operations for devices:[operation=C,U]devices |
| scope by group |
Some objects are identified by the group that they are in. By default, all groups for the specified event/topic are monitored. To limit the monitor topic to one or more groups, prefix the monitor topic with the group qualifier. For example:[group=America,Columbia]devices |
| scope by operation and group |
To use both the operation and the group qualifiers, prefix the monitor topic with both qualifiers:[operation=C,U,D][group=America,Columbia]devices Note You can prefix the qualifiers in any order. |
| special characters |
URL encode the following special characters when specifying additional subtopic components:/ (forward slash), % (percent sign), . (period), * (asterisk), [ (open bracket), ] (close bracket). When monitor topics are reported, components are URL encoded. This allows for easy parsing of monitor topics. The general procedure is to split the published topic string on the slash / separator character and then URL decode the identified components. |
| DataPoint wildcards |
You can use the * wildcard for creating a combination of a general and a specific topic for DataPoint data. For example, the topic DataPoint/*/metrics/sys/* will monitor DataPoint events reported by any device in the system for any stream that starts with metrics/sys. For example, this topic would cause DataPoints for streams 00000000-00000000-00000000-00000000/metrics/sys/uptime and 00000000-00000000-00000000-00000000/metrics/sys/cpu/used to both be returned. The * character represents a single path component, while the terminal * character represents any number of path components |
type
The type of the monitor. Valid types are polling, http or tcp.
- Polling monitors collect information inside of Remote Manager for eventual retrieval via the v1/monitors/history API. The v1/monitors/history API uses efficient mechanisms and paging to allow you to very quickly retrieva data from a bookmark (cursor) where you last stopped reading.
- HTTP monitors are used to send push events to a client application via HTTP PUT or POST call. See HTTP/HTTPS transport protocol
- TCP monitors are used when a client application wants to connect with a TCP protocol TCP Transport to fetch monitor events.
url
For HTTP monitors only. URL of the customer web server. For http URLs, the default listening port is 80; for https URLs, the default listening port is 443.
History Fields
Among other values, the monitors/history API outputs these unique fields:
| Name |
Type |
Description |
| polling_cursor |
string |
Returned for every monitors/history query that has returned any results or has received a cursor as input, allowing an efficient continuation of the query at a later time. |
| next_uri |
string |
URI value that can be used to request the next page of data. No value is returned if there are no more pages available. |
| polling_uri |
string |
Returned for every monitors/history query that has returned any results. Allows an efficient continuation of the query at a later time. |
Create a Polling Monitor
The following example shows how to create a polling monitor.
Request
POST /ws/v1/monitors/inventory
Request
{
  "type": "polling",
  "description": "DataPoint with schema conversion",
  "topics": [
    "DataPoint/*/cl1/cval",
    "DataPoint/*/ts1/bat"
  ],
  "schema_type": "handlebars",
  "schema" : "[{{#eachFiltered this}}{{#if @index}},{{/if}}\n  {\n    \"timestamp\": \"{{formatTime DataPoint.timestamp}}\",\n    \"stream\": \"{{DataPoint.streamId}}\",\n    \"value\": \"{{DataPoint.data}}\",\n    \"device\": \"{{firstPathComponent DataPoint.streamId}}\"\n  }{{/eachFiltered}}\n]",
}
Response
The monitor is initially created with an inactive status. The system activates it in short order.
{
    "customer_id": 42,
    "description": "DataPoint with schema conversion",
    "id": 24797,
    "persistent": true,
    "schema": "[{{#eachFiltered this}}{{#if @index}},{{/if}}\n  {\n    \"timestamp\": \"{{formatTime DataPoint.timestamp}}\",\n    \"stream\": \"{{DataPoint.streamId}}\",\n    \"value\": \"{{DataPoint.data}}\",\n    \"device\": \"{{firstPathComponent DataPoint.streamId}}\"\n  }{{/eachFiltered}}\n]",
    "schema_type": "handlebars",
    "status": "inactive",
    "topics": [
        "DataPoint/*/cl1/cval",
        "DataPoint/*/ts1/bat"
    ],
    "type": "polling"
}
Create an HTTP Monitor
The following example shows how to create an HTTP monitor.
An HTTP monitor sends events to the target URL. You must run a server at the target URL.
For test URLs, see one of the many online services that can receive and allow you to inspect web requests.
For example: RequestBin
Request
POST /ws/v1/monitors/inventory
Request
{
  "type": "http",
  "topics": [
    "DataPoint/*/cl1/cval",
    "DataPoint/*/ts1/bat"
  ],
  "description": "DataPoint Events",
  "method": "POST",
  "format": "json",
  "url": "https://example.com/apis/post",
  "auth_token": "user:password",
  "headers": [
    "ExampleHeader: TestValue",
    "From: Remote Manager",
    "Third: meep! meep!"
  ],
  "persistent": true,
  "batch_duration": 10,
  "batch_size": 100,
  "schema_type": "handlebars",
  "schema": "[{{#eachFiltered this}}{{#if @index}},{{/if}}\n  {\n    \"timestamp\": \"{{formatTime DataPoint.timestamp}}\",\n    \"stream\": \"{{DataPoint.streamId}}\",\n    \"value\": \"{{DataPoint.data}}\",\n    \"device\": \"{{firstPathComponent DataPoint.streamId}}\"\n  }{{/eachFiltered}}\n]"
}
Response
The monitor is initially created with an inactive status. The system activates it in short order. If the target URL does not respond to requests, the monitor will eventually be deactivated.
{
    "batch_duration": 10,
    "batch_size": 100,
    "compression": "none",
    "customer_id": 42,
    "description": "DataPoint Events",
    "format": "json",
    "headers": [
        "ExampleHeader",
        "Third",
        "From"
    ],
    "id": 24798,
    "method": "POST",
    "persistent": true,
    "schema": "[{{#eachFiltered this}}{{#if @index}},{{/if}}\n  {\n    \"timestamp\": \"{{formatTime DataPoint.timestamp}}\",\n    \"stream\": \"{{DataPoint.streamId}}\",\n    \"value\": \"{{DataPoint.data}}\",\n    \"device\": \"{{firstPathComponent DataPoint.streamId}}\"\n  }{{/eachFiltered}}\n]",
    "schema_type": "handlebars",
    "status": "inactive",
    "topics": [
        "DataPoint/*/cl1/cval",
        "DataPoint/*/ts1/bat"
    ],
    "type": "http",
    "url": "https://example.com/apis/post"
}
Query Polling Monitor History
The following example shows how to get all event history for polling monitor 433016.
Request
/ws/v1/monitors/history/<monitorId>
Response
{
    "count": 1,
    "list": [
        {
            "DataPoint": {
                "cstId": 73846,
                "data": "0",
                "description": "",
                "id": "80ba3970-563d-11e5-b865-fa163ed14178",
                "quality": 99,
                "serverTimestamp": 1441725785735,
                "streamId": "00000000-00000000-00409DFF-FF50B8B1/temp",
                "streamType": "FLOAT",
                "streamUnits": "Kelvin",
                "timestamp": 1441725785735
            },
            "group": "*",
            "operation": "INSERTION",
            "timestamp": "2015-09-08T15:23:05.888Z",
            "topic": "73846/DataPoint/00000000-00000000-00409DFF-FF50B8B1/temp"
        }
    ],
    "polling_cursor": "80d1920a-563d-11e5-b865-fa163ed14178",
    "polling_uri": "/ws/v1/monitors/history/440495?cursor=80d1920a-563d-11e5-b865-fa163ed14178",
    "size": 1000
}
Restart Stuck Push Monitor
POST to v1/monitors/inventory/{monitorId}/reset to reset a monitor that is not sending data either because the monitor status is disabled or the monitor status is active but the receiver is not getting data.
Include the query parameter clear_persistence to clear persisted data and only send new data.
v1/network_interfaces
Use the v1/network_interfaces API to browser network interfaces of devices. Not all devices create network interface objects in the system.
URI
https://<hostname>/ws/v1/network_interfaces
| HTTP method |
Format |
Description |
Parameters |
| GET |
/ws/v1/network_interfaces |
Get a summary of the network interface web service. |
|
| POST |
/ws/v1/network_interfaces/inventory |
Create a network interface |
|
| GET |
/ws/v1/network_interfaces/inventory |
Get a list of network interface. |
query, size, orderby, cursor |
| GET |
/ws/v1/network_interfaces/bulk |
Get a CSV list of network interface. |
query, orderby, cursor, fields |
| GET, PUT, DELETE |
/ws/v1/network_interfaces/inventory/{id} |
Get, update, or delete the specified network interface. |
|
Parameters
| Name |
Description |
| cursor |
Cursor to get the next page of devices. Omit on initial call. |
| fields |
Comma-separated list of fields to return for bulk API |
| orderby |
Specify any field described in the query parameter syntax. Optionally add ‘asc’ or ‘desc’ to control the sort order. |
| query |
Specify the query to evaluate. See v1 API Query Language. |
| size |
Maximum number of items to return. The maximum and default is 1000. |
Network Interface Fields
The device may not report all fields. The fields are:
active
Was the network interface active on the last report.
customer_id
Identifier for the customer that owns the data.
device_id
System-generated identifier for the device.
imsi
The International Mobile Subscriber Identity (IMSI) is a unique 15 digit value.
interface_type
As reported by the device, one of unspecified, gsm, cdma, orbcomm, iridium, lte.
phone_number
The phone number of the sim card if one exists.
server_keyword
The server keyword is used by some devices to send SMS messages via the server.
server_phone
The server phone number is used on some devices to verify the server sending SMS messages or to send SMS messages via the server.
sim_id
The SIM card identifier (iccid).
v1/notification_configs
Use the v1/notification_configs API to create, update, list, and manage configurations that are used for alert notification delivery.
URI
https://<hostname>/ws/v1/notification_configs
| HTTP method |
Format |
Description |
Parameters |
| GET |
/ws/v1/notification_configs |
Get a summary of the notification configs web service. |
|
| GET |
/ws/v1/notification_configs/inventory |
Get a list of notification configs. |
query, size, orderby, cursor |
| GET, PUT, DELETE |
/ws/v1/notification_configs/inventory/{id} |
Get, update, or delete the specified notification config. |
|
The typical payload for a notification configuration is shown below. This notification configuration indicates that
the notification should be sent to the specified team members. The notifications are sent when either the Water Sensor
alert occurs or any alert in the NorthWest or SouthWest group occurs.
Additionally, a summary email is delivered to the team members once per day at about 11am Central time.
The id and customer_id fields are read-only and are assigned by the system.
{
    "name": "Send to team",
    "id": 1,
    "customer_id": 2,
    "enabled": true,

    "recipients": [
        "user1@example.com",
        "user1@example.com",
        "user3@example.com",
        "user4@example.com"
    ],

    "each_alert": true,

    "daily_summary": true,
    "at_time": "11:00:00",
    "timezone": "America/Chicago",

    "alerts": [
        "Water Sensor"
    ],
    "groups": [
        "NorthWest",
        "SouthWest"
    ]
}
Default values for fields
{
    "name": null,        // The Name field is required
    "id": null,          // set by the system
    "customer_id": null, // set by the system
    "enabled": false,

    "recipients": [],

    "each_alert": false,
    "daily_summary": false,
    "at_time": "00:00:00",
    "timezone": "UTC",

    "alerts": [],
    "groups": []
}
Notification Configuration Data
Each notification configuration stores a variety of information about the notifications that can be sent for alerts.
The fields are displayed below.
Except for the name field, all fields are optional, and by default a notification configuration
is disabled and will not cause any notifications or target any recipients, groups or alerts.
alerts - A list of alert names that will cause notifications to be sent. Default is an empty list.at_time - The approximate time of day that the daily summary email will be sent. The time is specified in the format HH:MM:SS where HH is the hour in 24-hour format, MM is the minute, and SS is the second. The time is specified in the timezone specified by the timezone field. Default is 00:00:00.customer_id - The unique identifier for the customer account. Read-only, generated by the system.daily_summary - If true, then a summary email will be sent to each recipient once per day. If false, then a summary email will not be sent to each recipient. Default is false.each_alert - If true, then each alert status change will be sent to each recipient. If false, then each alert status change will not be sent to each recipient. Default is false.enabled - If true, this notification configuration is enabled and may cause notifications to be sent. If false, this notification configuration is disabled and will not cause notifications to be sent. Default is false.groups - A list of group names that will cause notifications to be sent if a triggered alert is associated with the group. Default is an empty list.id - The unique identifier for this notification configuration. Read-only, generated by the system.name - The name used to distinguish this notification configuration from others in the account. Required.recipients - A list of email addresses that will receive notifications. If the each_alert field is true, then each alert will be sent to each recipient. If the daily_summary field is true, then a summary email will be sent to each recipient once per day. Default is an empty list.timezone - The timezone used to interpret the at_time field. The timezone is specified using the IANA Time Zone Database format. Default is UTC.
v1/notifications
Use the v1/notifications API to retrieve notifications.
URI
http://<hostname>/ws/v1/notifications
| Method |
Formats |
Description |
| GET |
/ws/v1/notifications |
Get a summary of the /v1/notifications web service. |
v1/reports
Remote Manager generates many different types of reports including information on alarms,
device properties, connections, health, and monitors. Use the v1/reports API to get
a list of all available reports or a specific status report.
URI
http://<hostname>/ws/v1/reports
Report Categories
Some report APIs constitute a larger group of APIs that use common parameters and query fields
or control reporting more generally.
| Method |
Formats |
Description |
| GET |
/ws/v1/reports/cellular_utilization/* |
APIs to generate cellular utilization reports |
| GET |
/ws/v1/reports/device_availability/* |
APIs to generate device availability reports |
| GET |
/ws/v1/reports/intelliflow/* |
APIs to generate intelliFlow reports |
| GET, POST, PUT, DELETE |
/ws/v1/reports/schedules/* |
APIs to create, update, run and delete scheduled reports |
Individual Reports
The following individual report APIs are similar in parameters and query fields.
| Method |
Formats |
Description |
| GET |
/ws/v1/reports |
Get a list of available reports, including summary information. |
| GET |
/ws/v1/reports/alarms |
Get a list of fired alarms, along with the total count for each alarm type. |
| GET |
/ws/v1/reports/alerts |
Summarize a list of fired alerts |
| GET |
/ws/v1/reports/connections |
Summarize current device connection status |
| GET |
/ws/v1/reports/devices/* |
All device APIs use the /ws/v1/devices/inventory API query language |
| GET |
/ws/v1/reports/devices/carrier |
Summarize devices by cellular network provider |
| GET |
/ws/v1/reports/devices/carrier2 |
Summarize devices by secondary cellular network provider |
| GET |
/ws/v1/reports/devices/provider |
Summarize devices by cellular sim provider |
| GET |
/ws/v1/reports/devices/provider2 |
Summarize devices by secondary cellular sim providers |
| GET |
/ws/v1/reports/devices/compliance |
Summarize devices by configuration compliance |
| GET |
/ws/v1/reports/devices/connection_status |
Summarize devices by current connection status |
| GET |
/ws/v1/reports/devices/customer_id |
Summarize devices by accessible customer IDs |
| GET |
/ws/v1/reports/devices/firmware_status |
Summarize devices by firmware status |
| GET |
/ws/v1/reports/devices/firmware_version |
Summarize devices by firmware version |
| GET |
/ws/v1/reports/devices/geolocation |
Summarize devices by geolocation |
| GET |
/ws/v1/reports/devices/health_status |
Summarize devices by health status |
| GET |
/ws/v1/reports/devices/ipsec_status2 |
Summarize devices by secondary ipsec status |
| GET |
/ws/v1/reports/devices/ipsec_status3 |
Summarize devices by tertiary ipsec status |
| GET |
/ws/v1/reports/devices/ipsec_status4 |
Summarize devices by quadrary ipsec status |
| GET |
/ws/v1/reports/devices/ipsec_status |
Summarize devices by primary ipsec status |
| GET |
/ws/v1/reports/devices/maintenance_mode |
Summarize devices by maintenance mode setting |
| GET |
/ws/v1/reports/devices/maintenance_window |
Summarize devices by maintenance window setting |
| GET |
/ws/v1/reports/devices/network2 |
Summarize devices by secondary network |
| GET |
/ws/v1/reports/devices/network |
Summarize devices by networks |
| GET |
/ws/v1/reports/devices/restricted_status |
Summarize devices by restricted status |
| GET |
/ws/v1/reports/devices/signal_percent2 |
Summarize devices by secondary network signal strength |
| GET |
/ws/v1/reports/devices/signal_percent |
Summarize devices by network signal strength |
| GET |
/ws/v1/reports/devices/tags |
Summarize devices by |
| GET |
/ws/v1/reports/devices/type_and_compliance |
Summarize devices by device type and configuration compliance |
| GET |
/ws/v1/reports/devices/type_and_firmware_version |
Summarize devices by device type and firmware version |
| GET |
/ws/v1/reports/devices/type_and_group_compliance |
Summarize devices by device type and group and configuration compliance |
| GET |
/ws/v1/reports/devices/type |
Summarize devices by device type |
| GET |
/ws/v1/reports/devices/vendor_id_and_type |
Summarize devices by vendor ID and device type |
| GET |
/ws/v1/reports/devices/vendor_id |
Summarize devices by vendor ID |
| GET |
/ws/v1/reports/monitors |
Summarize monitor states in the account |
| GET |
/ws/v1/reports/usage/data_details |
Detailed account data usage by service and device for a calendar month |
| GET |
/ws/v1/reports/usage/data_summary |
Summarize account data usage for a calendar month |
Parameters
| Name |
Type |
Description |
| child_groups |
string |
Boolean value that specifies whether to include all children of the group in the status: true to include all child groups; false to include only the parent group. The default is true. |
| end_time |
timestamp |
Specify the end time (exclusive) in ISO 8601 or epoch (long) or relative time (matching the form [-+]N[dhms] where d is days, h is hours, m is minutes, s is seconds, and -1d means one day ago, while +1d means one day from now. |
| group |
string |
Specify a group to get status information for the group. |
| query |
string |
Specify the device query to summarize. The query language is similar to SQL Query sntax:SQL-like conditions using AND, OR, and parenthesis to group expressionsVarious condition operators on numeric and text valuesSingle quoted text literals: ‘TheText’Text escape for quote character is the quote: ‘isn’’t difficult’Numeric literals support 0x prefix for hexEnumerated values (like connection_status) are treated as textCase insensitive comparisonsTimestamp field conditions are not supported. |
| start_time |
timestamp |
Specify the start time (inclusive) in ISO 8601 or epoch (long) or relative time (matching the form [-+]N[dhms] where d is days, h is hours, m is minutes, s is seconds, and -1d means one day ago, while +1d means one day from now). |
| scope |
string |
Specify primary or secondary for any of the carrier, provider, network, and signal_percent device reports. The report summarizes information for the primary or secondary cellular modem. The default is primary. |
| type |
string |
Specify a device type for which you want to get status. |
Query fields
- carrier/carrier2 - the current network carrier of the primary or secondary cellular service
- connection_status - one of ‘connected’ or ‘disconnected’
- contact - any user contact information
- description - any description associated with the device
- firmware_version - the firmware level
- health_status - one of ’normal’, ‘warning’, ’error’ or ‘unknown’
- id - the device ID
- ip - the last known IP address of the device
- last_connect - last connect time of the device
- last_disconnect - last disconnect time of the device
- last_disconnect_reason - the reason for the last disconnect
- last_update - last update time of the device
- location - the device location
- mac - the MAC address
- name - the device name
- network/network2 - the current network (for example LTE) of the primary or secondary cellular service
- notes - device notes, also sometimes referred to as user meta data)
- provider/provider2 - the current SIM provider of the primary or secondary cellular service
- public_ip - the last known global IP address of the device
- restricted_status - one of ‘unrestricted’, ‘restricted’, ‘disabled’, ‘untrusted’
- serial_number - the device serial number
- signal_percent/signal_percent2 - the percent of signal strength from 0 to 100 primary or secondary cellular service
- signal_quality/signal_quality2 - the signal quality of the primary or secondary cellular service
- signal_strength/signal_strength2 - the signal strength of the primary or secondary cellular service
- type - the device type
- vendor_id - the vendor ID value of the device
Query operators
- =, <>-Equality comparisons, used on any numeric, group, tag, text or enumerated fields
- <, <=, >, >=-Relative comparisons, used on any numeric or text fields. Not used for group, tag or enumerated fields
- startsWith, endsWith, contains-Used on any group, tag or text matching fields. Not used for numeric fields
Timestamp field comparisons are not supported.
Query examples
query=group startsWith '/NorthWest' and (connection_status = 'disconnected' or signal_percent < 20)
Find any devices in the /Northwest group and any subgroups that are either disconnected or have a low signal strength.
query=tags = 'important' and (health_status = 'error' or health_status = 'warning')
Find any devices that have the ‘important’ tag and are in an error or warning health status.
Query full group path, so matches any device in group ‘/test’ and ignores any subgroups.
query=group startsWith 'test/'
Query full group path, so matches any device in the test root group and any subgroups.
query=group startsWith 'test'
Query full group path, so matches any device in any root group whose name starts with ’test’ and all subgroups.
query=group endsWith '/leaf'
Query full group path, so matches any device in any path that ends with the group name ’leaf’.
Matches any device having a tag ‘sensor’.
Matches any device having no tag ‘sensor’.
Matches any device having any tag containing ’ns’.
query=tags startsWith 'sens'
Matches any device having any tag that starts with ‘sens’.
Matches any device having any tag that ends with ‘or’.
Cellular Utilization
Remote Manager generates cellular utilization reports that can categorize devices cell plan use.
The device reports cellular utilization in a set of metric streams. On a DAL (Digi Accelerated Linux) device,
the cellular utilization metric streams must be enabled using
Monitoring -> Device Health -> Enable device metric samples upload configuration setting.
For a DAL (Digi Accelerated Linux) device, the monitored metric streams are
- metrics/cellular/M/simS/carrier
- metrics/cellular/M/simS/provider
- metrics/cellular/M/simS/rx/bytes
- metrics/cellular/M/simS/tx/bytes
Where the M is the modem number and S is the sim number.
Use the v1/reports API to get a list of all available reports or a specific status report.
URI
http://<hostname>/ws/v1/reports/cellular_utilization
| Method |
Formats |
Description |
Parameters |
| GET |
/ws/v1/reports/cellular_utilization |
Get a list of detailed cellular utilization information for devices. |
cursor, end_time, groupby, orderby, query, size, start_time |
| GET |
/ws/v1/reports/cellular_utilization/bulk |
Get a CSV list of detailed cellular utilization information for devices. |
end_time, groupby, orderby, query, start_time, fields |
| GET |
/ws/v1/reports/cellular_utilization/summary |
Get a list of summarized cellular utilization information for devices. |
end_time, groupby, orderby, query, start_time |
| GET |
/ws/v1/reports/cellular_utilization/summary/bulk |
Get a CSV list of summarized cellular utilization information for devices. |
end_time, groupby, orderby, query, start_time, fields |
Parameters
| Name |
Type |
Description |
| cursor |
string |
Specify the cursor (returned in the last page of results) to resume paging through results. |
| end_time |
timestamp |
Specify the end time (exclusive) in ISO 8601 or epoch (long) or relative time (matching the form [-+]N[dhms] where d is days, h is hours, m is minutes, s is seconds, and -1d means one day ago, while +1d means one day from now). |
| fields |
string |
Comma-separated list of fields to return for bulk API |
| groupby |
string |
The groupby parameter behaves similarly for detail and summary APIs. |
| orderby |
string |
Specify the field to order by, optionally followed by asc or desc for ascending or descending sort. |
| query |
string |
Specify the device query to summarize. The query language is similar to SQL Query sntax:SQL-like conditions using AND, OR, and parenthesis to group expressionsVarious condition operators on numeric and text valuesSingle quoted text literals: ‘TheText’Text escape for quote character is the quote: ‘isn’’t difficult’Numeric literals support 0x prefix for hexEnumerated values (like connection_status) are treated as textCase insensitive comparisonsTimestamp field conditions are not supported. |
| size |
integer |
Specify the size of the page to return. |
| start_time |
timestamp |
Specify the start time (inclusive) in ISO 8601 or epoch (long) or relative time (matching the form [-+]N[dhms] where d is days, h is hours, m is minutes, s is seconds, and -1d means one day ago, while +1d means one day from now). |
Query Parameters
The following query parameters have some unique behavior relative to other APIs.
groupby
Detail APIs
For the /ws/v1/reports/cellular_utilization and /ws/v1/reports/cellular_utilization/bulk APIs, specify none, device, carrier, or provider fields in the groupby parameter.
By default, and with the none value, when generating a detail report for each device, the cellular utilization is shown and there is no specific grouping. Grouping by none can generate a detail report with many rows for each device, depending on which combination of modem, sim, carrier, and provider were used when the traffic was generated.
Grouping by device fields generates a detail report with a single bytes_sent, bytes_received and total values for each device regardless which modem, sim, carrier, or provider was used for the traffic. The modem, sim, carrier and provider fields are not included in the report.
Similarly, grouping by carrier or provider fields generates a detail report with a single bytes_sent, bytes_received and total values for each carrier or provider used by a devce
regardless which modem or sim was used for the traffic. The modem, sim, and the other provider or carrier fields are not included in the report.
For none or when groupby is not specified, example data is shown below (shown as a table instead of json or csv):
name   device_id                            device_type     group      firmware_version   provider  carrier    modem  sim   bytes_sent  bytes_received  total
Bus42  00000000-00000000-000000FF-FF123456  Digi TX64       NorthWest  23.6.1.0           AT&T      AT&T       1      1     1000000     2000000         3000000
Bus42  00000000-00000000-000000FF-FF123456  Digi TX64       NorthWest  23.6.1.0           AT&T      Sprint     1      1     2000000     4000000         6000000
Bus42  00000000-00000000-000000FF-FF123456  Digi TX64       NorthWest  23.6.1.0           AT&T      AT&T       2      1     3000000     6000000         9000000
For device, the data above would be grouped as (shown as a table instead of json or csv):
name   device_id                            device_type     group      firmware_version   bytes_sent  bytes_received  total
Bus42  00000000-00000000-000000FF-FF123456  Digi TX64       NorthWest  23.6.1.0           6000000     12000000        18000000
For carrier, the data above would be grouped as (shown as a table instead of json or csv):
name   device_id                            device_type     group      firmware_version   carrier   bytes_sent  bytes_received  total
Bus42  00000000-00000000-000000FF-FF123456  Digi TX64       NorthWest  23.6.1.0           AT&T      4000000     8000000         12000000
Bus42  00000000-00000000-000000FF-FF123456  Digi TX64       NorthWest  23.6.1.0           Sprint    2000000     4000000         6000000
Summary APIs
For the /ws/v1/reports/cellular_utilization/summary and /ws/v1/reports/cellular_utilitization/summary/bulk APIs, specify modem, sim, carrier, provider, device_type, firmware_version, group to summarize utilization across devices.
Query fields
Build query conditions using the following fields for cellular utilization.
See v1 API Query Language for detailed information on building API queries.
- bytes_received - The number of bytes sent in the interval
- bytes_sent - The number of bytes sent in the interval
- carrier - The reported network carrier of the traffic
- customer_id - The id of the account owning the device
- device_id - The device ID of the device that recorded the traffic
- device_type - The type of the device
- firmware_version - The current firmware version of the device
- group - The current group that the device is stored in
- modem - The modem number of the traffic
- name - The current name of the device
- provider - The reported sim provider of the traffic
- sim - The sim number of the traffic
- total - The total number of bytes sent and received in the interval
Device Availability
Remote Manager generates device availability reports that can categorize device connectivity with Remote Manager.
Use the v1/reports API to get a list of all available reports or a specific status report.
URI
http://<hostname>/ws/v1/reports/device_availability
| Method |
Formats |
Description |
Parameters |
| GET |
/ws/v1/reports/device_availability/details |
Get a list of detailed device availability information for devices. |
cursor, end_time, orderby, query, size, start_time |
| GET |
/ws/v1/reports/device_availability/details/bulk |
Get a CSV list of detailed device availability information for devices. |
end_time, orderby, query, start_time, fields |
| GET |
/ws/v1/reports/device_availability/summary |
Get a list of summarized device availability information for devices. |
end_time, orderby, query, start_time |
| GET |
/ws/v1/reports/device_availability/summary/bulk |
Get a CSV list of summarized device availability information for devices. |
end_time, orderby, query, start_time, fields |
Parameters
| Name |
Type |
Description |
| cursor |
string |
Specify the cursor (returned in the last page of results) to resume paging through results. |
| end_time |
timestamp |
Specify the end time (exclusive) in ISO 8601 or epoch (long) or relative time (matching the form [-+]N[dhms] where d is days, h is hours, m is minutes, s is seconds, and -1d means one day ago, while +1d means one day from now). |
| fields |
string |
Comma-separated list of fields to return for bulk API |
| orderby |
string |
Specify the field to order by, optionally followed by asc or desc for ascending or descending sort. In addition to query fields, you can specify uptime_percentage to order by the connected percentage of the target devices. |
| query |
string |
Specify the device query to summarize. The query language is similar to SQL Query sntax:SQL-like conditions using AND, OR, and parenthesis to group expressionsVarious condition operators on numeric and text valuesSingle quoted text literals: ‘TheText’Text escape for quote character is the quote: ‘isn’’t difficult’Numeric literals support 0x prefix for hexEnumerated values (like connection_status) are treated as textCase insensitive comparisonsTimestamp field conditions are not supported. |
| size |
integer |
Specify the size of the page to return. |
| start_time |
timestamp |
Specify the start time (inclusive) in ISO 8601 or epoch (long) or relative time (matching the form [-+]N[dhms] where d is days, h is hours, m is minutes, s is seconds, and -1d means one day ago, while +1d means one day from now). |
Query fields
Build query conditions using the following fields for device availability.
See v1 API Query Language for detailed information on building API queries.
- connection_status - The current ‘connected’ or ‘disconnected’ state of the device
- customer_id - The id of the account owning the device
- device_id - The device ID of the device
- device_type - The type of the device
- group - The current group that the device is stored in
- last_connect - The last connect time of the device
- name - The current name of the device
- vendor_id - The vendor ID of the device
intelliFlow
Remote Manager generates intelliFlow reports for devices with intelliFlow data collection enabled.
An intelliFlow report categorizes traffic from host systems through end devices to server systems.
The host system is typically a PC or IOT device getting a DHCP address from the end device.
The end device is typically a cellular router that connects directly to Remote Manager for statistics and management services.
The host system typically communicates via the end device to many servers for email, web browsing or other network services via TCP/IP.
On a DAL (Digi Accelerated Linux) device, the intelliFlow data reporting must be enabled using
Monitoring -> intelliFlow -> Enable intelliFlow setting.
Use the v1/reports API to get a list of all available reports or a specific status report.
URI
http://<hostname>/ws/v1/reports/intelliflow
| Method |
Formats |
Description |
Parameters |
| GET |
/ws/v1/reports/intelliflow/detail |
Get a list of detailed intelliFlow information for devices. |
cursor, end_time, orderby, query, report_type, size, start_time |
| GET |
/ws/v1/reports/intelliflow/detail/bulk |
Get a CSV list of detailed intelliFlow information for devices. |
end_time, orderby, query, report_type, start_time, fields |
| GET |
/ws/v1/reports/intelliflow/summary |
Get a list of summarized intelliFlow information for devices. |
end_time, orderby, query, report_type, start_time |
| GET |
/ws/v1/reports/intelliflow/summary/bulk |
Get a CSV list of summarized intelliFlow information for devices. |
end_time, orderby, query, report_type, start_time, fields |
Parameters
| Name |
Type |
Description |
| cursor |
string |
Specify the cursor (returned in the last page of results) to resume paging through results. |
| end_time |
timestamp |
Specify the end time (exclusive) in ISO 8601 or epoch (long) or relative time (matching the form [-+]N[dhms] where d is days, h is hours, m is minutes, s is seconds, and -1d means one day ago, while +1d means one day from now). |
| fields |
string |
Comma-separated list of fields to return for bulk API |
| orderby |
string |
Specify the field to order by, optionally followed by asc or desc for ascending or descending sort. |
| query |
string |
Specify the device query to summarize. The query language is similar to SQL Query sntax:SQL-like conditions using AND, OR, and parenthesis to group expressionsVarious condition operators on numeric and text valuesSingle quoted text literals: ‘TheText’Text escape for quote character is the quote: ‘isn’’t difficult’Numeric literals support 0x prefix for hexEnumerated values (like connection_status) are treated as textCase insensitive comparisonsTimestamp field conditions are not supported. |
| report_type |
string |
Specify the report type to categorize data. Both detail and summary information is additionally categorized by report_type. |
| size |
integer |
Specify the size of the page to return. |
| start_time |
timestamp |
Specify the start time (inclusive) in ISO 8601 or epoch (long) or relative time (matching the form [-+]N[dhms] where d is days, h is hours, m is minutes, s is seconds, and -1d means one day ago, while +1d means one day from now). |
Report Type Values
The intelliFlow report type categorizes device traffic by the specified field.
| Value |
Description |
| port |
Categorize by port number. |
| port_name |
Categorize by port name. These are the IANA names. |
| service_type |
Categorize by service type. These names are configured in the intelliFlow settings on the device. |
| server_address |
Categorize by the server address. |
| server_domain |
Categorize by the server domain name. |
| host_address |
Categorize by the host that is communicating via the end device. |
Query fields
Build query conditions using the following fields for intelliFlow.
See v1 API Query Language for detailed information on building API queries.
- bytes_received - The number of bytes sent in the interval
- bytes_sent - The number of bytes sent in the interval
- customer_id - The id of the account owning the device
- device_id - The device ID of the end device that recorded the traffic
- device_type - The type of the end device
- firmware_version - The current firmware version of the end device
- group - The current group that the end device is stored in
- host_address - The IP address of the host communicating via the end device
- host_mac - The Mac address of the host communicating via the end device
- host_name - The name of the host communicating via the end device
- hour - The timestamp representing the hour that the data was recorded
- name - The current name of the end device
- port - The port number destination of the traffic
- port_name - The IANA name of the traffic
- server_address - The server address of the traffic
- server_domain - The domain name of the server of the traffic
- service_type - The service name configured for the port in the intelliFlow settings on the end device
Scheduled Reports
Use the ws/v1/reports/schedules API to schedule recurring reports and have them emailed to recipients as Excel files.
You can schedule reports to run daily, weekly, or monthly.
Weekly run at a specific day of the week while monthly reports run on a specific day of the month.
The reports run at a time of your choosing.
Use the v1/reports API to get a list of all available reports or a specific status report.
URI
http://<hostname>/ws/v1/reports/schedules
| Method |
Formats |
Description |
Parameters |
| GET |
/ws/v1/reports/schedules/inventory |
Get a list of detailed schedule information for devices. |
cursor, orderby, query, size |
| POST |
/ws/v1/reports/schedules/inventory |
Create a new scheduled report. |
|
| PUT |
/ws/v1/reports/schedules/inventory/{id} |
Update the properties of a single scheduled report. |
|
| GET |
/ws/v1/reports/schedules/inventory/{id} |
Retrieve a single scheduled report. |
|
| DELETE |
/ws/v1/reports/schedules/inventory/{id} |
Delete a single scheduled report. |
|
| POST |
/ws/v1/reports/schedules/run/{id} |
Immediately run a single scheduled report. Returns the generated Excel report to the API caller but does not send email for the report. The response type of this API is “application/vnd.openxmlformats-officedocument.spreadsheetml.sheet” |
|
Parameters
| Name |
Type |
Description |
| cursor |
string |
Specify the cursor (returned in the last page of results) to resume paging through results. |
| orderby |
string |
Specify the field to order by, optionally followed by asc or desc for ascending or descending sort. |
| query |
string |
Specify the device query to summarize. The query language is similar to SQL Query sntax:SQL-like conditions using AND, OR, and parenthesis to group expressionsVarious condition operators on numeric and text valuesSingle quoted text literals: ‘TheText’Text escape for quote character is the quote: ‘isn’’t difficult’Numeric literals support 0x prefix for hexEnumerated values (like connection_status) are treated as textCase insensitive comparisonsTimestamp field conditions are not supported. |
| size |
integer |
Specify the size of the page to return. |
Payload fields
The fields that define a scheduled report follow. Fields marked with output only cannot be
specified in a create or update operation.
| Name |
Type |
Description |
| account_filter |
string |
For an account with subaccounts, use account filter to select customer IDs for the target data in the report |
| at_time |
localtime |
Time of day of the form: 14:45[:00]. A 24 hour time of day in the timezone specified. If timezone is not specified, the system selects a timezone. |
| customer_id |
integer |
The account that owns the scheduled report (output only) |
| description |
string |
An optional description for the scheduled report |
| enabled |
boolean |
Is the scheduled report enabled, that is, will it run automatically |
| end_time |
timestamp |
The end time of the data in the report. Specify the end time (exclusive) in ISO 8601 or epoch (long) or relative time (matching the form -N[dhms] where d is days, h is hours, m is minutes, s is seconds, and -1d means one day prior to the report run time). |
| frequency |
string |
One of daily, weekly, monthly, the report runs once per interval |
| groupby |
groupby |
The summarization type used by the report. See the Payload Values section |
| id |
integer |
The identifier of the scheduled report (output only) |
| last_run |
timestamp |
The time (if any) that the scheduled report ran last (output only) |
| mail_body |
string |
The body of the email. |
| mail_subject |
string |
The subject of the email. |
| mail_to |
string |
A comma separated list of valid email addresses to send the report to. |
| name |
string |
A unique name for the scheduled report |
| on_day |
integer |
The day of the interval that the report runs on. See the Payload Values section |
| query |
string |
The API query as supported by the matching report type. For example a cellular_utilization report can only use query fields supported by the /ws/v1/reports/cellular_utilization API |
| start_time |
timestamp |
The start time of the data in the report. Specify the start time (inclusive) in ISO 8601 or epoch (long) or relative time (matching the form -N[dhms] where d is days, h is hours, m is minutes, s is seconds, and -1d means one day prior to the report run time). |
| timezone |
string |
The timezone to be used to calculate the time of day. If the timezone is not specified, the system selects a timezone. See the Payload Values section |
| type |
string |
One of cellular_utilization, device_availability, intelliflow |
Payload Values
These fields support unique or special values.
- account_filter - The account filter describes the list of accounts owning the target data for the report. If left off, only the owning account data is queried. An account filter is a string of the form “all”, customer ID as a string, or a comma separated list of customer IDs that the report owner is authorized to.
- groupby - Certain report types can further summarize data by grouping it.
- For any report, you can, leave this field off or specify
none and the report selects the default grouping.
- A
device_availability report does not support other grouping values
- A
cellular_utilization report supports carrier, modem, sim, device_type, firmware_version, or group.
- An
intelliflow report supports port, port_name, service_type, server_address, server_domain, or host_address.
- mail_subject and mail_body - When entering text for the email subject or body, you can use the special values
{name} or {description} in the text. These values are replaced with the report name or description fields when the report is emailed.
- on_day - Use the on_day field to indicate the day of the week or the day of the month that a report runs on.
- The default value if unspecified is 1
- Leave this value off or specify 1 for a daily report
- For a
weekly report, specify values 1 to 7, day 1 is Sunday.
- For a
monthly report, specify values 1 to 28 or a value of -1 to indicate the last day of the month.
- timezone - Specify a timezone using a region based timezone syntax, like
America/Chicago or an offset value like +00:00. Some special timezones are supported like UTC or GMT and a value like GMT+05:00 is also supported.
Query fields
See v1 API Query Language for detailed information on building API queries.
All of the fields described in the Payload section are supported by the query language, except for at_time.
v1/security_policies
Use the v1/security_policies API to manage security policies for the current account.
Security policies contain CIDR block rules that indicate which IP addresses are allowed to access the account for a user.
After a user is assigned a security policy, all logins from that user (by API or UI) will only be allowed from IP addresses indicated in the policy.
URI
http://<hostname>/ws/v1/security_policies
| Method |
Format |
Description |
Parameters |
| GET |
/ws/v1/security_policies |
Get a summary of the subaccounts web service. |
|
| GET |
/ws/v1/security_policies/inventory |
Get a list of security policies. |
orderby cursor size query |
| GET |
/ws/v1/security_policies/inventory/{id} |
Get a single security policy (rules are included). |
orderby cursor size query |
| POST |
/ws/v1/security_policies/inventory |
Create a security policy. |
|
| DELETE |
/ws/v1/security_policies/inventory/{id} |
Delete a single security policy and its rules. Fails if the rule is in use by any users. |
orderby cursor size query |
| GET |
/ws/v1/security_policies/inventory/{id}/rules/inventory |
Get a list of security rules associated with the policy |
orderby cursor size query |
| GET |
/ws/v1/security_policies/inventory/{id}/rules/inventory/{ruleId} |
Get a single security rules from the policy |
|
| POST |
/ws/v1/security_policies/inventory/{id}/rules/inventory |
Create a security rule for the policy |
|
| DELETE |
/ws/v1/security_policies/inventory/{id}/rules/inventory/{ruleId} |
Delete a security rule from the policy |
|
Parameters
| Name |
Type |
Description |
| cursor |
string |
Cursor to get the next page of results. Omit on initial call. |
| orderby |
string |
Specify any field described in the object for the API. Optionally add asc or desc to control the sort order. |
| query |
string |
The Remote Manager query language query condition used to filter results. See v1 API Query Language. |
| size |
integer |
Number of items to return. The maximum and default is 1000. |
Security Policy Fields
customer_id
The customer ID of the account that owns the security policy.
description
(Optional) A description of the security policy.
id
The unique ID of the security policy.
name
The name of the security policy. A user is assigned a security policy by name.
type
(Optional) All security policies are of type ‘allow’.
An allow security policy means that once the policy is assigned to a user, the user can only login from the IP addresses indicated in the policy.
Security Rule Fields
description
(Optional) A description of the security rule.
id
The unique ID of the security policy.
security_policy_id
The security policy ID of the owning security policy.
type
(Optional) All security policies are of type ‘CIDR’. Security rules only support CIDR block notation.
value
The CIDR notation value for the security policy. The CIDR notation value is the IP address and the subnet mask. For
example,
192.168.1.0/8 is a CIDR notation value that indicates the network 192.168.1.0 with a subnet mask of 8 bits.
The CIDR notation value can also be a single IP address. For example, 192.168.1.1/32 is a CIDR notation value that
indicates
the single IP address 192.168.1.1.
v1/settings
Use the v1/settings API to create, update, or list settings (preferences) for your account.
URI
http://<hostname>/ws/v1/settings
| HTTP method |
Format |
Description |
Parameters |
| GET |
/ws/v1/settings |
Get summary of the settings APIs. |
|
| GET |
/ws/v1/settings/inventory/ws/v1/settings/inventory.xml |
Get a list of all settings for your account. |
|
| GET |
/ws/v1/settings/inventory/{name} |
Get the value for a specific setting. |
name |
| PUT |
/ws/v1/settings/inventory/ |
Change the value for a setting. |
name value |
| DELETE |
/ws/v1/groups/inventory/{name} |
Remove a setting. |
name |
v1/streams
Use the v1/streams API to manage data streams and data points. You can also use the streams web service to upload a batch of data points to streams using an XML or CVS file. See Direct device uploads.
URI
http://<hostname>/ws/v1/streams
| Method |
Format |
Description |
Parameters |
| GET |
/ws/v1/streams |
Get a summary of the streams APIs. |
None |
| GET |
/ws/v1/streams/bulk/history |
Get historical data in CSV format. |
order start_time end_time timeline fields |
| GET, POST |
/ws/v1/streams/inventory |
List, create, or modify data streams. |
order cursor size category |
| GET |
/ws/v1/streams/bulk |
List, create, or modify data streams. |
order cursor size category fields |
| GET |
/ws/v1/streams/inventory/{stream_id} |
Get a specific data stream. |
order cursor size start_time end_time timezone interval method |
| PUT, DELETE |
/ws/v1/streams/inventory/{stream_id} |
Create, modify, or delete a specific data stream. |
|
| GET |
/ws/v1/streams/inventory?category=carrier |
Get carrier usage data for devices. |
|
| POST |
/ws/v1/streams/history |
Add one or more data points to a data stream |
|
| GET |
/ws/v1/streams/history/{stream_id} |
Get the history for a data stream. |
order cursor size start_time end_time timeline |
| DELETE |
/ws/v1/streams/history/{stream_id} |
Delete the history for a data stream. |
start_time end_time timeline |
| GET |
/ws/v1/streams/rollups/{stream_id} |
Get roll-up information for a data stream. |
|
| GET |
/ws/v1/streams/history/{device_id}/carrier/{sim_id}/usage/{usage_id} |
Get carrier usage data for a device. |
|
| GET |
/ws/v1/streams/inventory?category=data |
Get data streams reported by devices. |
|
| GET |
/ws/v1/streams/inventory?category=metrics |
Get health metrics streams reported by devices. |
|
| GET |
/ws/v1/streams/inventory?category=management |
Get management streams recorded for devices. |
|
Stream fields
id
Steam identifier.
description
Stream description.
type
Data type of the stream:
- integer
- long
- float
- double
- string
- binary
value
Current value of the data stream.
timestamp
Date and time the current value was set.
server_timestamp
Date and time the current value was received.
stream_units
Units for the data.
forwards
List of additional streams to forward data to when received.
History fields
id
Identifier of the data point in the stream history.
stream_id
Stream identifier of the history data.
Roll-up fields
stream_id
Stream identifier for the roll-up data.
Parameters
| Name |
Type |
Description |
| category |
string |
Return streams for the specified category: data, metrics, management, or carrier. If you do not use the category parameter, streams for all categories are returned. |
| cursor |
string |
Cursor to get the next page of devices. Omit on initial call. |
| end_time |
timestamp |
End time (exclusive) in ISO 8601 or epoch (long). |
| fields |
string |
Comma-separated list of fields to return for bulk API |
| interval |
string |
Rollup interval: half, hour, day, week, or month. The default is hour. |
| method |
string |
Rollup method: sum, average, min, max, count, standarddev. The default is average. |
| order |
string |
Return streams ordered by ID (asc | desc). The default is ascending (asc). |
| size |
integer |
Number of items to return. The maximum and default is 1000. |
| start_time |
timestamp |
Start time (inclusive) in ISO 8601 or epoch (long). |
| timeline |
string |
Timestamps to use in the request: client or server. The default is client. |
| timezone |
string |
Timezone in which to calculate rollups. Applies only to rollups with intervals of day or longer. |
Direct Device Uploads
Devices can upload directly to data streams over any of the existing transports (TCP, UDP, SMS, and Satellite). The path specified in the data service message begins with DataPoint and the rest of the message is mapped to a data stream appended to the device ID.
For example, if the device sends a data point file specifying the filename DataPoint/temp1, the data point is added to the data stream /temp1. The file must follow one of the expected formats and must specify the format via the file extension. The following types are supported for a given extension:
| Format |
Extension |
Description |
| XML |
.xml |
XML representation same as the /ws/DataPoint interface. |
| CSV |
.csv |
Comma separated list. One data point per line with details separated by commas. |
| Binary |
.bin |
Whatever the content of the uploaded data is directly inserted to a single data point. |
To maximize the speed and throughput of Remote Manager, limitations have been imposed on device uploads.
- Maximum number of data points allowed per request: 250
- Maximum size of Send Data requests: 2MB
- Maximum size of replies to Device Requests: 2MB
- Maximum number of binary data points allowed: 64KB
When devices push data points up to Remote Manager, the description included refers to the data point, not the data stream. To view the description, you must retrieve data point via web services.
XML
XML format uses the same format used in /ws/DataPoint PUT. The stream id is ignored since it is provided by the path. Also, any streams listed in the forwardTo field will be normalized to the device’s stream. This is done to prevent one device from uploading data into another device’s stream.
<DataPoint>
    <data>42</data>
    <!-- Everything below this is optional -->
    <description>Temperature at device 1</description>
    <location>0.0, 0.0, 0.0</location>
    <quality>99</quality>
    <dataType>float</dataType>
    <units>Kelvin</units>
</DataPoint>
For multiple data points in one message:
<list>
  <DataPoint>
    <data>42</data>
    <timestamp>1234566</timestamp>
  </DataPoint>
  <DataPoint>
    <data>43</data>
  </DataPoint>
</list>
CSV
An optional upload format is to specify the data in UTF-8 encoded comma separated values. Each line ('\n' terminated) specifies a data point. The default order is:
DATA, TIMESTAMP, QUALITY, DESCRIPTION, LOCATION, DATATYPE, UNITS, FORWARDTO
Meaning the following file:
data, 1,99,"my description",,INTEGER,kelvins,"stream1,stream2"
data2,2,50,"my description"
data3,3,25,"my description"
Would create 3 data points, set the stream’s units/type to kelvins/Integers, and have the data points with the data “data”, “data2”, and “data3”, using the epoch timestamps of 1, 2, and 3.
Note that location was omitted in the above example. You can omit values by leaving them empty or stopping before the end. For example:
**Empty values:**data,1,,,99
**Ending early:**data,1
Order can be overridden. You can define a header on the first line by starting it with a ‘#’ character, for example:
#TIMESTAMP,DATA
1, data
2, data2
3, data3
Will create 3 data points 1ms apart starting at epoch (1970).
Multiple datapoints for multiple streams from a device can be inserted in one message using the STREAMID value. When the STREAMID value is specified, the file name is no longer used for the stream name.
For example:
#STREAMID,DATA,TIMESTAMP
sensor1/port1,97,1
sensor1/port2,98,1
sensor2/port1,42,1
sensor2/port2,0,2
Will create 4 data points, one in each of 4 separate streams for the device. The first 3 data points are at 1ms after the epoch (1970) and the final data point is 1ms later.
The XML version is as follows:
<list>
<DataPoint><streamId>sensor1/port1</streamId><data>97</data><timestamp>1</timestamp></DataPoint>
<DataPoint><streamId>sensor1/port2</streamId><data>98</data><timestamp>1</timestamp></DataPoint>
<DataPoint><streamId>sensor2/port1</streamId><data>42</data><timestamp>1</timestamp></DataPoint>
<DataPoint><streamId>sensor2/port2</streamId><data>0</data><timestamp>2</timestamp></DataPoint>
</list>
The disadvantage to using the XML format is that it is very verbose. This binary alternative format can be used to be more concise. You can specify a simple value instead of XML or CSV data. When the value is pushed to /DataPoint, it is stored in complete as-is in time-series data (in the exact binary format as provided). For details on endianness, bit lengths, and so on for supported data types see the dataType in the Data Streams section. However, data types are not required. Data can be 1 byte status indicators or 10k images but Remote Manager will not be able to provide rollups on things which do not use the specified formats.
For instance, the following data service message:
| path: |
/DataPoint/temp1.bin |
| content: |
42 |
Will result in a new data point with a value of “42” (in binary).
Note: The binary concise mechanism has the following limitations:
- Only single values can be uploaded per data service message
- Data must be smaller than 64k
Whitespace characters for the data value are preserved in all formats. Use quotes around the string for CSV format to preserve break lines. For binary data, we recommend you to use binary concise format. Binary concise format however can’t be used to create multiple data points in a single request. To create multiple binary data points in a single request, we recommend you to use a base64 encoded string.
List All Streams
Use the following API to list all streams for the current user.
Request
GET /ws/v1/streams/inventory
Response
{
    "count": 1000,
    "size": 1000,
    "cursor": "380a2605-392b-d5aa-392b-d5a9ad4571a0",
    "next_uri": "/ws/v1/streams/inventory?size=3&cursor=380a2605-392b-d5aa-392b-d5a9ad4571a0",
    "list": [
        {
            "history_uri": "/ws/v1/streams/history/F9F967B4-33804DCE-2BDC4702-45053B1C/humidity",
            "id": "F9F967B4-33804DCE-2BDC4702-45053B1C/humidity",
            "server_timestamp": "2014-02-23T19:12:59.847Z",
            "timestamp": "2014-02-23T19:12:56.510Z",
            "type": "LONG",
            "units": "%",
            "value": "44"
        },
        {
            "description": "freezer",
            "history_uri": "/ws/v1/streams/history/F9F967B4-33804DCE-2BDC4702-45053B1C/temperature",
            "id": "F9F967B4-33804DCE-2BDC4702-45053B1C/temperature",
            "server_timestamp": "2014-02-23T19:12:59.848Z",
            "timestamp": "2014-02-23T19:12:57.283Z",
            "type": "LONG",
            "units": "F",
            "value": "71"
        },
        ...
    ],
}
Get a Stream
Use the following request to get a stream.
Request
GET /ws/v1/streams/inventory/F9F967B4-33804DCE-2BDC4702-45053B1C/temperature
Response
{
    "customer_id": 57639,
    "history_uri": "/ws/v1/streams/history/F9F967B4-33804DCE-2BDC4702-45053B1C/temperature",
    "id": "F9F967B4-33804DCE-2BDC4702-45053B1C/temperature",
    "last_update": "2022-02-01T22:04:13.916Z",
    "rollup_ttl": 2678400,
    "server_timestamp": "2022-02-01T22:04:13.802Z",
    "timestamp": "2022-02-01T22:04:13.802Z",
    "ttl": 2678400,
    "type": "LONG",
    "value": "71"
}
Create a Stream
Use the following API to create (or update) one or more streams. The request payload can include a single stream or multiple streams. Multiple streams must be wrapped in an array for JSON and a element for XML. The response always returns the streams as a list.
Request
`POST /ws/v1/streams/inventory
Payload
{
    "description": "test stream",
    "id": "MyNewStream",
    "type": "LONG"
}
Response
{
    "count": 1,
    "list": [
        {
            "description": "test stream",
            "id": "MyNewStream",
            "type": "LONG"
        }
    ]
}
Create Multiple Streams
The following example shows how to create multiple streams with one stream request.
Request
POST /ws/v1/streams/inventory
Payload
[
    {
        "description": "test stream",
        "id": "MyNewStream",
        "type": "LONG"
    },
    {
        "description": "another test stream",
        "id": "MyOtherStream",
        "type": "STRING"
    }
]
Response
{
    "count": 2,
    "list": [
        {
            "description": "test stream",
            "id": "MyNewStream",
            "type": "LONG"
        },
        {
            "description": "another test stream",
            "id": "MyOtherStream",
            "type": "STRING"
        }
    ]
}
Add Multiple Datapoints to a Stream
The following example adds multiple data points to the “myStream” data stream.
Request
POST /ws/v1/streams/history
Payload
[
 {
   "stream_id": "myStream",
   "stream_type": "DOUBLE",
   "timestamp": "2014-02-23T19:37:04.517Z",
   "value": "41"
 },
 {
   "stream_id": "myStream",
   "stream_type": "DOUBLE",
   "timestamp": "2014-02-23T19:38:01.372Z",
   "value": "42"
 },
 {
   "stream_id": "myStream",
   "stream_type": "DOUBLE",
   "timestamp": "2014-02-23T19:39:02.785Z",
   "value": "43"
 }
]
Edit a Stream
Use the following API request to update (or create) a single stream.
Request
PUT /ws/v1/streams/inventory/F9F967B4-33804DCE-2BDC4702-45053B1C/temperature
Payload
Response
{
    "description": "freezer",
    "history_uri": "/ws/v1/streams/history/F9F967B4-33804DCE-2BDC4702-45053B1C/temperature",
    "id": "F9F967B4-33804DCE-2BDC4702-45053B1C/temperature",
    "server_timestamp": "2014-02-23T19:12:59.848Z",
    "timestamp": "2014-02-23T19:12:57.283Z",
    "type": "LONG",
    "units": "Celsius",
    "value": "71"
}
Delete a Stream
Use the following API request to get history for data points in a stream:
DELETE /ws/v1/streams/inventory/F9F967B4-33804DCE-2BDC4702-45053B1C/temperature
A DELETE request does not return a response unless there is an error.
Get Data History for a Stream
Use the following API request to get history for data points in a stream:
Request
GET /ws/v1/streams/history/F9F967B4-33804DCE-2BDC4702-45053B1C/temperature
Response
{
    "count": 1000,
    "size": 1000,
    "cursor": "4fec418e-9cba-11e3-9a38-7cc3a1879642",
    "next_uri": "/ws/v1/streams/history/F9F967B4-33804DCE-2BDC4702-45053B1C/temperature?cursor=4fec418e-9cba-11e3-9a38-7cc3a1879642",
    "list": [
        {
            "id": "1e1b67a5-9cb6-11e3-9a38-7cc3a1879642",
            "quality": 0,
            "server_timestamp": "2014-05-08T20:05:23.358Z",
            "stream_id": "F9F967B4-33804DCE-2BDC4702-45053B1C/temperature",
            "timestamp": "2014-02-23T18:12:55.434Z",
            "value": "68"
        },
        {
            "id": "4fec418e-9cba-11e3-9a38-7cc3a1879642",
            "quality": 0,
            "server_timestamp": "2014-05-08T20:06:09.710Z",
            "stream_id": "F9F967B4-33804DCE-2BDC4702-45053B1C/temperature",
            "timestamp": "2014-02-23T18:42:56.998Z",
            "value": "70"
        }
        ...
    ]
}
Delete Stream History
Use the following API request to delete datapoints from a steam. You can delete datapoints within a time range. If no time range is specified, all datapoints are deleted.
DELETE /ws/v1/streams/history/F9F967B4-33804DCE-2BDC4702-45053B1C/temperature?start_time=2014-02-23T00:00:00.000Z&end_time=2014-02-24T00:00:00.000Z
Alternatively, you can use relative times for the start and end times. The following delete operation deletes all datapoints between 1 day and 1 second ago.
DELETE /ws/v1/streams/history/F9F967B4-33804DCE-2BDC4702-45053B1C/temperature?start_time=-1d&end_time=-1s
Get Rollup Data for a Stream
Use the following API request to get rollups of stream history. Rollups are defined by a method (average, min, max, and so on) and an interval (hourly, daily, and so on).
This request returns the average for each hour during the last day.
Request
GET /ws/v1/streams/rollups/F9F967B4-33804DCE-2BDC4702-45053B1C/temperature?method=average&interval=hour&start_time=-1d
Alternatively use a timestamp for start_time:
GET /ws/v1/streams/rollups/F9F967B4-33804DCE-2BDC4702-45053B1C/temperature?method=average&interval=hour&start_time=2014-02-23T00:00:00.000Z
Response
{
    "count": 2,
    "size": 1000,
    "start_time": "2014-02-23T00:00:00.000Z"
    "list": [
        {
            "stream_id": "F9F967B4-33804DCE-2BDC4702-45053B1C/temperature",
            "timestamp": "2014-02-23T18:00:00.000Z",
            "value": 69.0
        },
        {
            "stream_id": "F9F967B4-33804DCE-2BDC4702-45053B1C/temperature",
            "timestamp": "2014-02-23T19:00:00.000Z",
            "value": 71.0
        }
    ],
}
v1/subaccounts
Use the v1/subaccounts API to manage subaccounts for the current account..
URI
http://<hostname>/ws/v1/subaccounts
| Method |
Format |
Description |
Parameters |
| GET |
/ws/v1/subaccounts |
Get a summary of the subaccounts web service. |
|
| GET |
/ws/v1/subaccounts/inventory |
Get a list of subaccounts. |
orderby cursor size query |
| POST |
/ws/v1/subaccounts/inventory |
Create a subaccount. |
|
| GET, PUT |
/ws/v1/subaccounts/inventory/{customer_id} |
Retrieve (GET) or update (PUT) a subaccount. |
|
| DELETE |
/ws/v1/subaccounts/inventory/{customer_id} |
Remove a subaccount. |
delete_devices |
v1/users
Use the v1/users API to create, update, or list users for your account. Only admin users can view or change all users for an account. Users without admin privileges can view or update their own user account, but they cannot change their security policy or role.
URI
http://<hostname>/ws/v1/users
| HTTP method |
Format |
Description |
Parameters |
| GET |
/ws/v1/users |
Get summary of the users APIs. |
None |
| GET |
/ws/v1/users/bulk |
Get a list of all users for the account in CSV format. |
orderby query fields |
| POST, GET |
/ws/v1/users/change_password/{uuid} |
Change password for an existing user, or retrieve the accounts password complexity rules |
validate_only |
| POST |
/ws/v1/users/forgot_password/{username:.+} |
Submit a forgot password request, the user is emailed a password reset token. |
None |
| POST |
/ws/v1/users/forgot_username/{email_address:.+} |
Submit a forgot password request, the user is emailed a password reset token. |
None |
| GET, POST |
/ws/v1/users/inventory |
Retrieve (GET) or change a list of all users in the account. |
orderby cursor query size |
| GET, PUT, DELETE |
/ws/v1/users/inventory/{username:.+} |
Retrieve (GET), create (PUT), or remove (DELETE) a user. |
None |
Parameters
| Name |
Type |
Description |
| cursor |
string |
Cursor to get the next page of results. Omit on initial call. |
| orderby |
string |
Specify any field described in the query parameter syntax. Optionally add asc or desc to control the sort order. |
| fields |
string |
Comma-separated list of fields to return for bulk API |
| query |
string |
The Remote Manager query language query condition used to filter results. See v1 API Query Language. |
| size |
integer |
Number of items to return. The maximum and default is 1000. |
| validate_only |
boolean |
If true, the API call only validates the password in the payload based on the accounts password complexity rules and does not perform the action. The default is false. |
Fields
address
(Optional) String that specifies the street address for the user.
city
(Optional) String that specifies the city for the user.
country
(Optional) String that specifies the country for the user.
email
(Required) Email address for the user.
enabled
(Required) Specifies whether the username is enabled or disabled. The default is enabled.
first_name
(Required) First name of the user.
job_title
(Optional) Job title of the user.
last_login
Returns the timestamp of the last login for the user.
last_name
(Required) Last name of the user.
password
(Required) Password of the user.
phone_number
(Optional) Phone number for the user.
postal_code
(Optional) Postal code for the user address.
registration_date
Returns the timestamp for the user registration.
security_policy
(Optional) Specifies a security policy for the user.
role
(Required) Specifies the role for the user. Roles include: Administrator, User, Read only users, Application, Read only application.
state
(Optional) State for the user address.
username
(Required) Username for the user.
Alarm
Use the Alarm web service to create, list, or update alarms within your Remote Manager account. The maximum number of alarms per account is 16. When creating an alarm, you must specify an alarm template on which to base the alarm. See also the AlarmTemplate web service and Alarm template types.
URI
http://<hostname>/ws/Alarm
| HTTP method |
Format |
Description |
| GET |
/ws/Alarm |
Get a list of all alarms. |
| GET |
/ws/Alarm/{almId} |
Get details for a specific alarm. |
| POST |
/ws/Alarm |
Create a new alarm |
| PUT |
/ws/Alarm/{almId} |
Update an existing alarm. |
| DELETE |
/ws/Alarm/{almId} |
Delete an alarm. |
Elements
almId
Remote Manager identifier for the alarm.
cstId
Remote Manager identifier for the customer.
almtID
System-generated identifier for an alarm template. To get a list of available alarm template, use the AlarmTemplate web service.
grpId
Remote Manager identifier for the customer group.
almName
Name of the alarm.
almDescription
Description of the alarm.
almEnabled
Boolean value that indicates whether the alarm is enabled.
| Value |
Description |
| true |
Alarm is enabled. |
| false |
Alarm is disabled. |
almPriority
Keyword that indicates the user-defined alarm priority: high, medium, or low.
almScopeConfig
Specifies the resource scope for the alarm. Scope options include:
| Scope |
Description |
| Group |
Applies the alarm to the specified group indicated by the full group path. |
| Device |
Applies the alarm to the specified device ID. For example, 00000000-00000000-00000000-00000000. |
| XbeeNode |
Applies the alarm to the specified XbeeNode extended address. For example, 00:13:A2:00:00:00:00:00. |
| Resource |
Applies the alarm to a data stream path or pattern. You can use the wildcard charater asterisk () to match any element in the data stream path. For example, dia/channel//lth/temp matches all the lth temperature reading for all devices. |
| Global |
Applies the alarm at the customer level to monitor all instances of an entity. For example, you can create an alarm to monitor the total number of web services calls for your account. This option is available for subscription usage alarms only. |
See almScopeConfig for the required XML structure for almScopeConfig.
almRuleConfig
Specifies the rule configurations for an alarm:
| Rule configuration |
Description |
| FireRule |
A list of variables that specify the condition for firing the alarm. |
| ResetRule |
A list of variables that specify the condition for resetting the alarm. |
By default, all alarms reset automatically. You can disable automatic reset by passing the enabled = false attribute for the ResetRule element. For example, <ResetRule enabled = "false">.
See almRuleConfig for the required XML structure for almRuleConfig.
See Alarm template types for a list of available fire and reset variables for each alarm template type.
almRuleConfig
Use the following XML structure for almRuleConfig.
<almRuleConfig>
<Rules>
<FireRule name="fireRule1">
<Variable name="operator" value=">"/>
<Variable name="thresholdvalue" value="1"/>
<Variable name="timeUnit" value="seconds"/>
<Variable name="timeout" value="10"/>
<Variable name="type" value="double"/>
</FireRule>
<ResetRule name="resetRule1">
<Variable name="type" value="double"/>
<Variable name="thresholdvalue" value="1"/>
<Variable name="operator" value="<="/>
<Variable name="timeUnit" value="seconds"/>
<Variable name="timeout" value="10"/>
</ResetRule>
</Rules>
</almRuleConfig>
By default, all alarms reset automatically. You can disable automatic reset by passing the enabled = false attribute for ResetRule element; for example, <ResetRule enabled = "false">.
almScopeConfig
Use the following XML structure for almScopeConfig.
<almScopeConfig>
    <ScopingOptions>
        <Scope name="Resource" value="Weather/USA/*/Minneapolis"/>
    </ScopingOptions>
</almScopeConfig>
You can specify only one <ScopingOption> per <almScopeConfig> element; and you can specify only one <Scope> per <ScopingOptions>. To specified multiple <scopes> for an alarm, use multiple <almScopeConfig> statements.
List All Alarms
The following example shows how to list all alarms for your account.
Request
Response
The sample result shows the result header and three alarms.
<result>
    <resultTotalRows>3</resultTotalRows>
    <requestedStartRow>0</requestedStart/row>
    <resultSize>3</resultSize>
    <requestedSize>1000</requestedSize>
    <remainingSize>0<remainingSize>
   <Alarm>
	<almId>142</almId>   <!-- alarm #1 -->
	<cstId>2</cstId>
	<almtId>4</almtId>
	<grpId>2</grpId>
	<almName>Device Excessive Connections</almName>
	<almDescription>Detects devices with an excessive number of
	  connection attempts</almEnabled>
	<almPriority>0</almPriority>
	<almEnabled>true</almName>
	<almScopeConfig>
	   <ScopingOptions>
		<Scope name="Group" value="/CUS0000001_Digi_International/" />
	   </ScopingOptions>
	</almScopeConfig>
	<almRuleConfig>
	   <Rules>
		<FireRule name="fireRule1">
		   <Variable name="disconnectWindow" value="5" />
		   <Variable name="disconnectCount" value="5" />
		</FireRule>
		<ResetRule name="resetRule1">
		   <Variable name="reconnectWindow" value="5" />
		</ResetRule>
	   </Rules>
	</almRuleConfig>
   </Alarm>
   <Alarm>
	<almId>151</almId>   <!-- alarm #2 -->
	<cstId>2</cstId>
	<almtId>2</almtId>
	<grpId>2</grpId>
	<almName>Device Offline</almName>
	<almDescription>Detects when a device disconnects from Remote Manager and fails
	   to reconnect within the specified time.</almEnabled>
	<almPriority>1</almPriority>
	<almEnabled>true</almName>
	<almScopeConfig>
	   <ScopingOptions>
		<Scope name="Group" value="/CUS0000001_Digi_International/" />
	   </ScopingOptions>
	</almScopeConfig>
	<almRuleConfig>
	   <Rules>
		<FireRule name="fireRule1">
		   <Variable name="reconnectWindowDuration" value="10" />
		</FireRule>
		<ResetRule name="resetRule1"/>
	   </Rules>
	</almRuleConfig>
   </Alarm>
   <Alarm>
	<almId>152</almId>   <!-- alarm #3 -->
	<cstId>2</cstId>
	<almtId>1</almtId>
	<grpId>2</grpId>
	<almName>System Alarm</almName>
	<almDescription>Detects when system alarm condistions occur.</almEnabled>
	<almPriority>0</almPriority>
	<almEnabled>true</almName>
	<almScopeConfig>
	</almScopeConfig>
	<almRuleConfig>
	</almRuleConfig>
   </Alarm>
</result>
Get Alarm Details
The following example shows how to get details for a sample alarm with an alarm ID of 3035.
Request
Response
<result>
  <resultTotalRows>1</resultTotalRows>
  <requestedStartRow>0</requestedStartRow>
  <resultSize>1</resultSize>
  <requestedSize>1000</requestedSize>
  <remainingSize>0</remainingSize>
  <Alarm>
    <almId>3035</almId>
    <cstId>2</cstId>
    <almtId>2</almtId>
    <grpId>11959</grpId>
    <almName>Device Offline</almName>
    <almDescription>Detects when a device disconnects from Remote Manager and fails to reconnected within the specified time</almDescription>
    <almEnabled>true</almEnabled>
    <almPriority>2</almPriority>
    <almScopeConfig>
      <ScopingOptions>
        <Scope name="Group" value="/CUS000000_Digi_Test/PW_Test/"/>
      </ScopingOptions>
    </almScopeConfig>
    <almRuleConfig>
      <Rules>
        <FireRule name="fireRule1">
          <Variable name="reconnectWindowDuration" value="1"/>
        </FireRule>
        <ResetRule name="resetRule1"/>
      </Rules>
    </almRuleConfig>
  </Alarm>
</result>
Create a Datapoint Condition Alarm
The following sample shows how to create a data point condition alarm that fires when the outside temperature data point is less than than 10 degrees Fahrenheit below zero.
In this example, the alarm template ID for the data point condition alarm is 9 (almtId=9). To find the almtId for an alarm type, send a GET ws/AlarmTemplate request to get a list of all available alarm templates.
Request
POST /ws/Alarm
Payload
<Alarm>
<almtId>9</almtId> <!-- Datapoint Condition Alarm -->
<almName>Minneapolis Temperature</almName>
<almDescription>Fire when it gets extremely cold.</almDescription>
<almScopeConfig>
<ScopingOptions>
<Scope name="Resource" value="temperature/MN/Minneapolis" />
</ScopingOptions>
</almScopeConfig>
<almRuleConfig>
<Rules>
<FireRule>
<Variable name="thresholdValue" value="-10" />
<Variable name="timeUnit" value="minutes" />
<Variable name="type" value="numeric" />
<Variable name="timeout" value="10" />
<Variable name="operator" value="<" />
</FireRule>
<ResetRule>
<Variable name="thresholdValue" value="-10" />
<Variable name="timeUnit" value="minutes" />
<Variable name="type" value="numeric" />
<Variable name="timeout" value="10" />
<Variable name="operator" value=">" />
</ResetRule>
</Rules>
</almRuleConfig>
</Alarm>
Create a Diachannel Datapoint Condition Alarm
The following sample shows how to create a DIA channel data point condition alarm that fires when the helium level in an MRI gets low.
In this example, the alarm template ID for the DIA channel data point condition alarm is 6 (almtId=6). To find the almtId for an alarm type, send a GET ws/AlarmTemplate request to get a list of all available alarm templates.
Request
POST /ws/Alarm
Payload
<Alarm>
<almtId>6</almtId> <!-- Dia Channel DataPoint Condition Alarm -->
<almName>Low Helium</almName>
<almDescription>Fires when the helium level in the MRI gets low</almDescription>
<almScopeConfig>
<ScopingOptions>
<Scope name="Group" value="CUS001_ABC/Test/" />
</ScopingOptions>
</almScopeConfig>
<almRuleConfig>
<Rules>
<FireRule>
<Variable name="thresholdValue" value="10" />
<Variable name="channelName" value="helium" />
<Variable name="instanceName" value="mri" />
<Variable name="timeUnit" value="seconds" />
<Variable name="type" value="numeric" />
<Variable name="timeout" value="5" />
<Variable name="operator" value="<" />
</FireRule>
<ResetRule>
<Variable name="thresholdValue" value="10" />
<Variable name="channelName" value="helium" />
<Variable name="instanceName" value="mri" />
<Variable name="timeUnit" value="seconds" />
<Variable name="type" value="numeric" />
<Variable name="timeout" value="5" />
<Variable name="operator" value=">" />
</ResetRule>
</Rules>
</almRuleConfig>
</Alarm>
Create a Smart Energy Missing Datapoint Alarm
The following sample shows how to create a smart energy missing data point alarm that fires when the devices do not report smart energy data.
In this example, the alarm template ID for the smart energy missing data point alarm is 12 (almtId=12). To find the almtId for an alarm type, send a GET ws/AlarmTemplate request to get a list of all available alarm templates.
Request
POST /ws/Alarm
Payload
<Alarm>
   <almtId>12</almtId>   <!-- Missing Smart Energy DataPoint alarm -->
   <almName>Missing Smart Energy DataPoint</almName>
   <almDescription>Fires when devices have not reported SmartEnergy data within the specified time</almDescription>
   <almScopeConfig>
      <ScopingOptions>
         <Scope name="Group" value="/CUS001_ABC/" />
      </ScopingOptions>
   </almScopeConfig>
   <almRuleConfig>
      <Rules>
         <FireRule>
            <Variable name="uploadTimeUnit" value="hours" />
            <Variable name="clusterType" value="*" />
            <Variable name="readingTimeUnit" value="4" />
            <Variable name="attributeId" value="4" />
            <Variable name="uploadInterval" value="1" />
            <Variable name="clusterId" value="*" />
            <Variable name="endpointId" value="*" />
            <Variable name="readingInterval" value="10" />
         </FireRule>
         <ResetRule />
      </Rules>
   </almRuleConfig>
</Alarm>
Create a Subscription Usage Alarm
The following sample shows how to create a subscription usage alarm that fires when Verizon cellular usage data exceeds 2 MB. The subscription usage alarm must specify the svcID along with a metric. Use the CustomerRatePlan web service to get a list of svcIDs.
In this example, the alarm template ID for the subscription usage alarm is 8 (almtId=8). To find the almtId for an alarm type, send a GET ws/AlarmTemplate request to get a list of all available alarm templates.
Request
POST /ws/Alarm
Payload
<Alarm>
   <almtId>8</almtId>   <!-- Subscription Usage alarm -->
   <almName>Verizon Cellular Usage</almName>
   <almDescription>Fires when verizon cellular usage data exceeds 2MB </almDescription>
   <almScopeConfig>
      <ScopingOptions>
         <Scope name="Device" value="00000000-00000000-000000FF-FF000001" />
      </ScopingOptions>
   </almScopeConfig>
   <almRuleConfig>
      <Rules>
         <FireRule>
            <Variable name="unit" value="mb" />
            <Variable name="thresholdValue" value="2" />
            <Variable name="svcId" value="14" />
            <Variable name="metric" value="transferred" />
         </FireRule>
         <ResetRule />
      </Rules>
   </almRuleConfig>
</Alarm>
AlarmStatus
Use the AlarmStatus web service to retrieve the current status of one or more alarms or to update the status of an alarm.
URI
http://<hostname>/ws/AlarmStatus
| HTTP method |
Format |
Description |
| GET |
/ws/AlarmStatus |
Get statuses for all current alarms. |
| GET |
/ws/AlarmStatus/{almId} |
Get statuses for a specific alarm. |
| PUT |
/ws/AlarmStatus/{almId}/{almsSourceEntityId} |
Update the alarm status. |
Elements
id
Unique identifier for the alarm status that consists of two elements:
| ID Element |
Description |
| almId |
System-generated identifier for the alarm. |
| almsSourceEntityId |
System-generated identifier for the entity associated with the alarm status, such as a device or task. |
almsStatus
Current status of the alarm:
| Status value |
Description |
| 0 |
Alarm is reset. |
| 1 |
Alarm is triggered. |
| 2 |
Alarm is acknowledged. |
almsTopic
Topic for the alarm.
cstId
Remote Manager identifier for the customer.
almsUpdateTime
Time at which the alarm status was last updated (ISO 8601 standard format).
almsPayload
Payload associated with the status change for the alarm in XML format. The payload can be any event object in the system that caused the status of the alarm to change. Typically, the payload is a web services object, such as a monitor or device core object.
Get Status for All Alarms
The following sample request shows how to get a list of all alarm statuses for all alarms.
Request
Response
<?xml version="1.0" encoding="UTF-8"?>
<result>
   <resultTotalRows>4</resultTotalRows>
   <requestedStartRow>0</requestedStartRow>
   <resultSize>4</resultSize>
   <requestedSize>1000</requestedSize>
   <remainingSize>0</remainingSize>
   <AlarmStatus>
      <id>
         <almId>142</almId>   <!-- alarm 142 almId #1 -->
         <almsSourceEntityId>46911</almsSourceEntityId>
      </id>
      <almsStatus>2</almsStatus>
      <almsTopic>Alarm.System.Monitor.inactive</almsTopic>
      <cstId>2</cstId>
      <almsUpdateTime>2012-06-27T21:02:09.567Z</almsUpdateTime>
      <almsPayload>
         <Payload>
            <Message>Monitor disconnected: node left the cluster</Message>
            <Monitor>
               <monId>46911</monId>
               <cstId>2</cstId>
               <monLastConnect>2012-06-27T17:08:27.457Z</monLastConnect>
               <monTopic>AlarmTemplate,Alarm,AlarmStatus,DeviceCore,XbeeCore</monTopic>
               <monTransportType>alarm</monTransportType>
               <monFormatType>xml</monFormatType>
               <monBatchSize>100</monBatchSize>
               <monCompression>none</monCompression>
               <monStatus>1</monStatus>
               <monBatchDuration>10</monBatchDuration>
            </Monitor>
         </Payload>
      </almsPayload>
   </AlarmStatus>
   <AlarmStatus>
      <id>
         <almId>142</almId>   <!-- alarm 142 almId #2 -->
         <almsSourceEntityId>Monitor:46911</almsSourceEntityId>
      </id>
      <almsStatus>0</almsStatus>
      <almsTopic>Alarm.System.Monitor.active</almsTopic>
      <cstId>2</cstId>
      <almsUpdateTime>2012-06-27T22:01:40.953Z</almsUpdateTime>
      <almsPayload>
         <Payload>
            <Message>Monitor connected</Message>
            <Monitor>
               <monId>46911</monId>
               <cstId>2</cstId>
               <monLastConnect>2012-06-27T21:39:50.833Z</monLastConnect>
               <monTopic>AlarmStatus,AlarmTemplate,Notification,Alarm</monTopic>
               <monTransportType>alarm</monTransportType>
               <monFormatType>xml</monFormatType>
               <monBatchSize>100</monBatchSize>
               <monCompression>none</monCompression>
               <monStatus>0</monStatus>
               <monBatchDuration>10</monBatchDuration>
            </Monitor>
         </Payload>
      </almsPayload>
   </AlarmStatus>
   <AlarmStatus>
      <id>
         <almId>151</almId>   <!-- alarm 151 almId #1 -->
         <almsSourceEntityId>00000000-00000000-00409DFF-FF441634</almsSourceEntityId>
      </id>
      <almsStatus>1</almsStatus>
      <almsTopic>Alarm.DeviceOffline</almsTopic>
      <cstId>2</cstId>
      <almsUpdateTime>2012-07-02T15:25:57.387Z</almsUpdateTime>
      <almsPayload>
         <Payload>
            <DeviceCore>
               <id>
                  <devId>11116</devId>
                  <devVersion>0</devVersion>
               </id>
               <devRecordStartDate>2012-07-02T13:27:00.000Z</devRecordStartDate>
               <devMac>00:40:9D:44:16:34</devMac>
               <devConnectwareId>00000000-00000000-00409DFF-FF441634</devConnectwareId>
               <cstId>2</cstId>
               <grpId>2</grpId>
               <devEffectiveStartDate>2012-07-02T13:27:00.000Z</devEffectiveStartDate>
               <devTerminated>false</devTerminated>
               <dvVendorId>4261412867</dvVendorId>
               <dpDeviceType>CPX2e SE</dpDeviceType>
               <dpFirmwareLevel>50331744</dpFirmwareLevel>
               <dpFirmwareLevelDesc>3.0.0.96</dpFirmwareLevelDesc>
               <dpRestrictedStatus>0</dpRestrictedStatus>
               <dpLastKnownIp>10.9.16.17</dpLastKnownIp>
               <dpGlobalIp>66.77.174.126</dpGlobalIp>
               <dpConnectionStatus>0</dpConnectionStatus>
               <dpLastConnectTime>2012-07-02T13:26:35.627Z</dpLastConnectTime>
               <dpContact />
               <dpDescription />
               <dpLocation />
               <dpPanId>0xf02d</dpPanId>
               <xpExtAddr>00:13:A2:00:40:5C:0A:6A</xpExtAddr>
               <dpServerId />
               <dpZigbeeCapabilities>875</dpZigbeeCapabilities>
               <grpPath>/CUS0000001_Digi_International/</grpPath>
            </DeviceCore>
         </Payload>
      </almsPayload>
   </AlarmStatus>
   <AlarmStatus>
      <id>
         <almId>152</almId>   <!-- alarm 152 almId #1 -->
         <almsSourceEntityId>Monitor:47827</almsSourceEntityId>
      </id>
      <almsStatus>0</almsStatus>
      <almsTopic>Alarm.System.Monitor.active</almsTopic>
      <cstId>2</cstId>
      <almsUpdateTime>2012-07-02T02:10:57.130Z</almsUpdateTime>
      <almsPayload>
         <Payload>
            <Message>Monitor connected</Message>
            <Monitor>
               <monId>47827</monId>
               <cstId>2</cstId>
               <monLastConnect>2012-06-29T19:18:10.287Z</monLastConnect>
               <monTopic>XbeeCore,DeviceCore,AlarmStatus,AlarmTemplate,Notification,Alarm</monTopic>
               <monTransportType>alarm</monTransportType>
               <monFormatType>xml</monFormatType>
               <monBatchSize>100</monBatchSize>
               <monCompression>none</monCompression>
               <monStatus>1</monStatus>
               <monBatchDuration>10</monBatchDuration>
            </Monitor>
         </Payload>
      </almsPayload>
   </AlarmStatus>
</result>
Acknowledge a Fired Alarm
The following sample request shows how to acknowledge a fired alarm. The sample alarm ID is 3140, the almsSourceEntity for the alarm event is 00000000-00000000-00409DFF-FF53231C.
Request
PUT ws/AlarmStatus/3140/00000000-00000000-00409DFF-FF53231C/`
Payload
<AlarmStatus>
   <almsStatus>2</almsStatus>
</AlarmStatus>
Response
GET ws/AlarmStatus/3140/00000000-00000000-00409DFF-FF53231C/
<?xml version="1.0" encoding="ISO-8859-1"?>
<result>
  <resultTotalRows>1</resultTotalRows>
  <requestedStartRow>0</requestedStartRow>
  <resultSize>1</resultSize>
  <requestedSize>1000</requestedSize>
  <remainingSize>0</remainingSize>
  <AlarmStatus>
    <id>
      <almId>3140</almId>
      <almsSourceEntityId>00000000-00000000-00409DFF-FF53231C</almsSourceEntityId>
    </id>
    <almsStatus>2</almsStatus>
    <almsTopic>Alarm.DeviceOffline</almsTopic>
    <cstId>2</cstId>
    <almsUpdateTime>2014-07-07T22:06:26.193Z</almsUpdateTime>
    <almsPayload>
      <Payload>
        <Method>Manual</Method>
      </Payload>
    </almsPayload>
  </AlarmStatus>
</result>
Reset a Fired Alarm
The following sample request uses the PUT method with the AlarmStatus web service to reset a fired alarm. The almID is 3140 and almsSourceEntity for the alarm event is 00000000-00000000-00409DFF-FF53231C.
Request
PUT ws/AlarmStatus/3140/00000000-00000000-00409DFF-FF53231C/
Payload
<AlarmStatus>
   <almsStatus>0</almsStatus>
</AlarmStatus>
Response
GET ws/AlarmStatus/3140/00000000-00000000-00409DFF-FF53231C/
<?xml version="1.0" encoding="ISO-8859-1"?>
<result>
  <resultTotalRows>1</resultTotalRows>
  <requestedStartRow>0</requestedStartRow>
  <resultSize>1</resultSize>
  <requestedSize>1000</requestedSize>
  <remainingSize>0</remainingSize>
  <AlarmStatus>
    <id>
      <almId>3140</almId>
      <almsSourceEntityId>00000000-00000000-00409DFF-FF53231C</almsSourceEntityId>
    </id>
    <almsStatus>0</almsStatus>
    <almsTopic>Alarm.DeviceOffline</almsTopic>
    <cstId>2</cstId>
    <almsUpdateTime>2014-07-07T22:06:26.193Z</almsUpdateTime>
    <almsPayload>
      <Payload>
        <Method>Manual</Method>
      </Payload>
    </almsPayload>
  </AlarmStatus>
</result>
AlarmStatusHistory
Use the AlarmStatusHistory web service to retrieve a record of alarm statuses over time.
URI
http://<hostname>/ws/AlarmStatusHistory
| HTTP method |
Format |
Description |
| GET |
/ws/AlarmStatusHistory |
Get a list of all alarm statuses over time. |
| GET |
/ws/AlarmStatusHistory/{almId} |
Get a list of alarm statuses over time for a specific alarm. |
Elements
id
Unique identifier for the alarm status that consists of two elements:
| ID Element |
Description |
| almId |
System-generated identifier for the alarm. |
| almsSourceEntityId |
System-generated identifier for the entity associated with the alarm status, such as a device or task. |
almsStatus
Current status of the alarm:
| Status value |
Description |
| 0 |
Alarm is reset. |
| 1 |
Alarm is triggered. |
| 2 |
Alarm is acknowledged. |
almsTopic
Topic for the alarm.
cstId
Remote Manager identifier for the customer.
almsUpdateTime
Time at which the alarm status was last updated (ISO 8601 standard format).
almsPayload
Payload associated with the status change for the alarm in XML format. The payload can be any event object in the system that caused the status of the alarm to change. Typically, the payload is a web services object, such as a monitor or device core object.
Query parameters
size
Number of resources to return for a GET request. Allowable value is a number from 1 to 1000. The default is 1000.
pageCursor
Page cursor that was returned from a previous request that can be used to retrieve the next page of data.
startTime
Start time (inclusive) for the status history you want to retrieve.
endTime
End time (exclusive) for the status history you want to retrieve.
order
Sort order for the retrieved data: asc for ascending or desc for descending.
List all Status History
The following sample request shows how to get all statuses for all configured alarms over time.
Request
GET ws/AlarmStatusHistory
Response (abbreviated)
<?xml version="1.0" encoding="ISO-8859-1"?>
<result>
   <resultSize>580</resultSize>
   <requestedSize>1000</requestedSize>
   <pageCursor>5a0319a4-7c95-11e4-a62c-fa163e4e63b3</pageCursor>
   <requestedStartTime>-1</requestedStartTime>
   <requestedEndTime>-1</requestedEndTime>
   <AlarmStatusHistory>
      <id>
         <almId>9219</almId>
         <almsSourceEntityId>00000000-00000000-BBCCDDFF-FF004000</almsSourceEntityId>
      </id>
      <almsStatus>0</almsStatus>
      <almsTopic>Alarm.DeviceOffline</almsTopic>
      <cstId>2</cstId>
      <almsUpdateTime>2014-11-10T23:48:42.594Z</almsUpdateTime>
      <almsPayload>
         <Payload>
            <DeviceCore>
               <id>
                  <devId>317792</devId>
                  <devVersion>0</devVersion>
               </id>
               <devRecordStartDate>2014-08-13T17:41:00.000Z</devRecordStartDate>
               <devMac>BB:CC:DD:00:40:00</devMac>
               <devConnectwareId>00000000-00000000-BBCCDDFF-FF004000</devConnectwareId>
               <cstId>2</cstId>
               <grpId>20686</grpId>
               <devEffectiveStartDate>2014-08-13T17:41:00.000Z</devEffectiveStartDate>
               <devTerminated>false</devTerminated>
               <dvVendorId>50331650</dvVendorId>
               <dpDeviceType>Joshs Device</dpDeviceType>
               <dpFirmwareLevel>16777216</dpFirmwareLevel>
               <dpFirmwareLevelDesc>1.0.0.0</dpFirmwareLevelDesc>
               <dpRestrictedStatus>0</dpRestrictedStatus>
               <dpLastKnownIp>199.17.162.22</dpLastKnownIp>
               <dpGlobalIp>199.17.162.22</dpGlobalIp>
               <dpConnectionStatus>1</dpConnectionStatus>
               <dpLastConnectTime>2014-11-10T23:48:42.394Z</dpLastConnectTime>
               <dpContact/>
               <dpDescription/>
               <dpLocation/>
               <dpMapLat>44.932017</dpMapLat>
               <dpMapLong>-93461594000000.000000</dpMapLong>
               <dpServerId>ClientID[5]</dpServerId>
               <dpZigbeeCapabilities>0</dpZigbeeCapabilities>
               <dpCapabilities>68178</dpCapabilities>
               <grpPath>/CUS0000002_Systems_Assurance/WSU/</grpPath>
               <dpLastDisconnectTime>2014-11-03T22:46:03.460Z</dpLastDisconnectTime>
               <dpLastUpdateTime>2014-10-22T15:52:44.247Z</dpLastUpdateTime>
               <dpHealthStatus>-1</dpHealthStatus>
            </DeviceCore>
         </Payload>
      </almsPayload>
      <almsSeverity>1</almsSeverity>
   </AlarmStatusHistory>
   <AlarmStatusHistory>
      <id>
         <almId>9219</almId>
         <almsSourceEntityId>00000000-00000000-BBCCDDFF-FF004000</almsSourceEntityId>
      </id>
      <almsStatus>1</almsStatus>
      <almsTopic>Alarm.DeviceOffline</almsTopic>
      <cstId>2</cstId>
      <almsUpdateTime>2014-11-11T03:42:29.477Z</almsUpdateTime>
      <almsPayload>
         <Payload>
            <DeviceCore>
               <id>
                  <devId>317792</devId>
                  <devVersion>0</devVersion>
               </id>
               <devRecordStartDate>2014-08-13T17:41:00.000Z</devRecordStartDate>
               <devMac>BB:CC:DD:00:40:00</devMac>
               <devConnectwareId>00000000-00000000-BBCCDDFF-FF004000</devConnectwareId>
               <cstId>2</cstId>
               <grpId>20686</grpId>
               <devEffectiveStartDate>2014-08-13T17:41:00.000Z</devEffectiveStartDate>
               <devTerminated>false</devTerminated>
               <dvVendorId>50331650</dvVendorId>
               <dpDeviceType>Joshs Device</dpDeviceType>
               <dpFirmwareLevel>16777216</dpFirmwareLevel>
               <dpFirmwareLevelDesc>1.0.0.0</dpFirmwareLevelDesc>
               <dpRestrictedStatus>0</dpRestrictedStatus>
               <dpLastKnownIp>199.17.162.22</dpLastKnownIp>
               <dpGlobalIp>199.17.162.22</dpGlobalIp>
               <dpConnectionStatus>0</dpConnectionStatus>
               <dpLastConnectTime>2014-11-10T23:48:42.393Z</dpLastConnectTime>
               <dpContact/>
               <dpDescription/>
               <dpLocation/>
               <dpMapLat>44.932017</dpMapLat>
               <dpMapLong>-93461594000000.000000</dpMapLong>
               <dpServerId/>
               <dpZigbeeCapabilities>0</dpZigbeeCapabilities>
               <dpCapabilities>68178</dpCapabilities>
               <grpPath>/CUS0000002_Systems_Assurance/WSU/</grpPath>
               <dpLastDisconnectTime>2014-11-11T03:37:29.368Z</dpLastDisconnectTime>
               <dpLastUpdateTime>2014-10-22T15:52:44.247Z</dpLastUpdateTime>
               <dpHealthStatus>-1</dpHealthStatus>
            </DeviceCore>
         </Payload>
      </almsPayload>
      <almsSeverity>1</almsSeverity>
   </AlarmStatusHistory>
Get Status History for an Alarm
The following sample request shows how to retrieve alarm status history for alarm ID 9219 with source entity ID 00000000-00000000-BBCCDDFF-FF004000.
Request
GET ws/AlarmStatusHistory/9219/00000000-00000000-BBCCDDFF-FF004000/
Response (abbreviated)
<?xml version="1.0" encoding="ISO-8859-1"?>
<result>
   <resultSize>29</resultSize>
   <requestedSize>1000</requestedSize>
   <pageCursor>3ab1d732-7c95-11e4-a62c-fa163e4e63b3</pageCursor>
   <requestedStartTime>-1</requestedStartTime>
   <requestedEndTime>-1</requestedEndTime>
   <AlarmStatusHistory>
      <id>
         <almId>9219</almId>
         <almsSourceEntityId>00000000-00000000-BBCCDDFF-FF004000</almsSourceEntityId>
      </id>
      <almsStatus>0</almsStatus>
      <almsTopic>Alarm.DeviceOffline</almsTopic>
      <cstId>2</cstId>
      <almsUpdateTime>2014-11-10T23:48:42.594Z</almsUpdateTime>
      <almsPayload>
         <Payload>
            <DeviceCore>
               <id>
                  <devId>317792</devId>
                  <devVersion>0</devVersion>
               </id>
               <devRecordStartDate>2014-08-13T17:41:00.000Z</devRecordStartDate>
               <devMac>BB:CC:DD:00:40:00</devMac>
               <devConnectwareId>00000000-00000000-BBCCDDFF-FF004000</devConnectwareId>
               <cstId>2</cstId>
               <grpId>20686</grpId>
               <devEffectiveStartDate>2014-08-13T17:41:00.000Z</devEffectiveStartDate>
               <devTerminated>false</devTerminated>
               <dvVendorId>50331650</dvVendorId>
               <dpDeviceType>Joshs Device</dpDeviceType>
               <dpFirmwareLevel>16777216</dpFirmwareLevel>
               <dpFirmwareLevelDesc>1.0.0.0</dpFirmwareLevelDesc>
               <dpRestrictedStatus>0</dpRestrictedStatus>
               <dpLastKnownIp>199.17.162.22</dpLastKnownIp>
               <dpGlobalIp>199.17.162.22</dpGlobalIp>
               <dpConnectionStatus>1</dpConnectionStatus>
               <dpLastConnectTime>2014-11-10T23:48:42.394Z</dpLastConnectTime>
               <dpContact/>
               <dpDescription/>
               <dpLocation/>
               <dpMapLat>44.932017</dpMapLat>
               <dpMapLong>-93461594000000.000000</dpMapLong>
               <dpServerId>ClientID[5]</dpServerId>
               <dpZigbeeCapabilities>0</dpZigbeeCapabilities>
               <dpCapabilities>68178</dpCapabilities>
               <grpPath>/CUS0000002_Systems_Assurance/WSU/</grpPath>
               <dpLastDisconnectTime>2014-11-03T22:46:03.460Z</dpLastDisconnectTime>
               <dpLastUpdateTime>2014-10-22T15:52:44.247Z</dpLastUpdateTime>
               <dpHealthStatus>-1</dpHealthStatus>
            </DeviceCore>
         </Payload>
      </almsPayload>
      <almsSeverity>1</almsSeverity>
   </AlarmStatusHistory>
   <AlarmStatusHistory>
      <id>
         <almId>9219</almId>
         <almsSourceEntityId>00000000-00000000-BBCCDDFF-FF004000</almsSourceEntityId>
      </id>
      <almsStatus>1</almsStatus>
      <almsTopic>Alarm.DeviceOffline</almsTopic>
      <cstId>2</cstId>
      <almsUpdateTime>2014-11-11T03:42:29.477Z</almsUpdateTime>
      <almsPayload>
         <Payload>
            <DeviceCore>
               <id>
                  <devId>317792</devId>
                  <devVersion>0</devVersion>
               </id>
               <devRecordStartDate>2014-08-13T17:41:00.000Z</devRecordStartDate>
               <devMac>BB:CC:DD:00:40:00</devMac>
               <devConnectwareId>00000000-00000000-BBCCDDFF-FF004000</devConnectwareId>
               <cstId>2</cstId>
               <grpId>20686</grpId>
               <devEffectiveStartDate>2014-08-13T17:41:00.000Z</devEffectiveStartDate>
               <devTerminated>false</devTerminated>
               <dvVendorId>50331650</dvVendorId>
               <dpDeviceType>Joshs Device</dpDeviceType>
               <dpFirmwareLevel>16777216</dpFirmwareLevel>
               <dpFirmwareLevelDesc>1.0.0.0</dpFirmwareLevelDesc>
               <dpRestrictedStatus>0</dpRestrictedStatus>
               <dpLastKnownIp>199.17.162.22</dpLastKnownIp>
               <dpGlobalIp>199.17.162.22</dpGlobalIp>
               <dpConnectionStatus>0</dpConnectionStatus>
               <dpLastConnectTime>2014-11-10T23:48:42.393Z</dpLastConnectTime>
               <dpContact/>
               <dpDescription/>
               <dpLocation/>
               <dpMapLat>44.932017</dpMapLat>
               <dpMapLong>-93461594000000.000000</dpMapLong>
               <dpServerId/>
               <dpZigbeeCapabilities>0</dpZigbeeCapabilities>
               <dpCapabilities>68178</dpCapabilities>
               <grpPath>/CUS0000002_Systems_Assurance/WSU/</grpPath>
               <dpLastDisconnectTime>2014-11-11T03:37:29.368Z</dpLastDisconnectTime>
               <dpLastUpdateTime>2014-10-22T15:52:44.247Z</dpLastUpdateTime>
               <dpHealthStatus>-1</dpHealthStatus>
            </DeviceCore>
         </Payload>
      </almsPayload>
      <almsSeverity>1</almsSeverity>
   </AlarmStatusHistory>
   <AlarmStatusHistory>
      <id>
         <almId>9219</almId>
         <almsSourceEntityId>00000000-00000000-BBCCDDFF-FF004000</almsSourceEntityId>
      </id>
      <almsStatus>0</almsStatus>
      <almsTopic>Alarm.DeviceOffline</almsTopic>
      <cstId>2</cstId>
      <almsUpdateTime>2014-11-11T18:26:08.073Z</almsUpdateTime>
      <almsPayload>
         <Payload>
            <DeviceCore>
               <id>
                  <devId>317792</devId>
                  <devVersion>0</devVersion>
               </id>
               <devRecordStartDate>2014-08-13T17:41:00.000Z</devRecordStartDate>
               <devMac>BB:CC:DD:00:40:00</devMac>
               <devConnectwareId>00000000-00000000-BBCCDDFF-FF004000</devConnectwareId>
               <cstId>2</cstId>
               <grpId>20686</grpId>
               <devEffectiveStartDate>2014-08-13T17:41:00.000Z</devEffectiveStartDate>
               <devTerminated>false</devTerminated>
               <dvVendorId>50331650</dvVendorId>
               <dpDeviceType>Joshs Device</dpDeviceType>
               <dpFirmwareLevel>16777216</dpFirmwareLevel>
               <dpFirmwareLevelDesc>1.0.0.0</dpFirmwareLevelDesc>
               <dpRestrictedStatus>0</dpRestrictedStatus>
               <dpLastKnownIp>199.17.162.22</dpLastKnownIp>
               <dpGlobalIp>199.17.162.22</dpGlobalIp>
               <dpConnectionStatus>1</dpConnectionStatus>
               <dpLastConnectTime>2014-11-11T18:26:07.903Z</dpLastConnectTime>
               <dpContact/>
               <dpDescription/>
               <dpLocation/>
               <dpMapLat>44.932017</dpMapLat>
               <dpMapLong>-93461594000000.000000</dpMapLong>
               <dpServerId>ClientID[4]</dpServerId>
               <dpZigbeeCapabilities>0</dpZigbeeCapabilities>
               <dpCapabilities>68178</dpCapabilities>
               <grpPath>/CUS0000002_Systems_Assurance/WSU/</grpPath>
               <dpLastDisconnectTime>2014-11-11T03:37:29.367Z</dpLastDisconnectTime>
               <dpLastUpdateTime>2014-10-22T15:52:44.247Z</dpLastUpdateTime>
               <dpHealthStatus>-1</dpHealthStatus>
            </DeviceCore>
         </Payload>
      </almsPayload>
      <almsSeverity>1</almsSeverity>
   </AlarmStatusHistory>
   <AlarmStatusHistory>
      <id>
         <almId>9219</almId>
         <almsSourceEntityId>00000000-00000000-BBCCDDFF-FF004000</almsSourceEntityId>
      </id>
      <almsStatus>1</almsStatus>
      <almsTopic>Alarm.DeviceOffline</almsTopic>
      <cstId>2</cstId>
      <almsUpdateTime>2014-11-11T19:04:15.977Z</almsUpdateTime>
      <almsPayload>
         <Payload>
            <DeviceCore>
               <id>
                  <devId>317792</devId>
                  <devVersion>0</devVersion>
               </id>
               <devRecordStartDate>2014-08-13T17:41:00.000Z</devRecordStartDate>
               <devMac>BB:CC:DD:00:40:00</devMac>
               <devConnectwareId>00000000-00000000-BBCCDDFF-FF004000</devConnectwareId>
               <cstId>2</cstId>
               <grpId>20686</grpId>
               <devEffectiveStartDate>2014-08-13T17:41:00.000Z</devEffectiveStartDate>
               <devTerminated>false</devTerminated>
               <dvVendorId>50331650</dvVendorId>
               <dpDeviceType>Joshs Device</dpDeviceType>
               <dpFirmwareLevel>16777216</dpFirmwareLevel>
               <dpFirmwareLevelDesc>1.0.0.0</dpFirmwareLevelDesc>
               <dpRestrictedStatus>0</dpRestrictedStatus>
               <dpLastKnownIp>199.17.162.22</dpLastKnownIp>
               <dpGlobalIp>199.17.162.22</dpGlobalIp>
               <dpConnectionStatus>0</dpConnectionStatus>
               <dpLastConnectTime>2014-11-11T18:26:07.903Z</dpLastConnectTime>
               <dpContact/>
               <dpDescription/>
               <dpLocation/>
               <dpMapLat>44.932017</dpMapLat>
               <dpMapLong>-93461594000000.000000</dpMapLong>
               <dpServerId/>
               <dpZigbeeCapabilities>0</dpZigbeeCapabilities>
               <dpCapabilities>68178</dpCapabilities>
               <grpPath>/CUS0000002_Systems_Assurance/WSU/</grpPath>
               <dpLastDisconnectTime>2014-11-11T18:59:15.868Z</dpLastDisconnectTime>
               <dpLastUpdateTime>2014-10-22T15:52:44.247Z</dpLastUpdateTime>
               <dpHealthStatus>-1</dpHealthStatus>
            </DeviceCore>
         </Payload>
      </almsPayload>
      <almsSeverity>1</almsSeverity>
   </AlarmStatusHistory>
   <AlarmStatusHistory>
      <id>
         <almId>9219</almId>
         <almsSourceEntityId>00000000-00000000-BBCCDDFF-FF004000</almsSourceEntityId>
      </id>
      <almsStatus>0</almsStatus>
      <almsTopic>Alarm.DeviceOffline</almsTopic>
      <cstId>2</cstId>
      <almsUpdateTime>2014-11-11T23:43:52.707Z</almsUpdateTime>
      <almsPayload>
         <Payload>
            <DeviceCore>
               <id>
                  <devId>317792</devId>
                  <devVersion>0</devVersion>
               </id>
               <devRecordStartDate>2014-08-13T17:41:00.000Z</devRecordStartDate>
               <devMac>BB:CC:DD:00:40:00</devMac>
               <devConnectwareId>00000000-00000000-BBCCDDFF-FF004000</devConnectwareId>
               <cstId>2</cstId>
               <grpId>20686</grpId>
               <devEffectiveStartDate>2014-08-13T17:41:00.000Z</devEffectiveStartDate>
               <devTerminated>false</devTerminated>
               <dvVendorId>50331650</dvVendorId>
               <dpDeviceType>Joshs Device</dpDeviceType>
               <dpFirmwareLevel>16777216</dpFirmwareLevel>
               <dpFirmwareLevelDesc>1.0.0.0</dpFirmwareLevelDesc>
               <dpRestrictedStatus>0</dpRestrictedStatus>
               <dpLastKnownIp>199.17.162.22</dpLastKnownIp>
               <dpGlobalIp>199.17.162.22</dpGlobalIp>
               <dpConnectionStatus>1</dpConnectionStatus>
               <dpLastConnectTime>2014-11-11T23:43:52.632Z</dpLastConnectTime>
               <dpContact/>
               <dpDescription/>
               <dpLocation/>
               <dpMapLat>44.932017</dpMapLat>
               <dpMapLong>-93461594000000.000000</dpMapLong>
               <dpServerId>ClientID[4]</dpServerId>
               <dpZigbeeCapabilities>0</dpZigbeeCapabilities>
               <dpCapabilities>68178</dpCapabilities>
               <grpPath>/CUS0000002_Systems_Assurance/WSU/</grpPath>
               <dpLastDisconnectTime>2014-11-11T18:59:15.867Z</dpLastDisconnectTime>
               <dpLastUpdateTime>2014-10-22T15:52:44.247Z</dpLastUpdateTime>
               <dpHealthStatus>-1</dpHealthStatus>
            </DeviceCore>
         </Payload>
      </almsPayload>
      <almsSeverity>1</almsSeverity>
   </AlarmStatusHistory>
   <AlarmStatusHistory>
      <id>
         <almId>9219</almId>
         <almsSourceEntityId>00000000-00000000-BBCCDDFF-FF004000</almsSourceEntityId>
      </id>
      <almsStatus>1</almsStatus>
      <almsTopic>Alarm.DeviceOffline</almsTopic>
      <cstId>2</cstId>
      <almsUpdateTime>2014-11-11T23:56:33.677Z</almsUpdateTime>
      <almsPayload>
         <Payload>
            <DeviceCore>
               <id>
                  <devId>317792</devId>
                  <devVersion>0</devVersion>
               </id>
               <devRecordStartDate>2014-08-13T17:41:00.000Z</devRecordStartDate>
               <devMac>BB:CC:DD:00:40:00</devMac>
               <devConnectwareId>00000000-00000000-BBCCDDFF-FF004000</devConnectwareId>
               <cstId>2</cstId>
               <grpId>20686</grpId>
               <devEffectiveStartDate>2014-08-13T17:41:00.000Z</devEffectiveStartDate>
               <devTerminated>false</devTerminated>
               <dvVendorId>50331650</dvVendorId>
               <dpDeviceType>Joshs Device</dpDeviceType>
               <dpFirmwareLevel>16777216</dpFirmwareLevel>
               <dpFirmwareLevelDesc>1.0.0.0</dpFirmwareLevelDesc>
               <dpRestrictedStatus>0</dpRestrictedStatus>
               <dpLastKnownIp>199.17.162.22</dpLastKnownIp>
               <dpGlobalIp>199.17.162.22</dpGlobalIp>
               <dpConnectionStatus>0</dpConnectionStatus>
               <dpLastConnectTime>2014-11-11T23:43:52.633Z</dpLastConnectTime>
               <dpContact/>
               <dpDescription/>
               <dpLocation/>
               <dpMapLat>44.932017</dpMapLat>
               <dpMapLong>-93461594000000.000000</dpMapLong>
               <dpServerId/>
               <dpZigbeeCapabilities>0</dpZigbeeCapabilities>
               <dpCapabilities>68178</dpCapabilities>
               <grpPath>/CUS0000002_Systems_Assurance/WSU/</grpPath>
               <dpLastDisconnectTime>2014-11-11T23:51:33.617Z</dpLastDisconnectTime>
               <dpLastUpdateTime>2014-10-22T15:52:44.247Z</dpLastUpdateTime>
               <dpHealthStatus>-1</dpHealthStatus>
            </DeviceCore>
         </Payload>
      </almsPayload>
      <almsSeverity>1</almsSeverity>
   </AlarmStatusHistory>
AlarmTemplate
Use the AlarmTemplate web service to retrieve information about available alarm types within your Remote Manager host.
URI
http://<hostname>/ws/AlarmTemplate
| HTTP method |
Format |
Description |
| GET |
/ws/AlarmTemplate |
Get a list of all available alarm templates. |
Elements
almtID
System-generated identifier for an alarm template. To get a list of available alarm template, use the AlarmTemplate web service.
almtName
Name of the alarm template.
almtDescription
Description of the alarm template.
grpId
Remote Manager identifier for the customer group.
almtTopic
Topic for the alarm template.
almtScopeOptions
Specifies the resource scope for the alarm template. Scope options include:
| Scope |
Description |
| Group |
Applies the alarm to the specified group indicated by the full group path. |
| Device |
Applies the alarm to the specified device. For example, 00000000-00000000-00000000-00000000. |
| XbeeNode |
Applies the alarm to the specified XbeeNode, expressed as the XbeeNode extended address. For example, 00:13:A2:00:00:00:00:00. |
| Resource |
Applies the alarm to a data stream path or pattern. You can use the wildcard charater asterisk () to match any element in the data stream path. For example, dia/channel//lth/temp matches all the lth temperature reading for all devices. |
| Global |
Applies the alarm at the customer level to monitor all instances of an entity. For example, you can create an alarm to monitor the total number of web services calls for your account. This option is available for subscription usage alarms only. |
See almtScopeOptions for the required XML structure for almtScopeOptions.
almtRules
Specifies the rule configurations for the alarm template:
| Rule configuration |
Description |
| FireRule |
A list of variables that specify the condition for firing the alarm. |
| ResetRule |
A list of variables that specify the condition for resetting the alarm. |
See almtRules for the required XML structure for almtRules.
See Alarm template types for a list of available fire and reset variables for each alarm template type.
Template Types
The following table lists and describes all available alarm template types.
| Alarm template type |
Description |
Scoping Options |
Fire variables |
Reset variables |
| Device offline |
Detects when a device disconnects from Remote Manager and fails to reconnect withint the specified time. |
Device Group |
reconnectWindowDuration |
none |
| XBeeNode offline |
Detects when an XBee node disconnects from Remote Manager and fails to reconnect within the specified time. |
Device Group XBeeNode |
reconnectWindowDuration |
none |
| Device excessive disconnects |
Detects devices with an excessive number of disconnects. |
Device Group |
disconnectCount disconnectWindow |
reconnectWindow |
| XBeeNode excessive deactivations |
Detects XBee nodes with an excessive number of deactivations. |
Device Group XBeeNode |
deactivationCount deactivationWindow |
activationWindow |
| DIA channel data point condition watch |
Detects when the specified DIA channel conditions are met. |
Device Group |
instanceName channelName type operator thresholdValue timeout timeUnit |
instanceName channelName type operator thresholdValue timeout timeUnit |
| Smart energy data point condition match |
Detects when the specified DIA channel conditions are met. |
Device Group XBeeNode |
endpointID clusterType clusterID attributeID type operator thresholdValue timeout timeUnit |
endpointID clusterType clusterID attributeID type operator thresholdValue timeout timeUnit |
| Data point condition match |
Detects when the specified data point usage conditions are met. |
Resource |
type operator thresholdValue timeout timeUnit |
type operator thresholdValue timeout timeUnit |
| Subscription usage |
Detects when subscription usage exceeds a specified threshold. |
Device Group Global |
svcID thresholdValue metric unit |
none |
| Missing data point |
Detects when one or more data points are not reported on within the specified time. |
Resource |
uploadInterval uploadTimeUnit readingInterval readingTimeUnit |
none |
| Missing DIA channel data point |
Detects when devices haven not reported DIA channel data within the specified time.Note The alarm will not be registered until the first data point is sent after the alarm is created or edited. |
Device Group |
instanceName channelName uploadInterval uploadTimeUnit readingInterval readingTimeUnit |
none |
| Missing smart energy data point |
Detects when devices have not reported smart energy data within the specifed time.Note The alarm will not be registered until the first data point is sent after the alarm is created or edited. |
Device Group XBeeNode |
endpointID clusterType clusterID attributedID uploadInterval uploadTimeUnit readingInterval readingTimeUnit |
none |
almtScopeOptions
Use the following XML structure for almtScopeOptions.
<almScopeConfig>
    <ScopingOptions>
        <Scope name="Resource" value="Weather/USA/*/Minneapolis"/>
    </ScopingOptions>
</almScopeConfig>
almtRules
Use the following structure for almtRules.
<almRuleConfig>
    <Rules>
	<FireRule>
	  <Variable name="variableName" value="value"/>
	  ...
	  </FireRule>
	  <ResetRule>
	  <Variable name="variableName" value="value"/>
	  ...
	  </ResetRule>
    </Rules>
</almRuleConfig>
List All Templates
The following sample request retrieves a list of all alarm templates for your Remote Manager host.
Request
Response
<?xml version="1.0" encoding="ISO-8859-1"?>
<result>
   <resultTotalRows>11</resultTotalRows>
   <requestedStartRow>0</requestedStartRow>
   <resultSize>11</resultSize>
   <requestedSize>1000</requestedSize>
   <remainingSize>0</remainingSize>
Alarm template ID 2: Device offline
  <AlarmTemplate>
    <almtId>2</almtId>
    <almtName>Device Offline</almtName>
    <almtDescription>Detects when a device disconnects from Remote Manager and fails to reconnected</almtDescription>
    <grpId>1</grpId>
    <almtTopic>Alarm.DeviceOffline</almtTopic>
    <almtScopeOptions>
      <ScopingOptions>
        <Scope name="Group"/>
        <Scope name="Device"/>
      </ScopingOptions>
    </almtScopeOptions>
    <almtRules>
      <Rules>
        <FireRule name="fireRule1">
          <Variable name="reconnectWindowDuration" type="int"/>
        </FireRule>
        <ResetRule name="resetRule1">
        </ResetRule>
      </Rules>
    </almtRules>
    <almtResourceList>DeviceCore,AlarmStatus</almtResourceList>
  </AlarmTemplate>
Alarm template ID 3: XBeeNode offline
  <AlarmTemplate>
    <almtId>3</almtId>
    <almtName>XBeeNode Offline</almtName>
    <almtDescription>Detects when an XBee Node disconnects from Remote Manager and fails to reconnect</almtDescription>
    <grpId>1</grpId>
    <almtTopic>Alarm.XBeeNodeOffline</almtTopic>
    <almtScopeOptions>
      <ScopingOptions>
        <Scope name="Group"/>
        <Scope name="Device"/>
        <Scope name="XbeeNode"/>
      </ScopingOptions>
    </almtScopeOptions>
    <almtRules>
      <Rules>
        <FireRule name="fireRule1">
          <Variable name="reconnectWindowDuration" type="int"/>
        </FireRule>
        <ResetRule name="resetRule1">
        </ResetRule>
      </Rules>
    </almtRules>
    <almtResourceList>XbeeCore,AlarmStatus</almtResourceList>
  </AlarmTemplate>
Alarm template ID 4: Device excessive disconnects
  <AlarmTemplate>
    <almtId>4</almtId>
    <almtName>Device Excessive Disconnects</almtName>
    <almtDescription>Detects devices with an excessive number of disconnects.</almtDescription>
    <grpId>1</grpId>
    <almtTopic>Alarm.DeviceExcessiveDisconnect</almtTopic>
    <almtScopeOptions>
      <ScopingOptions>
        <Scope name="Group"/>
        <Scope name="Device"/>
      </ScopingOptions>
    </almtScopeOptions>
    <almtRules>
      <Rules>
        <FireRule name="fireRule1">
          <Variable name="disconnectCount" type="int"/>
          <Variable name="disconnectWindow" type="int"/>
        </FireRule>
        <ResetRule name="resetRule1">
          <Variable name="reconnectWindow" type="int"/>
        </ResetRule>
      </Rules>
    </almtRules>
    <almtResourceList>DeviceCore,AlarmStatus</almtResourceList>
  </AlarmTemplate>
Alarm template ID 5: XBeeNode excessive deactivations
  <AlarmTemplate>
    <almtId>5</almtId>
    <almtName>XBeeNode Excessive Deactivations</almtName>
    <almtDescription>Detects XBeeNodes with an excessive number of deactivations.</almtDescription>
    <grpId>1</grpId>
    <almtTopic>Alarm.XBeeNodeExcessiveDeactivation</almtTopic>
    <almtScopeOptions>
      <ScopingOptions>
        <Scope name="Group"/>
        <Scope name="Device"/>
        <Scope name="XbeeNode"/>
      </ScopingOptions>
    </almtScopeOptions>
    <almtRules>
      <Rules>
        <FireRule name="fireRule1">
          <Variable name="deactivationCount" type="int"/>
          <Variable name="deactivationWindow" type="int"/>
        </FireRule>
        <ResetRule name="resetRule1">
          <Variable name="activationWindow" type="int"/>
        </ResetRule>
      </Rules>
    </almtRules>
    <almtResourceList>XbeeCore,AlarmStatus</almtResourceList>
  </AlarmTemplate>
Alarm template ID 6: DIA channel data point condition match
<AlarmTemplate>
<almtId>6</almtId>
<almtName>Dia channel data point condition match</almtName>
<almtDescription>Detects dia channel condition</almtDescription>
<grpId>1</grpId>
<almtTopic>Alarm.DiaChannelDataPoint</almtTopic>
<almtScopeOptions>
<ScopingOptions>
<Scope name="Group"/>
<Scope name="Device"/>
</ScopingOptions>
</almtScopeOptions>
<almtRules>
<Rules>
<FireRule name="fireRule1">
<Variable name="instanceName" type="string"/>
<Variable name="channelName" type="string"/>
<Variable name="type" type="enum">
<Value desc="Numeric" value="numeric"/>
<Value desc="String" value="string"/>
</Variable>
<Variable name="operator" type="enum">
<Value desc=">" value=">"/>
<Value desc=">=" value=">="/>
<Value desc="<" value="<"/>
<Value desc="<=" value="<="/>
<Value desc="=" value="="/>
<Value desc="!=" value="<>"/>
</Variable>
<Variable name="thresholdValue" type="string"/>
<Variable name="timeout" type="int"/>
<Variable name="timeUnit" type="enum">
<Value desc="Seconds" value="seconds"/>
<Value desc="Minutes" value="minutes"/>
<Value desc="Hours" value="hours"/>
</Variable>
</FireRule>
<ResetRule name="resetRule1">
<Variable name="instanceName" type="string"/>
<Variable name="channelName" type="string"/>
<Variable name="type" type="enum">
<Value desc="Numeric" value="numeric"/>
<Value desc="String" value="string"/>
</Variable>
<Variable name="operator" type="enum">
<Value desc=">" value=">"/>
<Value desc=">=" value=">="/>
<Value desc="<" value="<"/>
<Value desc="<=" value="<="/>
<Value desc="=" value="="/>
<Value desc="!=" value="<>"/>
</Variable>
<Variable name="thresholdValue" type="string"/>
<Variable name="timeout" type="int"/>
<Variable name="timeUnit" type="enum">
<Value desc="Seconds" value="seconds"/>
<Value desc="Minutes" value="minutes"/>
<Value desc="Hours" value="hours"/>
</Variable>
</ResetRule>
</Rules>
</almtRules>
<almtResourceList>DataPoint,AlarmStatus</almtResourceList>
</AlarmTemplate>
Alarm template ID 7: Smart energy data point condition match
<AlarmTemplate>
<almtId>7</almtId>
<almtName>Smart energy data point condition match</almtName>
<almtDescription>Detects smart energy data point condition</almtDescription>
<grpId>1</grpId>
<almtTopic>Alarm.XbeeAttributeDataPoint</almtTopic>
<almtScopeOptions>
<ScopingOptions>
<Scope name="Group"/>
<Scope name="Device"/>
<Scope name="XbeeNode"/>
</ScopingOptions>
</almtScopeOptions>
<almtRules>
<Rules>
<FireRule name="fireRule1">
<Variable name="endpointId" type="string"/>
<Variable name="clusterType" type="string"/>
<Variable name="clusterId" type="string"/>
<Variable name="attributeId" type="string"/>
<Variable name="type" type="enum">
<Value desc="Numeric" value="numeric"/>
<Value desc="String" value="string"/>
</Variable>
<Variable name="operator" type="enum">
<Value desc=">" value=">"/>
<Value desc=">=" value=">="/>
<Value desc="<" value="<"/>
<Value desc="<=" value="<="/>
<Value desc="=" value="="/>
<Value desc="!=" value="<>"/>
</Variable>
<Variable name="thresholdValue" type="string"/>
<Variable name="timeout" type="int"/>
<Variable name="timeUnit" type="enum">
<Value desc="Seconds" value="seconds"/>
<Value desc="Minutes" value="minutes"/>
<Value desc="Hours" value="hours"/>
</Variable>
</FireRule>
<ResetRule name="resetRule1">
<Variable name="endpointId" type="string"/>
<Variable name="clusterType" type="string"/>
<Variable name="clusterId" type="string"/>
<Variable name="attributeId" type="string"/>
<Variable name="type" type="enum">
<Value desc="Numeric" value="numeric"/>
<Value desc="String" value="string"/>
</Variable>
<Variable name="operator" type="enum">
<Value desc=">" value=">"/>
<Value desc=">=" value=">="/>
<Value desc="<" value="<"/>
<Value desc="<=" value="<="/>
<Value desc="=" value="="/>
<Value desc="!=" value="<>"/>
</Variable>
<Variable name="thresholdValue" type="string"/>
<Variable name="timeout" type="int"/>
<Variable name="timeUnit" type="enum">
<Value desc="Seconds" value="seconds"/>
<Value desc="Minutes" value="minutes"/>
<Value desc="Hours" value="hours"/>
</Variable>
</ResetRule>
</Rules>
</almtRules>
<almtResourceList>DataPoint,AlarmStatus</almtResourceList>
</AlarmTemplate>
Alarm template ID 8: Subscription usage
  <AlarmTemplate>
    <almtId>8</almtId>
    <almtName>Subscription Usage</almtName>
    <almtDescription>Fires when subscription usage exceeds a certain threshold</almtDescription>
    <grpId>1</grpId>
    <almtTopic>Alarm.SubscriptionUsage</almtTopic>
    <almtScopeOptions>
      <ScopingOptions>
        <Scope name="Group"/>
        <Scope name="Global"/>
        <Scope name="Device"/>
      </ScopingOptions>
    </almtScopeOptions>
    <almtRules>
      <Rules>
        <FireRule name="fireRule1" uiView="SubscriptionFireRule">
          <Variable name="svcId" type="int"/>
          <Variable name="thresholdValue" type="numeric"/>
          <Variable name="metric" type="string"/>
          <Variable name="unit" type="string"/>
        </FireRule>
        <ResetRule name="resetRule1">
        </ResetRule>
      </Rules>
    </almtRules>
    <almtResourceList>SubscriptionUseCore,AlarmStatus</almtResourceList>
  </AlarmTemplate>
Alarm template ID 9: Data point condition
<AlarmTemplate>
<almtId>9</almtId>
<almtName>DataPoint condition</almtName>
<almtDescription>Fires when data point usage conditions given below is met</almtDescription>
<grpId>1</grpId>
<almtTopic>Alarm.DataPointConditionMatch</almtTopic>
<almtScopeOptions>
<ScopingOptions>
<Scope name="Resource"/>
</ScopingOptions>
</almtScopeOptions>
<almtRules>
<Rules>
<FireRule name="fireRule1">
<Variable name="type" type="enum">
<Value desc="Numeric" value="numeric"/>
<Value desc="String" value="string"/>
</Variable>
<Variable name="operator" type="enum">
<Value desc=">" value=">"/>
<Value desc=">=" value=">="/>
<Value desc="<" value="<"/>
<Value desc="<=" value="<="/>
<Value desc="=" value="="/>
<Value desc="!=" value="<>"/>
</Variable>
<Variable name="thresholdValue" type="string"/>
<Variable name="timeout" type="int"/>
<Variable name="timeUnit" type="enum">
<Value desc="Seconds" value="seconds"/>
<Value desc="Minutes" value="minutes"/>
<Value desc="Hours" value="hours"/>
</Variable>
</FireRule>
<ResetRule name="resetRule1">
<Variable name="type" type="enum">
<Value desc="Numeric" value="numeric"/>
<Value desc="String" value="string"/>
</Variable>
<Variable name="operator" type="enum">
<Value desc=">" value=">"/>
<Value desc=">=" value=">="/>
<Value desc="<" value="<"/>
<Value desc="<=" value="<="/>
<Value desc="=" value="="/>
<Value desc="!=" value="<>"/>
</Variable>
<Variable name="thresholdValue" type="string"/>
<Variable name="timeout" type="int"/>
<Variable name="timeUnit" type="enum">
<Value desc="Seconds" value="seconds"/>
<Value desc="Minutes" value="minutes"/>
<Value desc="Hours" value="hours"/>
</Variable>
</ResetRule>
</Rules>
</almtRules>
<almtResourceList>DataPoint,AlarmStatus</almtResourceList>
</AlarmTemplate>
Alarm template ID 10: Missing data point
  <AlarmTemplate>
    <almtId>10</almtId>
    <almtName>Missing DataPoint</almtName>
    <almtDescription>Fires when a data points are not reported within the specified time</almtDescription>
    <grpId>1</grpId>
    <almtTopic>Alarm.MissingDataPoint</almtTopic>
    <almtScopeOptions>
      <ScopingOptions>
        <Scope name="Resource"/>
      </ScopingOptions>
    </almtScopeOptions>
    <almtRules>
      <Rules>
        <Description>Note: Alarm will not be registered until the first DataPoint is sent after the Alarm is created or edited.</Description>
        <FireRule name="fireRule1">
          <Variable name="uploadInterval" type="int"/>
          <Variable name="uploadTimeUnit" type="enum">
            <Value desc="Minutes" value="minutes"/>
            <Value desc="Hours" value="hours"/>
          </Variable>
          <Variable name="readingInterval" type="int"/>
          <Variable name="readingTimeUnit" type="enum">
            <Value desc="Seconds" value="seconds"/>
            <Value desc="Minutes" value="minutes"/>
            <Value desc="Hours" value="hours"/>
          </Variable>
        </FireRule>
        <ResetRule name="resetRule1">
        </ResetRule>
      </Rules>
    </almtRules>
    <almtResourceList>DataPoint,AlarmStatus</almtResourceList>
  </AlarmTemplate>
Alarm template ID 11: Missing DIA channel data point
  <AlarmTemplate>
    <almtId>11</almtId>
    <almtName>Missing DiaChannel DataPoint</almtName>
    <almtDescription>Fires when devices have not reported DIA channel data within the specified time</almtDescription>
    <grpId>1</grpId>
    <almtTopic>Alarm.MissingDiaChannelDataPoint</almtTopic>
    <almtScopeOptions>
      <ScopingOptions>
        <Scope name="Group"/>
        <Scope name="Device"/>
      </ScopingOptions>
    </almtScopeOptions>
    <almtRules>
      <Rules>
        <Description>Note: Alarm will not be registered until the first DataPoint is sent after the Alarm is created or edited.</Description>
        <FireRule name="fireRule1">
          <Variable name="instanceName" type="string"/>
          <Variable name="channelName" type="string"/>
          <Variable name="uploadInterval" type="int"/>
          <Variable name="uploadTimeUnit" type="enum">
            <Value desc="Minutes" value="minutes"/>
            <Value desc="Hours" value="hours"/>
          </Variable>
          <Variable name="readingInterval" type="int"/>
          <Variable name="readingTimeUnit" type="enum">
            <Value desc="Seconds" value="seconds"/>
            <Value desc="Minutes" value="minutes"/>
            <Value desc="Hours" value="hours"/>
          </Variable>
        </FireRule>
        <ResetRule name="resetRule1">
        </ResetRule>
      </Rules>
    </almtRules>
    <almtResourceList>DataPoint,AlarmStatus</almtResourceList>
  </AlarmTemplate>
Alarm template ID 12: Missing smart energy data point
  <AlarmTemplate>
    <almtId>12</almtId>
    <almtName>Missing Smart Energy DataPoint</almtName>
    <almtDescription>Fires when devices have not reported Smart Energy data within the specified time</almtDescription>
    <grpId>1</grpId>
    <almtTopic>Alarm.MissingSmartEnergyDataPoint</almtTopic>
    <almtScopeOptions>
      <ScopingOptions>
        <Scope name="Group"/>
        <Scope name="Device"/>
        <Scope name="XbeeNode"/>
      </ScopingOptions>
    </almtScopeOptions>
    <almtRules>
      <Rules>
        <Description>Note: Alarm will not be registered until the first DataPoint is sent after the Alarm is created or edited.</Description>
        <FireRule name="fireRule1">
          <Variable name="endpointId" type="string"/>
          <Variable name="clusterType" type="string"/>
          <Variable name="clusterId" type="string"/>
          <Variable name="attributeId" type="string"/>
          <Variable name="uploadInterval" type="int"/>
          <Variable name="uploadTimeUnit" type="enum">
            <Value desc="Minutes" value="minutes"/>
            <Value desc="Hours" value="hours"/>
          </Variable>
          <Variable name="readingInterval" type="int"/>
          <Variable name="readingTimeUnit" type="enum">
            <Value desc="Seconds" value="seconds"/>
            <Value desc="Minutes" value="minutes"/>
            <Value desc="Hours" value="hours"/>
          </Variable>
        </FireRule>
        <ResetRule name="resetRule1">
        </ResetRule>
      </Rules>
    </almtRules>
    <almtResourceList>DataPoint,AlarmStatus</almtResourceList>
  </AlarmTemplate>
CarrierAuth
Use the CarrierAuth web service to get, configure, modify, or delete carrier account credentials.
URI
http://<hostname>/ws/CarrierAuth
| HTTP method |
Format |
Description |
| GET |
/ws/CarrierAuth |
Get a list of all configured carrier accounts.Note Password information is not returned. |
| POST |
/ws/CarrierAuth |
Configure authorization information for a carrier account. |
| PUT |
/ws/CarrierAuth/{caId} |
Update carrier authorization information for an existing carrier account. |
| DELETE |
/ws/CarrierAuth/{caId} |
Delete carrier authorization information for a carrier account. |
Elements
caId
Identifier associated with a specific carrier authentication. A unique identifier is returned for each CarrierAuth request.
cstId
Remote Manager identifier for the customer.
prvName
Cellular service provider name. Options include: ATT, DeutscheTelekom, Rogers, Telefonica, Verizon, or Vodafone.
caUserName
Username associated with the carrier account. This is the username provided by your business account carrier that you used to set up the carrier account within Remote Manager.
caPassword
Password for the cellular service account. This password was provided by your business account carrier.
caUpdateTime
Date and time in ISO 8601 format when your carrier account information was last updated.
caLicenseKey1
Admintrator license key required for AT&T, Rogers, and Telefonica.
Get All Carrier Accounts
The following example shows how to get a list of configured carrier accounts for your Remote Manager account.
Note Password information is not retured.
Request
Response
<?xml version="1.0" encoding="ISO-8859-1"?>
<result>
  <resultTotalRows>2</resultTotalRows>
  <requestedStartRow>0</requestedStartRow>
  <resultSize>2</resultSize>
  <requestedSize>1000</requestedSize>
  <remainingSize>0</remainingSize>
  <CarrierAuth>
    <caId>2</caId>
    <cstId>3</cstId>
    <prvName>ATT</prvName>  <!-- carrier account #1 -->
    <caUserName>exampleUser</caUserName>
    <caUpdateTime>2012-10-15T15:17:00.000Z</caUpdateTime>
  </CarrierAuth>
  <CarrierAuth>
    <caId>67</caId>
    <cstId>3</cstId>
    <prvName>Vodafone</prvName>    <!-- carrier account #2 -->
    <caUserName>exampleUser</caUserName>
    <caUpdateTime>2012-10-31T18:55:00.000Z</caUpdateTime>
  </CarrierAuth>
</result>
Configure Carrier Account Credentials
The following example shows how to configure credentials for an AT&T account.
POST /ws/CarrierAuth
<CarrierAuth>
   <prvName>ATT</prvName>
   <caUserName>ExampleUser</caUserName>
   <caPassword>123</caPassword>
   <caLicenseKey1>123</caLicenseKey1>
 </CarrierAuth>
Update a Carrier Account
The following example shows how to insert a caId element in an existing AT&T account.
PUT /ws/CarrierAuth
<CarrierAuth>
   <caId>7</caId>
   <prvName>ATT</prvName>
   <caUserName>exampleUser</caUserName>
   <caPassword>123</caPassword>
   <caLicenseKey1>123</caLicenseKey1>
 </CarrierAuth>
Delete Carrier Account
The following example shows how to delete the record of a carrier account in Remote Manager.
DELETE ws/CarrierAuth/{subscription_id}
Replace subscription_id with the subscription ID of the account you want to delete.
CustomerRatePlan
Remote Manager uses rate limits on subscription usage for features provided by the system. Use the CustomerRatePlan API to see the rate plan limits.
URI
http://<hostname>/ws/CustomerRatePlan
| HTTP method |
Format |
Description |
| GET |
/ws/CustomerRatePlan |
Get rate plan information |
Example:
<result>
  <resultTotalRows>150</resultTotalRows>
  <requestedStartRow>0</requestedStartRow>
  <resultSize>150</resultSize>
  <requestedSize>1000</requestedSize>
  <remainingSize>0</remainingSize>
  <CustomerRatePlan>
    <id>
      <cstId>57639</cstId>
      <svcId>1</svcId>
      <svcVersion>0</svcVersion>
      <rpId>1630</rpId>
      <rpVersion>0</rpVersion>
    </id>
    <scId>46072</scId>
    <scVersion>1</scVersion>
    <scEffectiveStartDate>2021-02-24T17:45:00.000Z</scEffectiveStartDate>
    <scRecordEndDate>2021-02-24T17:45:00.000Z</scRecordEndDate>
    <scTerminated>false</scTerminated>
    <rpAutoSubscribe>true</rpAutoSubscribe>
    <rpTerminated>false</rpTerminated>
    <rpPooled>1</rpPooled>
    <rpLimit>0</rpLimit>
    <rpLimit2>10000</rpLimit2>
    <rpLimit3>0</rpLimit3>
    <rpLimit4>0</rpLimit4>
    <rpEnforceLimit>false</rpEnforceLimit>
    <rpEnforceLimit2>false</rpEnforceLimit2>
    <rpEnforceLimit3>false</rpEnforceLimit3>
    <rpEnforceLimit4>false</rpEnforceLimit4>
    <rpDescription>Device messaging DIGI-RM-PRM</rpDescription>
    <svcName>messaging</svcName>
    <svcDescription>Device messaging</svcDescription>
    <svcLevel>2</svcLevel>
    <svcMetricCount>2</svcMetricCount>
    <svcMetric>size</svcMetric>
    <svcMetric2>messages</svcMetric2>
    <svcUnits>kbytes</svcUnits>
    <svcUnits2>count</svcUnits2>
    <svcEnforceable>false</svcEnforceable>
    <svcEnforceable2>false</svcEnforceable2>
    <svcEnforceable3>false</svcEnforceable3>
    <svcEnforceable4>false</svcEnforceable4>
  </CustomerRatePlan>
  ...etc...
</result>
DataPoint
The DataPoint API is a pre-version 1 API used to get, create, modify, or delete data points. Data points created by the API are supported. However, when creating new data streams, use the v1/streams API.
The DataPoint web service lists, creates, or deletes data points within a data stream.
URI
http://<hostname>/ws/DataPoint
| Method |
Format |
Description |
| GET |
/ws/DataPoint/{streamId} |
List all data points for a data stream. |
| POST |
/ws/DataPoint/{streamId} |
Create one or more data points in a data stream. |
| DELETE |
/ws/DataPoint/{streamId} |
Delete an existing data point within a data stream. |
Elements
id
Identifier for the data point.
cstId
Remote Manager identifier for the customer.
streamId
Full path for the stream that contains the data points. Typically this is the data stream that the data point belongs to, but if you are using replication (forwardTo) it may be different.
timestamp
Client-assigned timestamp. If there is no client-assigned timestamp, the serverTimestamp value is used.
serverTimestamp
Server-assigned timestamp that indicates when the data point was stored on the server. Not writable by the client.
data
Data value for the data point.
description
Description of the data.
quality
User-defined 32-bit integer value representing the quality of the data in the data point.
location
Geo-location information associated with the data point which indicates the location when the data point was recorded. Geo-location is represented as a comma-delimited list of floats in order of lat, long, elevation (degrees, degrees, meters).
dataType
Type of data stored in the data stream.
- Integer: data can be represented with a network (= big-endian) 32-bit two’s-complement integer
- Long: data can be represented with a network (= big-endian) 64-bit two’s complement integer
- Float: data can be represented with a network (= big-endian) 32-bit IEEE754 floating point
- Double: data can be represented with a network (= big-endian) 64-bit IEEE754 floating point
- String: UTF-8
- Binary
- Unknown
units
User-defined name for the units in which data is reported.
forwardTo
Comma-delimited list of data streams to which to forward the data points.
Parameters
| Name |
Type |
Description |
| startTime |
timestamp |
Start time (inclusive) in ISO 8601 or epoch (long). |
| endTime |
timestamp |
End time (exclusive) in ISO 8601 or epoch (long). |
| timeline |
string |
Timestamps to use in the request: client or server. The default is client. |
| pageCursor |
string |
Cursor to get the next page of devices. Omit on initial call. |
| size |
integer |
Number of items to return. The maximum and default is 1000. |
| order |
string |
Return streams ordered by ID (asc | desc). The default is ascending (asc). |
| timezone |
string |
Timezone in which to calculate rollups. Applies only to rollups with intervals of day or longer. |
| rollupInterval |
string |
Rollup interval: half, hour, day, week, or month. The default is hour. |
| rollupMethod |
string |
Rollup method: sum, average, min, max, count, or standarddev. The default is average. |
Direct Device Uploads
Devices can upload directly to data streams over any of the existing transports (TCP, UDP, SMS, and Satellite). The path specified in the data service message begins with DataPoint and the rest of the message is mapped to a data stream appended to the device ID.
For example, if the device sends a data point file specifying the filename DataPoint/temp1, the data point is added to the data stream /temp1. The file must follow one of the expected formats and must specify the format via the file extension. The following types are supported for a given extension:
| Format |
Extension |
Description |
| XML |
.xml |
XML representation same as the /ws/DataPoint interface. |
| CSV |
.csv |
Comma separated list. One data point per line with details separated by commas. |
| Binary |
.bin |
Whatever the content of the uploaded data is directly inserted to a single data point. |
To maximize the speed and throughput of Remote Manager, limitations have been imposed on device uploads.
- Maximum number of data points allowed per request: 250
- Maximum size of Send Data requests: 2MB
- Maximum size of replies to Device Requests: 2MB
- Maximum number of binary data points allowed: 64KB
When devices push data points up to Remote Manager, the description included refers to the data point, not the data stream. To view the description, you must retrieve data point via web services.
XML
XML format uses the same format used in /ws/DataPoint PUT. The stream id is ignored since it is provided by the path. Also, any streams listed in the forwardTo field will be normalized to the device’s stream. This is done to prevent one device from uploading data into another device’s stream.
<DataPoint>
    <data>42</data>
    <!-- Everything below this is optional -->
    <description>Temperature at device 1</description>
    <location>0.0, 0.0, 0.0</location>
    <quality>99</quality>
    <dataType>float</dataType>
    <units>Kelvin</units>
</DataPoint>
For multiple data points in one message:
<list>
  <DataPoint>
    <data>42</data>
    <timestamp>1234566</timestamp>
  </DataPoint>
  <DataPoint>
    <data>43</data>
  </DataPoint>
</list>
CSV
An optional upload format is to specify the data in UTF-8 encoded comma separated values. Each line ('\n' terminated) specifies a data point. The default order is:
DATA, TIMESTAMP, QUALITY, DESCRIPTION, LOCATION, DATATYPE, UNITS, FORWARDTO
Meaning the following file:
data, 1,99,"my description",,INTEGER,kelvins,"stream1,stream2"
data2,2,50,"my description"
data3,3,25,"my description"
Would create 3 data points, set the stream’s units/type to kelvins/Integers, and have the data points with the data “data”, “data2”, and “data3”, using the epoch timestamps of 1, 2, and 3.
Note that location was omitted in the above example. You can omit values by leaving them empty or stopping before the end. For example:
**Empty values:**data,1,,,99
**Ending early:**data,1
Order can be overridden. You can define a header on the first line by starting it with a ‘#’ character, for example:
#TIMESTAMP,DATA
1, data
2, data2
3, data3
Will create 3 data points 1ms apart starting at epoch (1970).
Multiple datapoints for multiple streams from a device can be inserted in one message using the STREAMID value. When the STREAMID value is specified, the file name is no longer used for the stream name.
For example:
#STREAMID,DATA,TIMESTAMP
sensor1/port1,97,1
sensor1/port2,98,1
sensor2/port1,42,1
sensor2/port2,0,2
Will create 4 data points, one in each of 4 separate streams for the device. The first 3 data points are at 1ms after the epoch (1970) and the final data point is 1ms later.
The XML version is as follows:
<list>
<DataPoint><streamId>sensor1/port1</streamId><data>97</data><timestamp>1</timestamp></DataPoint>
<DataPoint><streamId>sensor1/port2</streamId><data>98</data><timestamp>1</timestamp></DataPoint>
<DataPoint><streamId>sensor2/port1</streamId><data>42</data><timestamp>1</timestamp></DataPoint>
<DataPoint><streamId>sensor2/port2</streamId><data>0</data><timestamp>2</timestamp></DataPoint>
</list>
The disadvantage to using the XML format is that it is very verbose. This binary alternative format can be used to be more concise. You can specify a simple value instead of XML or CSV data. When the value is pushed to /DataPoint, it is stored in complete as-is in time-series data (in the exact binary format as provided). For details on endianness, bit lengths, and so on for supported data types see the dataType in the Data Streams section. However, data types are not required. Data can be 1 byte status indicators or 10k images but Remote Manager will not be able to provide rollups on things which do not use the specified formats.
For instance, the following data service message:
| path: |
/DataPoint/temp1.bin |
| content: |
42 |
Will result in a new data point with a value of “42” (in binary).
Note: The binary concise mechanism has the following limitations:
- Only single values can be uploaded per data service message
- Data must be smaller than 64k
Whitespace characters for the data value are preserved in all formats. Use quotes around the string for CSV format to preserve break lines. For binary data, we recommend you to use binary concise format. Binary concise format however can’t be used to create multiple data points in a single request. To create multiple binary data points in a single request, we recommend you to use a base64 encoded string.
DataStream
The DataStreams API is a pre-version 1 API used the get, create, modify, or delete data streams. Data streams created by the API are supported; when creating a new data stream, use the v1/streams API.
The DataStream web services creates, modifies, or deletes a data stream.
URI
http://<hostname>/ws/DataStream
| Method |
Format |
Description |
| GET |
/ws/DataStream |
List all data streams. |
| POST |
/ws/DataStream |
Create one or more data streams. |
| PUT |
/ws/DataStream |
Create or update a data stream. |
| DELETE |
/ws/DataStream/{streamId} |
Delete a data stream. |
Elements
cstId
Remote Manager identifier for the customer.
streamId
Full path for the stream that contains the data points. Typically this is the data stream that the data point belongs to, but if you are using replication (forwardTo) it may be different.
dataType
Type of data stored in the data stream.
- Integer: data can be represented with a network (= big-endian) 32-bit two’s-complement integer
- Long: data can be represented with a network (= big-endian) 64-bit two’s complement integer
- Float: data can be represented with a network (= big-endian) 32-bit IEEE754 floating point
- Double: data can be represented with a network (= big-endian) 64-bit IEEE754 floating point
- String: UTF-8
- Binary
- Unknown
units
User-defined name for the units in which data is reported.
description
Description of the data.
forwardTo
Comma-delimited list of data streams to which to forward the data points.
dataTtl
Time to live (TTL) in seconds for data points stored in the data stream. A data point expires after the configured amount of time and is automatically deleted.
rollupTtl
Time to live (TTL) in seconds for the aggregate roll-ups of data points stored in the stream. A roll-up expires after the configured amount of time and is automatically deleted.
currentValue
Information about the last recorded data point (not writeable in PUT or POST requests).
| Field |
Description |
| id |
Identifier for the data point. |
| timestamp |
Data point client timestamp. |
| serverTimestamp |
Timestamp when data point was received by the server. |
| data |
Data value of the data point. |
| description |
Data point description. |
| quality |
User-defined 32-bit integer value representing the quality of the data in the data point. |
| location |
Geo-location information associated with the data point which indicates the location when the data point was recorded. Geo-location is represented as a comma-delimited list of floats in order of lat, long, elevation (degrees, degrees, meters). |
Parameters
| Name |
Type |
Description |
| pageCursor |
string |
Page cursor returned from a previous request that can be used to retrieve the next page of data. Omit on initial call. |
| size |
integer |
Maximum number of items to return. The maximum and default is 1000. |
| category |
string |
Return streams for the specified category: data, metrics, management, or carrier. If you do not use the category parameter, streams for all categories are returned. |
DeviceCore
Use the DeviceCore web service to create, register, modify, or delete Remote Manager devices or to retrieve information about a registered device. You can retrieve settings, connection information, and state information for a registered device.
URI
http://<hostname>/ws/DeviceCore
| HTTP method |
Format |
Description |
| GET |
/ws/DeviceCore |
Get a list of devices provisioned in your account. |
| POST |
/ws/DeviceCore/{devConnectwareId} |
Add or register a device in your account. |
| PUT |
/ws/DeviceCore/[{id}|{devConnectwareId}] |
Add descriptive text fields for the device. |
| DELETE |
/ws/DeviceCore/[{id} |
Delete a device from your account. |
Elements
cstId
Remote Manager identifier for the customer.
devCellularModemId
Modem identifier of the device.
devConnectwareId
Device identifier of the device.
devEffectiveStartDate
Date the device was provisioned in Remote Manager.
devInstallCode
Installation code for the device. An installation code is required for any device manufactured with an associated installation code.
- If you attempt to add a device that requires an installation code with a missing or incorrect code, you receive an HTTP status 400 error code along with a message describing the error.
- If you are adding multiple devices and one or more of the device installation code is missing or incorrect, you receive an HTTP status 207 error along with a message describing the error.
devMac
MAC address for the device.
devRecordStartDate
Date the device record was created.
devTerminated
False if the device is currently in the customer account.
dpConnectionStatus
Connection status for the device
| Value |
Description |
| 0 |
Disconnected |
| 1 |
Connected |
Contact setting from the device.
dpCurrentConnectPw
Password for the device to connect to Remote Manager. If set, the device must provide the password to connect.
dpDescription
Description setting from the device.
dpDeviceType
Manufacturer-assigned device type, such as ConnectPort X2.
dpFirmwareLevel
Integer that represents the firmware level. For example, 34209795.
dpFirmwareLevelDesc
String value that represents the firmware level. For example, 2.10.0.3.
dpGlobalIp
IP address from which the device connected in IPv4 format.
dpLastConnectTime
Date the device last connected to Remote Manager. For example, 2010-07-21T15:20:00Z.
dpLastKnownIp
IP address last reported by the device in IPv4 format.
dpLocation
Location setting from the device.
dpMapLat
Map latitude setting from the device.
dpMapLong
Map longitude setting from the device.
dpPanId
PanId setting from the device.
dpRestrictedStatus
Indicates restrictions on the device for connecting to Remote Manager:
| Value |
Description |
| 0 |
Unrestricted |
| 2 |
Restricted |
| 3 |
Untrusted |
dpServerId
Identifier of the server to which the device is currently connected.
Comma-delimited set of user-defined tags.
User-specified free-form text field.
dvVendorId
Integer that identifies the manufacturing vendor.
grpId
Remote Manager identifier for the customer group.
grpPath
Full path name of the specified group. For PUT or POST requests, if the specified group does not exist, Remote Manager creates the group.
id
Unique identifier for the device that consists of the following elements:
- devId: System-generated identifier for the device.
- devVersion: Version for the device. A value of 0 indicates the most current version.
provisionId
Randomly-generated identifier used to provision the device. This identifier must be used in place of devConnectwareId and you must supply a vendor ID.
xpExtAddr
ZigBee 64-bit extended address from the device.
DeviceInterface
Use the DeviceInterface web service to get a list of devices and associated networks.
URI
http://<hostname>/ws/DeviceInterface
| HTTP method |
Format |
Description |
| GET |
/ws/DeviceInterface |
Get a list of devices and associated networks. |
Elements
None
List Devices and Associated Networks
The following example shows how to get a list of devices and associated networks.
Request
Response (abbreviated)
<?xml version="1.0" encoding="ISO-8859-1"?>
<result>
   <resultTotalRows>3585</resultTotalRows>
   <requestedStartRow>0</requestedStartRow>
   <resultSize>1000</resultSize>
   <requestedSize>1000</requestedSize>
   <remainingSize>2585</remainingSize>
   <DeviceInterface>
      <id>
         <devId>664928</devId>
         <devVersion>0</devVersion>
         <niId>0</niId>
         <niVersion>0</niVersion>
      </id>
      <devRecordStartDate>2014-09-15T16:27:00.000Z</devRecordStartDate>
      <devConnectwareId>00000000-00000000-000000FF-FF000088</devConnectwareId>
      <cstId>2</cstId>
      <grpId>2</grpId>
      <devEffectiveStartDate>2014-09-15T16:27:00.000Z</devEffectiveStartDate>
      <devTerminated>false</devTerminated>
   </DeviceInterface>
   <DeviceInterface>
      <id>
         <devId>1205698</devId>
         <devVersion>0</devVersion>
         <niId>0</niId>
         <niVersion>0</niVersion>
      </id>
      <devRecordStartDate>2014-09-07T14:19:00.000Z</devRecordStartDate>
      <devMac>00:40:9A:DA:01:E5</devMac>
      <devConnectwareId>00000000-00000000-00409AFF-FFDA01E5</devConnectwareId>
      <cstId>2</cstId>
      <grpId>1326</grpId>
      <devEffectiveStartDate>2014-05-08T18:44:00.000Z</devEffectiveStartDate>
      <devTerminated>false</devTerminated>
   </DeviceInterface>
   <DeviceInterface>
      <id>
         <devId>1205699</devId>
         <devVersion>0</devVersion>
         <niId>0</niId>
         <niVersion>0</niVersion>
      </id>
      <devRecordStartDate>2014-09-12T15:49:00.000Z</devRecordStartDate>
      <devMac>00:40:9A:DA:01:E7</devMac>
      <devConnectwareId>00000000-00000000-00409AFF-FFDA01E7</devConnectwareId>
      <cstId>2</cstId>
      <grpId>2</grpId>
      <devEffectiveStartDate>2014-05-08T18:44:00.000Z</devEffectiveStartDate>
      <devTerminated>false</devTerminated>
   </DeviceInterface>
   <DeviceInterface>
      <id>
         <devId>1205700</devId>
         <devVersion>0</devVersion>
         <niId>0</niId>
         <niVersion>0</niVersion>
      </id>
      <devRecordStartDate>2014-09-07T14:19:00.000Z</devRecordStartDate>
      <devMac>00:40:9A:DA:01:E6</devMac>
      <devConnectwareId>00000000-00000000-00409AFF-FFDA01E6</devConnectwareId>
      <cstId>2</cstId>
      <grpId>1326</grpId>
      <devEffectiveStartDate>2014-05-08T18:44:00.000Z</devEffectiveStartDate>
      <devTerminated>false</devTerminated>
   </DeviceInterface>
   <DeviceInterface>
      <id>
         <devId>1205701</devId>
         <devVersion>0</devVersion>
         <niId>0</niId>
         <niVersion>0</niVersion>
      </id>
      <devRecordStartDate>2014-09-07T14:19:00.000Z</devRecordStartDate>
      <devMac>00:40:9A:DA:01:E8</devMac>
      <devConnectwareId>00000000-00000000-00409AFF-FFDA01E8</devConnectwareId>
      <cstId>2</cstId>
      <grpId>1326</grpId>
      <devEffectiveStartDate>2014-05-08T18:44:00.000Z</devEffectiveStartDate>
      <devTerminated>false</devTerminated>
   </DeviceInterface>
DeviceMetaData
Use the DeviceMetaData to manage embedded device view descriptors not directly available from a device.
URI
http://<hostname>/ws/DeviceMetaData
| HTTP Method |
Format |
Description |
| GET |
/ws/DeviceMetaData |
Display a list of view descriptors for a vendor ID. |
| POST |
/ws/DeviceMetaData |
Add a view descriptor. |
| PUT |
/ws/DeviceMetaData |
Update a view descriptor. |
| DELETE |
/ws/DeviceMetaData |
Delete a view descriptor. |
Elements
dmId
Unique identifier for the metadata.
dvVendorId
Integer that identifies the manufacturing vendor.
dmDeviceType
Name of the device type.
dmProductId
Identifier of the product to which this metadata corresponds.
dmFirmwareId
Identifier of the firmware to which this metadata corresponds.
dmVersion
Firmware version to which the metadata corresponds.
dmName
Defines the descriptor type. Must be descriptor/ui.
dmCompressed
Indicates whether the metadata is compressed. Typically, metadata is not compressed.
dmData
Metadata contents.
DeviceVendor
Use the DeviceVendor web service to get a list of vendor identifiers available for your account, update the group into which new devices are provisioned, or update the default restriction status for new devices.
To see your vendor ID or register for an ID:
- Log in to your Remote Manager account.
- Switch to the classic Remote Manager UI
- Click Admin > Account Settings > My Account
- If you have already registered a vendor ID, the vendor ID is displayed, as well as the provisioning configuration.
- If you have not registered for a vendor ID, click Register for new vendor id and a vendor ID is assigned to your account. Refresh the account page to see the assigned vendor ID.
URI
http://<hostname>/ws/DeviceVendor
| HTTP Method |
Format |
Description |
| GET |
/ws/DeviceVendor |
Retrieve vendor IDs available for your account. |
| POST |
/ws/DeviceVendor |
Register a vendor ID to use for device development. |
| PUT |
/ws/DeviceVendor |
Update grpPath or dpRestrictedStatus elements for a vendor. |
Elements
dvVendorId
Integer that identifies the manufacturing vendor.
dvVendorIdDesc
Hexadecimal representation of the Vendor ID.
cstId
Remote Manager identifier for the customer.
dvDescription
Text description for the vendor ID.
dvRegistrationDate
Date when the Vendor ID was registered.
grpPath
Name of a group into which new auto-provisioned devices are put by default. <grpPath disabled="true"/> disables auto-provisioning. If you create a new device ID by performing a POST to ws/DeviceVendor, you can specify a grpPath that overrides the default group path.
dpRestrictedStatus
Indicates restrictions on the device for connecting to Remote Manager:
| Value |
Description |
| 0 |
Unrestricted |
| 2 |
Restricted |
| 3 |
Untrusted |
DeviceVendorSummary
Use the DeviceVendorSummary web service to get a summary of device types for your vendor ID.
URI
http://<hostname>ws/DeviceVendorSummary
| HTTP Method |
Format |
Description |
| GET |
/ws/DeviceVendorSummary |
Retrieve a list of device types associated with your vendor IDs. |
Elements
dvVendorId
Integer that identifies the manufacturing vendor.
dmDeviceType
Name of the device type.
dvVendorIdDesc
Hexadecimal representation of the Vendor ID.
cstId
Remote Manager identifier for the customer.
dvDescription
Text description for the vendor ID.
dmUiDescriptorCount
Indicates the number of UI descriptors for the device type.
Filedata
Use the FileData web service to query or locate one or more files based on file metadata, such as the name, type, storage path, size, or modification date.
URI
http://<hostname>/ws/FileData
| HTTP method |
Format |
Description |
| GET |
/ws/FileData |
Get a paged list of file metadata for all of your files. |
| PUT |
/ws/FileData// |
Upload or change a file or folder in your account. |
| DELETE |
/ws/FileData// |
Delete a file or folder from your account. |
Elements
fdPath
Specifies the hierarchical path to the file. Use the tilde character (~) to indicate your home directory.
fdName
Specifies the name of the file.
cstId
Remote Manager identifier for the customer.
fdCreatedDate
Specifies the date the file was first uploaded to Remote Manager (ISO 8601 standard format).
fdLastModifiedDate
Specifies the date the file was last modified (ISO 8601 standard format).
fdContentType
Specifies the type of data stored in the file.
fdSize
Specifies the size of the file in bytes.
fdType
Specifies the file type: file or directory.
The default is file.
[fdData]
Includes the Base64-encoded content of the file. A tool to encode and decode Base64 data is available here: http://ostermiller.org/calc/encode.html.
List All Files
The following example shows how to get a paged list of file metadata for all of your files.
Request
Response (abbreviated)
<?xml version="1.0" encoding="UTF-8"?>
<result>
    <resultTotalRows>455747</resultTotalRows>
    <requestedStartRow>0</requestedStartRow>
    <resultSize>1000</resultSize>
    <requestedSize>1000</requestedSize>
    <remainingSize>454747</remainingSize>
    <FileData>
        <id>
            <fdPath>/db/SB723050334974_Digi_International/00000000-00000000-00409DFF-FF640005/</fdPath>
            <fdName>RPC_response-1297463631.0-0001-received_attribute_report.xml</fdName>
        </id>
        <cstId>3439</cstId>
        <fdCreatedDate>2011-02-11T22:34:25Z</fdCreatedDate>
        <fdLastModifiedDate>2011-02-11T22:34:25Z</fdLastModifiedDate>
        <fdContentType>application/xml</fdContentType>
        <fdSize>506</fdSize>
        <fdType>file</fdType>
    </FileData>...<FileData>
        <id>
            <fdPath>/db/SB723050334974_Digi_International/00000000-00000000-00409DFF-FF640005/</fdPath>
            <fdName>RPC_response-1297463631.0-0003-received_attribute_report.xml</fdName>
        </id>
        <cstId>3439</cstId>
        <fdCreatedDate>2011-02-11T22:34:25Z</fdCreatedDate>
        <fdLastModifiedDate>2011-02-11T22:34:25Z</fdLastModifiedDate>
        <fdContentType>application/xml</fdContentType>
        <fdSize>506</fdSize>
        <fdType>file</fdType>
    </FileData>
</result>
Get Files With Condition
The following examples show how to get files based on conditions.
Example 1: Get files written after a specified date:
GET /ws/FileData?condition=fdType='file' and fdLastModifiedDate>'2013-12-06T14:50:00.000Z'
Example 2: Get files that match name patterns using wildcards
The following example returns all files whose name starts with ‘sample’ and ends with ‘gas’ that were written to Remote Manager after the specified date.
GET /ws/FileData?condition=fdName like 'sample%25gas' and fdType='file' and fdLastModifiedDate>'2013-12-06T14:50:00.000Z'
Get Files With Content
The following example shows how to use the embed=“true” option to embed the content of the file in the results in Base64 format.
Request
GET /ws/FileData?condition=fdPath='~/00000000-00000000-00409DFF-FF640005/' and fdType='file'
and fdLastModifiedDate>'2010-11-24T22:25:04Z'&embed=true
Response
<?xml version="1.0" encoding="UTF-8"?>
<result>
    <resultTotalRows>1264</resultTotalRows>
    <requestedStartRow>0</requestedStartRow>
    <resultSize>1000</resultSize>
    <requestedSize>1000</requestedSize>
    <remainingSize>264</remainingSize>
    <FileData>
        <id>
            <fdPath>/db/SB723050334974_Digi_International/00000000-00000000-00409DFF-FF640005/</fdPath>
            <fdName>RPC_response-1297463631.0-0001-received_attribute_report.xml</fdName>
        </id>
        <cstId>3439</cstId>
        <fdCreatedDate>2011-02-11T22:34:25Z</fdCreatedDate>
        <fdLastModifiedDate>2011-02-11T22:34:25Z</fdLastModifiedDate>
        <fdContentType>application/xml</fdContentType>
        <fdSize>506</fdSize>
        <fdType>file</fdType>
        <fdData>....</fdData>
    </FileData>...<FileData>
        <id>
            <fdPath>/db/SB723050334974_Digi_International/00000000-00000000-00409DFF-FF640005/</fdPath>
            <fdName>attribute_report.xml</fdName>
        </id>
        <cstId>3439</cstId>
        <fdCreatedDate>2011-02-11T22:34:25Z</fdCreatedDate>
        <fdLastModifiedDate>2011-02-11T22:34:25Z</fdLastModifiedDate>
        <fdContentType>application/xml</fdContentType>
        <fdSize>506</fdSize>
        <fdType>file</fdType>
        <fdData>....</fdData>
    </FileData>
</result>
FileDataCore
Use the FileDataCore web service to get a count and listing of all files stored on Remote Manager for your account. FileDataCore does not return file contents. To retrieve file contents, use the FileData web service.
URI
http://<hostname>/ws/FileDataCore
| HTTP method |
Format |
Description |
| GET |
/ws/FileDataCore |
Get a summary count and listing of all files for your Remote Manager account. |
Elements
None
FileDataHistory
Use the FileDataHistory web service to display activity history for files you have uploaded to a device. You can display archive history only for files that have a flag set to archive to the history table when the file was originally uploaded.
URI
http://<hostname>/ws/FileDataHistory
| HTTP method |
Format |
Description |
| GET |
/ws/FileDataHistory |
Display activity history for each file you have uploaded to a device. |
Elements
None
Group
Use the Group web service to retrieve information about groups in your Remote Manager account.
URI
http://<hostname>/ws/Group
| HTTP method |
Format |
Description |
| GET |
/ws/Group |
Get a list of all groups in your Remote Manager account. |
Elements
grpId
Remote Manager identifier for the customer group.
grpName
Name of the group.
grpDescription
Description of the group.
grpPath
Full path name of the specified group.
grpParentId
Integer representation of the group parent.
Monitor
Use the Monitor web service to monitor Remote Manager activity and push notifications to a client application. Each configured monitor specifies the Remote Manager events or activities to monitor, the notification mechanism, and the transport type (TCP, HTTP, or Polling).
Monitored events can include:
- Data: Data pushed into Remote Manager from remote gateways in the form of DataPoints (directly or through DIA or Smart Energy), FileData, and so on.
- Status: General status updates such as connection status or remote device availability.
- Alarms: Alarm status updates, such as when alarms are triggered or reset.
FileData and FileDataCore events are not published when the file size is larger than 120K. Delete operations for FileData events are never published.
The Monitor web service is available only for Remote Manager accounts with a subscription to the Push Monitor service.
For information on retrieving saved pushed notifications or resetting a monitor, see v1/monitors.
URI
http://<hostname>/ws/Monitor
| HTTP method |
Format |
Description |
| GET |
/ws/Monitor |
Get a list of all configured monitors. |
| GET |
/ws/Monitor/{monId} |
Get details for a specific monitor. |
| POST |
/ws/Monitor |
Create a new monitor to push event notifications. |
| PUT |
/ws/Monitor/{monId} |
Update an existing monitor. Note that any PUT request to a monitor resets the monitor state. |
| DELETE |
/ws/Monitor/{monId} |
Delete a monitor. |
Elements
monId
System-generated identifier for the monitor.
cstId
Remote Manager identifier for the customer.
Format for delivered event data:
monTopic
One or more topics to monitor. Supported monitor topics include:
-
alert_status
-
devices
-
jobs
-
Alarm
-
AlarmStatus
-
DataPoint
-
DataStream
-
DeviceCore
-
FileData
-
FileDataCore
-
Job
-
JobResult
-
XbeeCore
The following monitor topics have been deprecated and should not be used: DiaChannelDataFull, XbeeAttributeDataCore, XbeeEventDataCore.
FileData and FileDataCore events are not published when the file size is larger than 120K. Delete operations for FileData events are not published.
DataStream updates publish changes to DataStream attributes only, not currentValues. To get changes for currentValue, monitor the DataPoint topic to get changes to the current value as they arrive.
| To monitor |
Specify |
| general topic |
Resource name only. For example:DataPointMonitors all DataPoint events. |
| specific resource |
Resource name followed by the resource ID using standard REST slash conventions. For example:DataPoint/00000000-00000000-00000000-00000000Monitors DataPoint events reported by the specific device. |
| multiple topics |
Comma-delimited list of topics. For example:DataPoint,DeviceCoreMonitors all DataPoint and Device data for the current customer. |
| scope by operation |
By default, all operations for the specified monitor topic are monitored. To limit the monitor topic to specific operations, prefix the monitor topic with the operation qualifier. Valid operations:C for createU for any updateD for deleteFor example, to monitor update operations only for DeviceCore:[operation=U]DeviceCoreTo monitor create and update operations for DeviceCore:[operation=C,U]DeviceCore |
| scope by group |
By default, all groups for the specified monitor topic are monitored. To limit the monitor topic to one or more groups, prefix the monitor topic with the group qualifier. For example:[group=America,Columbia]DeviceCore |
| scope by operation and group |
To use both the operation and the group qualifiers, prefix the monitor topic with both qualifiers:[operation=C,U,D][group=America,Columbia]DeviceCore Note You can prefix the qualifiers in any order. |
| special characters |
URL encode the following special characters when specifying additional subtopic components:/ (forward slash)% (percent sign). (period)* (asterisk)[ (open bracket)] (close bracket)When monitor topics are reported, components are URL encoded. This allows for easy parsing of monitor topics. The general procedure is to split the published topic string on the backslash (/) separator character and then URL decode the identified components. |
For HTTP transport type only. HTTP header fields in the following format:
header-name: header-value
header-name-2: header-value-2
Returned in the GET response. Returned as a comma separated list of header names.
monTransportType
Transport method used to deliver push notifications to the client application:
monTransportUrl
For HTTP transport type only. URL of the customer web server. For http URLs, the default listening port is 80; for https URLs, the default listening port is 443.
monTransportToken
For HTTP transport type only. Credentials for basic authentication in the following format:
monTransportMethod
For HTTP transport type only. HTTP method to use for sending data: PUT or POST. The default is PUT.
monConnectTimeout
For HTTP transport type only. Time in milliseconds Remote Manager waits when attempting to connect to the destination http server. A value of 0 means use the system default of 5000 (5 seconds). Most monitors do not need to configure this setting.
monResponseTimeout
For HTTP transport type only. Time in milliseconds Remote Manager waits for a response for pushed events from the http server. A value of 0 means use the system default of 5000 (5 seconds). Most monitors do not need to configure this setting.
monAckOption
For TCP transport type only. Indicates whether the client will explicitly acknowledge TCP push events or allow Remote Manager to automatically acknowledge events when sent. Options include: explicit or off. The default is off.
monBatchSize
Specifies an upper bound on how many messages are aggregated before sending a batch. The default is 100.
monBatchDuration
Specifies an upper bound on the number of seconds messages are aggregated before sending. The default is 10.
monCompression
Keyword that specifies the method used to compress messages. Options include: zlib or none. The default is none. For zlib, the deflate algorithm is used to compress the data; use inflate to decompress the data.
Note For backwards compatibility, gzip is accepted as a valid keyword. Compression has always been done using the deflate algorithm.
monAutoReplayOnConnect
Boolean value that specifies whether Remote Manager replays any missed published events before any new published events are forwarded. True indicates missed published events are replayed. False indicates missed published events are not replayed. The default is false.
monDescription
Optional text field used to label or describe the monitor.
monLastConnect
Returned in the GET response. Specifies last connection time to the client application.
monLastSent
Returned in the GET response. Specifies the last message pushed to the client application.
monStatus
Returned in the GET response. Specifies the current connection status to the client application.
| Status |
Description |
| CONNECTING |
For HTTP monitors only. Remote Manager is attempting to connect to the configured HTTP server. Once connected, the state changes to ACTIVE. |
| ACTIVE |
Monitor is connected and publishing events. |
| INACTIVE |
Monitor is not connected and events are not published or recorded. |
| SUSPENDED |
For monitors with monAutoReplayOnConnect = True.Monitor has disconnected, but publish events are recorded for later replay. |
| DISABLED |
For HTTP monitors only. If a monitor has not connected for 24 hours, the state is set to DISABLED, and publish events are not recorded for replay. A disabled monitor must be reconfigured via the Monitor web service. |
| DISCONNECT |
Monitor is currently disconnecting, and events are not being published. For monitors with monAutoReplayOnConnect = True, events are recorded for later replay. (Dashboard shows status as Disconnecting.) |
Any PUT request to a monitor resets the monitor state.
List all Monitors
The following example shows how to list all configured monitors.
Request
Response
<?xml version="1.0" encoding="ISO-8859-1"?>
<result>
  <resultTotalRows>2</resultTotalRows>
  <requestedStartRow>0</requestedStartRow>
  <resultSize>2</resultSize>
  <requestedSize>1000</requestedSize>
  <remainingSize>0</remainingSize>
  <Monitor>
    <monId>148214</monId>
    <cstId>2</cstId>
    <monLastConnect>2014-07-09T22:01:41.187Z</monLastConnect>
    <monLastSent>2014-07-09T22:02:09.000Z</monLastSent>
    <monTopic>DeviceCore</monTopic>
    <monTransportType>tcp</monTransportType>
    <monFormatType>json</monFormatType>
    <monBatchSize>1</monBatchSize>
    <monCompression>zlib</monCompression>
    <monStatus>INACTIVE</monStatus>
    <monBatchDuration>60</monBatchDuration>
    <monLastSentUuid>ac59ee13-07b4-11e4-a573-fa163ef93b22</monLastSentUuid>
  </Monitor>
  <Monitor>
    <monId>148215</monId>
    <cstId>2</cstId>
    <monLastConnect>2014-07-21T21:24:02.507Z</monLastConnect>
    <monLastSent>2014-07-14T17:17:15.000Z</monLastSent>
    <monTopic>DeviceCore,XbeeCore</monTopic>
    <monTransportType>http</monTransportType>
    <monTransportUrl>https://google.com</monTransportUrl>
    <monFormatType>json</monFormatType>
    <monBatchSize>100</monBatchSize>
    <monCompression>none</monCompression>
    <monStatus>DISABLED</monStatus>
    <monBatchDuration>10</monBatchDuration>
    <monTransportMethod>PUT</monTransportMethod>
  </Monitor>
</result>
Create an Http Monitor
The following sample shows how to create a simple HTTP monitor.
Payload:
<Monitor>
  <monTopic>DeviceCore,XbeeCore</monTopic>
  <monTransportType>http</monTransportType>
  <monTransportUrl>https://your web site url</monTransportUrl>
  <monTransportToken>username:password</monTransportToken>
  <monTransportMethod>PUT</monTransportMethod>
  <monFormatType>json</monFormatType>
  <monBatchSize>100</monBatchSize>
  <monCompression>none</monCompression>
  <monBatchDuration>10</monBatchDuration>
</Monitor>
Create a Tcp Monitor
The following sample shows how to create a TCP monitor.
Payload:
<Monitor>
   <monTopic>DeviceCore,XbeeCore</monTopic>
   <monTransportType>tcp</monTransportType>
   <monFormatType>json</monFormatType>
   <monBatchSize>100</monBatchSize>
   <monCompression>none</monCompression>
   <monBatchDuration>10</monBatchDuration>
   <monAckOption>explicit</monAckOption>
   <monAutoReplayOnConnect>true</monAutoReplayOnConnect>
</Monitor>
Recover Disabled Monitor
An HTTP monitor that is not able to successfully connect over a 24 hour period is disabled. Once disabled:
- System alarm is generated to indicate the monitor state was changed to disabled.
- Remote Manager does not make any more attempts to connect the monitor.
- Persistent monitors no longer store missed monitor events.
To recover a disabled monitor, re-enable the monitor using the v1/monitors/inventory/{monitorId}/reset API and then wait for the monitor to reconnect.
Delete Monitor With Condition
The following examples shows how to delete all TCP monitors that are currently inactive:
DELETE ws/Monitor?condition=monTransportType='tcp' and monStatus='INACTIVE'
Delete Monitor
The following sample shows how to delete a monitor.
DELETE /ws/Monitor/148214
Create Polling Monitor
The following sample shows how to create a polling monitor.
Request
Payload
<Monitor>
  <monTopic>DeviceCore,DataPoint/00000000-00000000-00000000-00000000</monTopic>
  <monTransportType>polling</monTransportType>
  <monDescription>Query monitor saves push notifications but does not send them.</monDescription>
</Monitor>
Response
<?xml version="1.0" encoding="ISO-8859-1"?>
<result>
  <location>Monitor/433016</location>
</result>
To query the data from a polling monitor, see v1/monitors.
Monitor HTTP/HTTPS Transport Protocol
This section highlights the details associated with an HTTPS or HTTP connection between the Remote Manager server and the customer web server. This is a high speed, transport over a HTTP connection. This transport requires that the customer has a publicly facing web server application. Remote Manager will be the HTTP client and will push any configured published events to the customer’s web server. This transport uses basic authentication and therefore HTTPS is recommended. HTTP is available for debugging or troubleshooting.
To configure an HTTP monitor, specify http as the monTransportType setting. Additionally, specify monTransportUrl, monTransportToken, and monTransportHeaders options.
monTransportType: (Required) Sets the transport type, TCP or HTTP. For HTTP, set the transport type to HTTP.
monTransportUrl: (Required) Specifies the URL of the customer web server. The URL should be of the following form:
http[s]://customer.domain.com/application/path
monTransportToken: (Required) Specifies the credentials for basic authentication in the following format:
username:password
monTransportMethod: (Optional) Specifies the HTTP method to use to send data: PUT or POST. The default is PUT.
The following example shows how to create an HTTP monitor:
<Monitor>
   <monTopic>DeviceCore,XbeeCore</monTopic>
   <monTransportType>http</monTransportType>
   <monTransportUrl>your website url</monTransportUrl>
   <monTransportToken>username:password</monTransportToken>
   <monTransportMethod>PUT</monTransportMethod>
   <monFormatType>json</monFormatType>
   <monBatchSize>100</monBatchSize>
   <monCompression>none</monCompression>
   <monBatchDuration>10</monBatchDuration>
</Monitor>
monTransportHeaders: (Optional) Specifies HTTP header fields in the following format:
header-name: header-value
header-name-2: header-value-2
The standard and custom HTTP headers outlined below cannot be overridden.
Protocol
Once the HTTP monitor has been configured, the monitor will be activated and Remote Manager will connect to the customer’s web server. Any matching events will be published to the specified URL using the supplied token credentials. Please note that if the monitor’s URL or credentials are configured incorrectly or if the customer’s web server is unreachable, Remote Manager will periodically attempt to connect to the web server for up to 24 hours. The monitor will be disabled after 24 hours without a successful connection.
Events are published using the configured monTransportMethod: PUT or POST. The default is an HTTP PUT operation. The standard HTTP headers of the published event include:
- Authorization: Basic…
- Content-Type: “application/xml;charset=UTF-8” or “application/json;charset=UTF-8”
- Content-Length: indicates how many bytes of payload data are in the message
- [Content-Encoding: deflate] - if present, indicates the monitor event data is compressed
Additionally, the following custom header fields will be set to describe the payload being delivered:
- Monitor-Protocol-Version: indicates what version of push protocol is being used. The current version is ‘1’.
- Monitor-DataBlockId: a rotating integer ID that identifies the data block.
- Monitor-Aggregate-Count: the number of publish events included in this batch.
The body of the PUT operation is the published event payload data. Its format, compression, and size are indicated in the headers above. The payload data format is the same as for the TCP transport.
The returned HTTP status code indicates the ability of the customer application to receive and process the data:
- 200 - indicates customer application successfully received and processed the data
Standard HTTP headers
- Host: Indicates the domain name, and the port number of the server
- Accept: “text/html,application/xml,application/json”
- Accept-Language: “en-us”
- Accept-Charset: “UTF-8,ISO-8859-1”
- Cache-Control: “no-cache”
- Pragma: “no-cache”
- [Accept-Encoding: deflate]—If present, indicates the monitor event data is compressed.
Monitor Event Payload
Data is encapsulated in a message envelope that includes the topic, operation, and timestamp plus the data itself. This will be formatted according to the format type requested when establishing the monitor. Additionally, when the monAutoReplayOnConnect option is enabled, there will be a replay=“true” attribute if the message is being resent.
<?xml version="1.0" encoding="UTF-8"?>
<Msg topic="3/DeviceCore/882/7" operation="create|update|delete" timestamp="2010-12-03T13:34:00.001Z" [replay="true"]>
    <DeviceCore>
        <id>
            <devId>882</devId>
            <devVersion>7</devVersion>
        </id>
        <devRecordStartDate>2010-12-03T13:34:00Z</devRecordStartDate>
        <devMac>00:40:9D:3D:71:15</devMac>
        <devConnectwareId>00000000-00000000-00409DFF-FF3D7115</devConnectwareId>
        ...
    </DeviceCore>
</Msg>
{
   "Document":{
      "Msg":{
         "timestamp":"2010-12-03T13:34:00.001Z",
         "topic":"3/DeviceCore/882/7",
         "operation":"UPDATE",
         "DeviceCore":{
            "id":{
               "devId":882,
               "devVersion":7
            },
            "devMac":"00:40:9D:3D:71:15",
            "...": "..."
         }
      }
   }
}
Tcp Transport Protocol
This section details standard TCP/IP and SSL socket connections between a client application and Remote Manager. Because authentication messages flow across the socket, we strongly recommend using SSL. Use standard TCP/IP connections for debugging and troubleshooting only.
Monitor configuration options for TCP
The Monitor API provides two TCP-specific elements:
monTransportType: (Required) Sets the transport type, TCP or HTTP. For TCP, set the transport type to TCP.
monAckOption: (Optional) Specifies acknowledge options for sent messages.
- explicit: Client must explicitly acknowledge TCP push events.
- off: Remote Manager automatically acknowledges events when sent.
The default is off.
The following example shows how to create a TCP monitor:
<Monitor>
   <monTopic>DeviceCore,XbeeCore</monTopic>
   <monTransportType>tcp</monTransportType>
   <monFormatType>json</monFormatType>
   <monBatchSize>100</monBatchSize>
   <monCompression>none</monCompression>
   <monBatchDuration>10</monBatchDuration>
   <monAckOption>explicit</monAckOption>
   <monAutoReplayOnConnect>true</monAutoReplayOnConnect>
</Monitor>
Protocol
When a monitor is created through the Web Services API, a Monitor ID is assigned and returned to the caller. If the monitor is configured to use the TCP transport the customer application can activate the monitor by establishing a TCP socket connection back to the Remote Managerserver. SSL monitor sockets should be made to port 3201 while unsecure TCP sockets should be made to port 3200.
Once Remote Manager makes the socket connection, the customer application must send a ConnectRequest message through that connection to the Remote Manager server. The server will authenticate the request and send back a response. Once the connect request succeeds, the server will begin sending PublishMessages to the customer application as events matching the monitor configuration occur. There are two options on how the customer application can acknowledge the PublishMessages: explicit and off. The acknowledgment option is configured using the monAckOption in the Monitor web service. If not specified, the monAckOption defaults to off.
Explicit means that the customer application will acknowledge the receipt of PublishMessages using the PublishMessageReceived message. The dataBlockId in the PublishMessageReceived indicates that all events up to and including that dataBlockId were successfully received, i.e. one PublishMessageReceive message can acknowledge multiple PublishMessages. If the customer application detects a missing dataBlockId or cannot process a PublishMessage, it should disconnect the TCP socket. On the next reconnect, the replay will start with the unacknowledged push event. (Note that monAutoReplayOnConnect needs to be enabled.)
The off option means that Remote Manager will treat the push event as acknowledged when it is written to the TCP socket. Any PublishMessageReceived messages will be ignored by Remote Manager if the monitor is configured with monAckOption set to off.
As long as the monitor socket connection remains open, monitor events will flow from the server to the customer application per the requirements established in the monitor configuration. If the socket is closed for any reason, the monitor will be deactivated and monitor events will stop flowing to the customer application. When the monitor is deactivated, the monitor’s status will be marked as SUSPENDED (for monitors configured for auto replay of missed events using monAutoReplayOnConnect), otherwise INACTIVE. The customer application can reactivate the monitor socket in the same manner as the initial connection.
Conventions
In this protocol, all multi-byte numeric fields must be transmitted in big endian format. All text data must be transmitted as UTF-8 characters. See RFC 2279 as a reference for this format.
Framing
All messages between the client application and the Remote Manager server are framed as follows:
- Header [6 Bytes]
- Type: [2 Bytes] - indicates the type of message being exchanged
- Length: [4 Bytes] - indicating size of the framed message payload
- Payload [n Bytes] - the wrapped message
ConnectRequest Message
To initiate a new monitor connection, send a ConnectRequest message from the client application to Remote Manager. This is the first message sent upon connect and will authenticate and activate the monitor.
Header [6 Bytes] Type=0x0001
Payload:
- ProtocolVersion: [2 Bytes] - indicates what version of push protocol is being used. The current version is 0x0001.
- UserNameLen [2 Bytes] - length of UserName payload
- UserName: [UTF-8 encoded byte array] - the username to authenticate connection
- PasswordLen [2 Bytes] - length of Password payload
- Password: [UTF-8 encoded byte array] - the password to authenticate connection
- MonitorId: [4 Bytes] - the ID of the monitor for this connect
Example

Legend:
Type: 0x0001
Size: 0x00000013
ProtocolVersion: 0x0001
UsernameSize: 0x0005
Username: 0x7065707369 (pepsi)
PasswordSize: 0x0004
Password: 0x636f6c61 (cola)
MessageId: 0x00000104
ConnectResponse Message
The response to ConnectRequest, sent from Remote Manager to the client application, is a ConnectResponse message. This indicates to the client application the status of the web services request, as well as the protocol version that Remote Manager is speaking.
Header [6 Bytes] Type=0x0002
Payload:
- Status Code: [2 Bytes]
- ProtocolVersion: [2 Bytes] - indicates what version of push protocol is being used
Example:

Legend:
Type: 0x0002
Size: 0x00000004
Status: 0x0001
ProtocolVersion: 0x0001
PublishMessage Message
As monitored events occur, Remote Manager will send PublishMessage messages to the client application.
Header [6 Bytes] Type=0x0003
Payload:
- DataBlockId: [2 Bytes] - rotating id that uniquely identifies the data block
- Count: [2 Bytes] - number of messages in this batch
- Compression: [1 Byte] - indicates what payload compression algorithm is being used (0x00=none, 0x01=zlib)
- Format: [1 Byte] - indicates data format of payload (0x00=xml, 0x01=json)
- PayloadSize: [4 Bytes] - indicates how many bytes of payload data follow
- PayloadData: [n Bytes] - the actual Monitor event data (may be compressed & Base64 encoded)
Example:

Legend:
Type: 0x0003
Size: 0x00000215
DataBlockId: 0x01A7
Count: 0x0002
Compression: 0x00
Format: 0x00
PayloadSize: 0x00000205
PayloadData: 0x3C446F63756D656E74 … 6E743E
<Document>
    <Msg topic="3/DeviceCore/882/7" operation="update" timestamp="2010-12-03T13:34:00.001Z">
        <DeviceCore>...</DeviceCore>
    </Msg>
    <Msg topic="3/XbeeCore/00:13:A2:00:40:01:60:45/1/0/1794/256"operation="update" timestamp="2010-12-03T13:34:00.001Z">
        <XbeeCore>...</XbeeCore>
    </Msg>
</Document>
Publishmessagereceived Message
In response to a PublishMessage message, the client application will send a PublishMessageReceived to acknowledge the message was received and what its processing status is.
Header [6 Bytes] Type=0x0004
Payload:
- DataBlockId: [2 Bytes] - corresponds to incoming DataBlockId
- Status: [2 Bytes] 200 - indicates customer application successfully received and processed the data
Example:

Type: 0x0004
Size: 0x00000004
Status: 0x00C8
NetworkInterface
NetworkInterface contains specific information related to external network interfaces for devices where Remote Manager needs to have knowledge of that information in order to interact with those devices. For example, Remote Manager uses NetworkInterface records to associate phone numbers with one or more mobile identification numbers (SIM or modem serial number, depending upon the mobile technology).
URI
http://<hostname>/ws/NetworkInterface
| HTTP Method |
Format |
Description |
| GET |
/ws/NetworkInterface |
Display a list of modems provisioned in your account. |
| POST |
/ws/NetworkInterface |
Add a modem to your account. |
| PUT |
/ws/NetworkInterface |
Update modem information for your account. |
| DELETE |
/ws/NetworkInterface |
Delete a modem from your account. |
Elements
id
Element that uniquely identifies the network interface and consists of the following:
niId
System-generated identifier for the network interface.
niVersion
A value of 0 indicates the most recent version of the network interface record.
niPhoneCarrier
An integer that represents the telephone carrier service subscription for the network interface. The value is specific to the internal implementation of the SMS service used to send and receive SMS messages.
niTerminated
Boolean value that indicates whether the network interface is terminated. Enter either true or false.
niEffectiveStartDate
Date the network interface was added to Remote Manager.
cstId
Remote Manager identifier for the customer.
grpId
Remote Manager identifier for the customer group.
devId
Device ID of the device associated with this network interface record.
devVersion
A value of 0 which indicates the most recent version of the device record.
niInterfaceType
Integer that indicates the network interface type:
0: None
1: GSM
2: CDMA
3: ORBCOMM
4: Iridium
niSimId
Network interface SIM indentifier which is the ICCID, MEID, or ESN of the SIM or cellular modem.
niModemId
Modem ID of the satellite modem.
niPhone
Telephone number of the cellular line using international format for telephone numbers. For example:
+1 123-456-7890
niActivePhone
Boolean value that indicates whether this network interface record contains the telephone number (niPhone) to which Remote Manager sends SMS messages for this device. Only one NetworkInterface record can have niActivePhone set to true per device.
niIdigiPhone
Short or long code the device uses to communicate with Remote Manager.
niIdigiServiceId
Keyword used in the shared code
niImsi
International Mobile Subscriber Identity (IMSI) of the SIM.
NetworkInterfaceSubscriptionCore
Use the NetworkInterfaceSubscriptionCore web service to get subscription information for your devices based on the network interface records. The listing indicates whether carrier accounts have been assigned to the network interface records and what metrics are collected for each.
URI
http://<hostname>/ws/NetworkInterfaceSubscriptionCore
| HTTP Method |
Format |
Description |
| GET |
/ws/NetworkInterfaceSubscriptionCore |
Display a list of modems provisioned in your account. |
Elements
cstId
Remote Manager identifier for the customer.
id
Element that uniquely identifies the network interface and consists of the following:
niId
System-generated identifier for the network interface.
subId
Subscription identifier.
XbeeAttributeCore
Use the XbeeAttribueCore web service to identify one or more attributes of any node in your set of home area networks (HANs).
URI
http://<hostname>/ws/XbeeAttributeCore
| HTTP method |
Format |
Description |
| GET |
/ws/XbeeAttributeCore[?param1¶m2…¶mn] |
List all nodes in your account. |
Elements
devConnectwareId
Device identifier of the node gateway.
xpExtAddr
ZigBee 64-bit extended address of node.
xpParentAddr
For an endnode, the network address of the connecting router. For a router, the value is 0xFFFE.
xeEndpointId
ZigBee endpoint on which the cluster resides.
xpProfileId
ZigBee device profile associated with the node.
xeDeviceId
ZigBee device type associated with the node.
xeDeviceVersion
ZigBee device version.
xcClusterId
ZigBee cluster associated with the node.
xcClusterType
ZigBee cluster type.
| Cluster type |
Description |
| 0 |
Server |
| 1 |
Client |
xaAttributeId
ZigBee attribute identifier.
xaAttributeType
ZigBee attribute type. See ZigBee Cluster Library (ZCL) and associated profile specification for more information on ZigBee attribute types.
Identify Xbee Node Attributes
The following example shows how to identify node attributes in your home area networks (HANs).
Request
Response (abbreviated)
<?xml version="1.0" encoding="ISO-8859-1"?>
<result>
   <resultTotalRows>5978</resultTotalRows>
   <requestedStartRow>0</requestedStartRow>
   <resultSize>1000</resultSize>
   <requestedSize>1000</requestedSize>
   <remainingSize>4978</remainingSize>
   <XbeeAttributeCore>
      <id>
         <xpExtAddr>00:08:A2:00:06:3D:8E:BC</xpExtAddr>
         <xeEndpointId>1</xeEndpointId>
         <xcClusterType>0</xcClusterType>
         <xcClusterId>1794</xcClusterId>
         <xaAttributeId>256</xaAttributeId>
      </id>
      <cstId>2</cstId>
      <devConnectwareId>00000000-00000000-000000FF-FF000B21</devConnectwareId>
      <xeProfileId>265</xeProfileId>
      <xeDeviceId>1281</xeDeviceId>
      <xeDeviceVersion>0</xeDeviceVersion>
      <xaAttributeType>37</xaAttributeType>
   </XbeeAttributeCore>
   <XbeeAttributeCore>
      <id>
         <xpExtAddr>00:08:A2:00:0D:F1:50:05</xpExtAddr>
         <xeEndpointId>1</xeEndpointId>
         <xcClusterType>0</xcClusterType>
         <xcClusterId>1794</xcClusterId>
         <xaAttributeId>256</xaAttributeId>
      </id>
      <cstId>2</cstId>
      <devConnectwareId>00000000-00000000-000000FF-FF000427</devConnectwareId>
      <xeProfileId>265</xeProfileId>
      <xeDeviceId>1281</xeDeviceId>
      <xeDeviceVersion>0</xeDeviceVersion>
      <xaAttributeType>37</xaAttributeType>
   </XbeeAttributeCore>
   <XbeeAttributeCore>
      <id>
         <xpExtAddr>00:08:A2:00:0E:C3:35:E2</xpExtAddr>
         <xeEndpointId>1</xeEndpointId>
         <xcClusterType>0</xcClusterType>
         <xcClusterId>1794</xcClusterId>
         <xaAttributeId>256</xaAttributeId>
      </id>
      <cstId>2</cstId>
      <devConnectwareId>00000000-00000000-000000FF-FF0004EF</devConnectwareId>
      <xeProfileId>265</xeProfileId>
      <xeDeviceId>1281</xeDeviceId>
      <xeDeviceVersion>0</xeDeviceVersion>
      <xaAttributeType>37</xaAttributeType>
   </XbeeAttributeCore>
XbeeAttributeFull
Use the XbeeAttributeFull web service to display a list of ZigBee attribute names.
URI
http://<hostname>/ws/XbeeAttributeFull
| HTTP method |
Format |
Description |
| GET |
/ws/XbeeAttributeFull |
List all ZigBee attributes for all nodes. |
Elements
None
List Zigbee Full Attributes
The following example shows how to get a complete list of ZigBee attributes.
Request
GET /ws/XbeeAttributeFull
Response (abbreviated)
<?xml version="1.0" encoding="ISO-8859-1"?>
<result>
   <resultTotalRows>5978</resultTotalRows>
   <requestedStartRow>0</requestedStartRow>
   <resultSize>1000</resultSize>
   <requestedSize>1000</requestedSize>
   <remainingSize>4978</remainingSize>
   <XbeeAttributeFull>
      <id>
         <xpExtAddr>00:08:A2:00:06:3D:8E:BC</xpExtAddr>
         <xeEndpointId>1</xeEndpointId>
         <xcClusterType>0</xcClusterType>
         <xcClusterId>1794</xcClusterId>
         <xaAttributeId>256</xaAttributeId>
      </id>
      <cstId>2</cstId>
      <devConnectwareId>00000000-00000000-000000FF-FF000B21</devConnectwareId>
      <xpNetAddr>16054</xpNetAddr>
      <xpNodeType>1</xpNodeType>
      <xpMfgId>4126</xpMfgId>
      <xpDiscoveryIndex>1</xpDiscoveryIndex>
      <xpUpdateTime>2014-06-04T02:14:00.000Z</xpUpdateTime>
      <xeStatus>0</xeStatus>
      <xeProfileId>265</xeProfileId>
      <xeDeviceId>1281</xeDeviceId>
      <xeDeviceVersion>0</xeDeviceVersion>
      <xaAttributeType>37</xaAttributeType>
   </XbeeAttributeFull>
   <XbeeAttributeFull>
      <id>
         <xpExtAddr>00:08:A2:00:0D:F1:50:05</xpExtAddr>
         <xeEndpointId>1</xeEndpointId>
         <xcClusterType>0</xcClusterType>
         <xcClusterId>1794</xcClusterId>
         <xaAttributeId>256</xaAttributeId>
      </id>
      <cstId>2</cstId>
      <devConnectwareId>00000000-00000000-000000FF-FF000427</devConnectwareId>
      <xpNetAddr>16054</xpNetAddr>
      <xpNodeType>1</xpNodeType>
      <xpMfgId>4126</xpMfgId>
      <xpDiscoveryIndex>1</xpDiscoveryIndex>
      <xpUpdateTime>2014-06-04T02:01:00.000Z</xpUpdateTime>
      <xeStatus>0</xeStatus>
      <xeProfileId>265</xeProfileId>
      <xeDeviceId>1281</xeDeviceId>
      <xeDeviceVersion>0</xeDeviceVersion>
      <xaAttributeType>37</xaAttributeType>
   </XbeeAttributeFull>
   <XbeeAttributeFull>
      <id>
         <xpExtAddr>00:08:A2:00:0E:C3:35:E2</xpExtAddr>
         <xeEndpointId>1</xeEndpointId>
         <xcClusterType>0</xcClusterType>
         <xcClusterId>1794</xcClusterId>
         <xaAttributeId>256</xaAttributeId>
      </id>
      <cstId>2</cstId>
      <devConnectwareId>00000000-00000000-000000FF-FF0004EF</devConnectwareId>
      <xpNetAddr>16054</xpNetAddr>
      <xpNodeType>1</xpNodeType>
      <xpMfgId>4126</xpMfgId>
      <xpDiscoveryIndex>1</xpDiscoveryIndex>
      <xpUpdateTime>2014-06-04T02:01:00.000Z</xpUpdateTime>
      <xeStatus>0</xeStatus>
      <xeProfileId>265</xeProfileId>
      <xeDeviceId>1281</xeDeviceId>
      <xeDeviceVersion>0</xeDeviceVersion>
      <xaAttributeType>37</xaAttributeType>
   </XbeeAttributeFull>
   <XbeeAttributeFull>
      <id>
         <xpExtAddr>00:08:A2:00:21:46:E3:46</xpExtAddr>
         <xeEndpointId>1</xeEndpointId>
         <xcClusterType>0</xcClusterType>
         <xcClusterId>1794</xcClusterId>
         <xaAttributeId>256</xaAttributeId>
      </id>
      <cstId>2</cstId>
      <devConnectwareId>00000000-00000000-000000FF-FF00072E</devConnectwareId>
      <xpNetAddr>16054</xpNetAddr>
      <xpNodeType>1</xpNodeType>
      <xpMfgId>4126</xpMfgId>
      <xpDiscoveryIndex>1</xpDiscoveryIndex>
      <xpUpdateTime>2014-06-04T02:01:00.000Z</xpUpdateTime>
      <xeStatus>0</xeStatus>
      <xeProfileId>265</xeProfileId>
      <xeDeviceId>1281</xeDeviceId>
      <xeDeviceVersion>0</xeDeviceVersion>
      <xaAttributeType>37</xaAttributeType>
   </XbeeAttributeFull>
XbeeClusterCore
Use the XbeeClusterCore web service to list all clusters in your account.
URI
http://<hostname>/ws/XbeeClusterCore
| HTTP method |
Format |
Description |
| GET |
/ws/XbeeClusterCore |
List all clusters in your account. |
Example
The following example shows how to list all clusters in your account.
Request
Response (abbreviated)
<?xml version="1.0" encoding="ISO-8859-1"?>
<result>
   <resultTotalRows>53802</resultTotalRows>
   <requestedStartRow>0</requestedStartRow>
   <resultSize>1000</resultSize>
   <requestedSize>1000</requestedSize>
   <remainingSize>52802</remainingSize>
   <XbeeClusterCore>
      <id>
         <xpExtAddr>00:08:A2:00:06:3D:8E:BC</xpExtAddr>
         <xeEndpointId>1</xeEndpointId>
         <xcClusterType>0</xcClusterType>
         <xcClusterId>0</xcClusterId>
      </id>
      <cstId>2</cstId>
      <devConnectwareId>00000000-00000000-000000FF-FF000B21</devConnectwareId>
      <xeProfileId>265</xeProfileId>
      <xeDeviceId>1281</xeDeviceId>
      <xeDeviceVersion>0</xeDeviceVersion>
   </XbeeClusterCore>
   <XbeeClusterCore>
      <id>
         <xpExtAddr>00:08:A2:00:06:3D:8E:BC</xpExtAddr>
         <xeEndpointId>1</xeEndpointId>
         <xcClusterType>0</xcClusterType>
         <xcClusterId>3</xcClusterId>
      </id>
      <cstId>2</cstId>
      <devConnectwareId>00000000-00000000-000000FF-FF000B21</devConnectwareId>
      <xeProfileId>265</xeProfileId>
      <xeDeviceId>1281</xeDeviceId>
      <xeDeviceVersion>0</xeDeviceVersion>
   </XbeeClusterCore>
   <XbeeClusterCore>
      <id>
         <xpExtAddr>00:08:A2:00:06:3D:8E:BC</xpExtAddr>
         <xeEndpointId>1</xeEndpointId>
         <xcClusterType>0</xcClusterType>
         <xcClusterId>1794</xcClusterId>
      </id>
      <cstId>2</cstId>
      <devConnectwareId>00000000-00000000-000000FF-FF000B21</devConnectwareId>
      <xeProfileId>265</xeProfileId>
      <xeDeviceId>1281</xeDeviceId>
      <xeDeviceVersion>0</xeDeviceVersion>
   </XbeeClusterCore>
XbeeCore
Use the XbeeCore web service to display a current list of ZigBee nodes in your account or refresh (discover) the node list. You can also use PUT to associate text with a specified node.
URI
http://<hostname>/ws/XbeeCore
| HTTP method |
Format |
Description |
| GET |
/ws/XbeeCore[?param1¶m2…¶mn] |
List all nodes in your account. |
| PUT |
/ws/XbeeCore/{xpExtAddr}/{xpUserMetaData} |
Add user-defined text metadata to a node. |
Elements
cstId
Remote Manager customer identifier of the gateway owner.
grpId
Remote Manager customer group identifier of the gateway owner.
grpPath
Path of the specified Remote Manager group.
devConnectwareId
Device identifier of the node gateway.
xpExtAddr
ZigBee 64-bit extended address of node.
xpNetAddr
ZigBee 16-bit network address of the node.
xpNodeType
ZigBee node type:
| Node type |
Description |
| 0 |
Coordinator |
| 1 |
Router |
| 2 |
Endnode |
xpParentAddr
For an endnode (xpNodeType = 2), the network address of the connecting router. For a router (xpNodeType = 1), the value is 0xFFFE.
xpProfileId
ZigBee device profile identifier of the node.
xpMfgId
ZigBee manufacturing identifier of the node.
xpDeviceType
Device type of the node.
- Product type: Low order 16 bits.
- Module type: High order 16 bits.
Text descriptions for product and module types are returned by xmtModuleTypeDesc and xptProductTypeDesc.
xpNodeId
ZigBee node identifier.
xpDiscoveryIndex
Index within the list of nodes discovered on the home area network (HAN).
xmtModuleTypeDesc
Text description of the module type defined in xpDeviceType.
xptProductTypeDesc
Text description of the product type defined in xpDeviceType.
xpStatus
For Smart Energy nodes only. Connection status of the node: 0 for disconnected or 1 for connected.
xpUpdateTime
Time the node was last discovered.
User-defined free-form text associated with a specified node.
Parameters
Use the following parameters to determine the data to be retrieved by a GET operation.
| Parameter |
Description |
| cache |
Boolean value that indicates whether to use the cached node list.true: Return the cached list of discovered nodes.false: Return the current list of discovered nodes. |
| clear |
Boolean value that specifies whether to clear the current node list.true: Clear the current node list and discover/refresh the list.false: Use the current node information. |
List All Xbee Nodes
The following example shows how to list all nodes in all XBee networks associated with your Remote Manager account.
Request
Response (abbreviated)
<?xml version="1.0" encoding="ISO-8859-1"?>
<result>
   <resultTotalRows>5978</resultTotalRows>
   <requestedStartRow>0</requestedStartRow>
   <resultSize>1000</resultSize>
   <requestedSize>1000</requestedSize>
   <remainingSize>4978</remainingSize>
   <XbeeCore>
      <xpExtAddr>00:08:A2:00:06:3D:8E:BC</xpExtAddr>
      <devConnectwareId>00000000-00000000-000000FF-FF000B21</devConnectwareId>
      <cstId>2</cstId>
      <grpId>2</grpId>
      <xpNetAddr>16054</xpNetAddr>
      <xpNodeType>1</xpNodeType>
      <xpMfgId>4126</xpMfgId>
      <xpDiscoveryIndex>1</xpDiscoveryIndex>
      <xpStatus>1</xpStatus>
      <xpUpdateTime>2014-06-04T02:14:00.000Z</xpUpdateTime>
      <grpPath/>
   </XbeeCore>
   <XbeeCore>
      <xpExtAddr>00:08:A2:00:0D:F1:50:05</xpExtAddr>
      <devConnectwareId>00000000-00000000-000000FF-FF000427</devConnectwareId>
      <cstId>2</cstId>
      <grpId>2</grpId>
      <xpNetAddr>16054</xpNetAddr>
      <xpNodeType>1</xpNodeType>
      <xpMfgId>4126</xpMfgId>
      <xpDiscoveryIndex>1</xpDiscoveryIndex>
      <xpStatus>1</xpStatus>
      <xpUpdateTime>2014-06-04T02:01:00.000Z</xpUpdateTime>
      <grpPath/>
   </XbeeCore>
   <XbeeCore>
      <xpExtAddr>00:08:A2:00:0E:C3:35:E2</xpExtAddr>
      <devConnectwareId>00000000-00000000-000000FF-FF0004EF</devConnectwareId>
      <cstId>2</cstId>
      <grpId>2</grpId>
      <xpNetAddr>16054</xpNetAddr>
      <xpNodeType>1</xpNodeType>
      <xpMfgId>4126</xpMfgId>
      <xpDiscoveryIndex>1</xpDiscoveryIndex>
      <xpStatus>1</xpStatus>
      <xpUpdateTime>2014-06-04T02:01:00.000Z</xpUpdateTime>
      <grpPath/>
   </XbeeCore>
   <XbeeCore>
      <xpExtAddr>00:08:A2:00:21:46:E3:46</xpExtAddr>
      <devConnectwareId>00000000-00000000-000000FF-FF00072E</devConnectwareId>
      <cstId>2</cstId>
      <grpId>2</grpId>
      <xpNetAddr>16054</xpNetAddr>
      <xpNodeType>1</xpNodeType>
      <xpMfgId>4126</xpMfgId>
      <xpDiscoveryIndex>1</xpDiscoveryIndex>
      <xpStatus>1</xpStatus>
      <xpUpdateTime>2014-06-04T02:01:00.000Z</xpUpdateTime>
      <grpPath/>
   </XbeeCore>
   <XbeeCore>
      <xpExtAddr>00:08:A2:00:2D:DF:F3:25</xpExtAddr>
      <devConnectwareId>00000000-00000000-000000FF-FF000A16</devConnectwareId>
      <cstId>2</cstId>
      <grpId>2</grpId>
      <xpNetAddr>16054</xpNetAddr>
      <xpNodeType>1</xpNodeType>
      <xpMfgId>4126</xpMfgId>
      <xpDiscoveryIndex>1</xpDiscoveryIndex>
      <xpStatus>1</xpStatus>
      <xpUpdateTime>2014-06-04T02:14:00.000Z</xpUpdateTime>
      <grpPath/>
   </XbeeCore>
   <XbeeCore>
      <xpExtAddr>00:08:A2:00:40:CA:9D:2B</xpExtAddr>
      <devConnectwareId>00000000-00000000-000000FF-FF000673</devConnectwareId>
      <cstId>2</cstId>
      <grpId>2</grpId>
      <xpNetAddr>16054</xpNetAddr>
      <xpNodeType>1</xpNodeType>
      <xpMfgId>4126</xpMfgId>
      <xpDiscoveryIndex>1</xpDiscoveryIndex>
      <xpStatus>1</xpStatus>
      <xpUpdateTime>2014-06-04T02:15:00.000Z</xpUpdateTime>
      <grpPath/>
   </XbeeCore>
   <XbeeCore>
      <xpExtAddr>00:08:A2:00:40:F1:60:54</xpExtAddr>
      <devConnectwareId>00000000-00000000-000000FF-FF000B80</devConnectwareId>
      <cstId>2</cstId>
      <grpId>2</grpId>
      <xpNetAddr>16054</xpNetAddr>
      <xpNodeType>1</xpNodeType>
      <xpMfgId>4126</xpMfgId>
      <xpDiscoveryIndex>1</xpDiscoveryIndex>
      <xpStatus>1</xpStatus>
      <xpUpdateTime>2014-06-04T02:00:00.000Z</xpUpdateTime>
      <grpPath/>
   </XbeeCore>
   <XbeeCore>
      <xpExtAddr>00:08:A2:00:43:AE:22:86</xpExtAddr>
      <devConnectwareId>00000000-00000000-000000FF-FF0004FE</devConnectwareId>
      <cstId>2</cstId>
      <grpId>2</grpId>
      <xpNetAddr>16054</xpNetAddr>
      <xpNodeType>1</xpNodeType>
      <xpMfgId>4126</xpMfgId>
      <xpDiscoveryIndex>1</xpDiscoveryIndex>
      <xpStatus>1</xpStatus>
      <xpUpdateTime>2014-06-04T02:14:00.000Z</xpUpdateTime>
      <grpPath/>
   </XbeeCore>
Request Current List of Nodes from a Gateway
The following example shows how to request the current list of nodes from the gateway at address 00:13:A2:00:00:00:00:00.
GET /ws/XbeeCore?condition=xpExtAddr='00:13:A2:00:00:00:00:00'&cache=false
Request Node Discovery
The following example shows how to request a fresh discovery of all nodes for gateway 00:13:A2:00:00:00:00:00.
GET /ws/XbeeCore?condition=xpExtAddr='00:13:A2:00:00:00:00:00'&clear=true
Add Test Label to a Node
The following example shows how to add a text label to a specified node.
Payload:
<XbeeCore>
  <xpExtAddr>00:13:A2:00:00:00:00:00</xpExtAddr>
  <xpUserMetaData>user data here</xpUserMetaData>
</XbeeCore>
SCI Request
Every SCI request looks like the following:
<sci_request version="1.0">
    <{operation_name}>
        <targets>
          {targets}
        </targets>
          {payload}
    </{operation_name}>
</sci_request>
operation_name is either send_message, update_firmware, disconnect, or query_firmware_targets
targets contains one or more elements that look like: <device id="{device_id}"/>, <device id="all"/>, <device tag="{tag name}"/>, or <group path="{group name}"/>
payload is dependent on the operation
File Reference
The payload for an SCI command can be referenced from a file in Remote Manager Data Services as opposed to being explicitly described in the actual request. For example, the following SCI request payload is referenced instead of explicitly declared in the XML:
<sci_request version="1.0">
    <send_message>
        <targets>
            <device id="00000000-00000000-00000000-00000000"/>
        </targets>
        <file>/~/my_commands/set_settings.xml</file>
    </send_message>
</sci_request>
Where the content of set_settings.xml could be similar to the following:
<rci_request>
   <set_setting>
      <query_setting>....</query_setting>
   </set_setting>
</rci_request>
SCI Targets
Each element under Targets can be thought of as an OR statement, thus you can specify multiple group paths, and it will effect each path specified.
The targets field within an SCI request can be one of the following elements:
<device id="{device_id}"/>
When included in an SCI request, this element specifies a particular device ID. Requests issued will only be sent to the specified device.<device id="all"/>
When included in an SCI request, this element specifies the device IDs of all of your Remote Manager-registered devices. Requests issued will be sent to all of the devices registered within your Remote Manager user account.<device tag="{tag name}"/>
When included in an SCI request, this element specifies a particular tag name. Requests issued will be sent to all of the devices containing the specified tag name.<group path="{group name}"/>
When included in an SCI request, this element specifies a particular group name. Requests issued will be sent to each of the devices contained within the specified group.
Synchronous Requests
Synchronous request using a device ID
POST the following to: /ws/sci
<!-- common to every sci request -->
<sci_request version="1.0">
    <!-- indicates we want to send an rci request -->
   <send_message>
      <!-- preparing us for the list of who to operate on -->
      <targets>
         <!-- we will send it to this device -->
         <device id="00000000-00000000-00000000-00000000" />
      </targets>
      <!-- the payload for the send_message command, an rci request -->
      <rci_request version="1.1">
         <query_state>
            <device_stats />
         </query_state>
      </rci_request>
   </send_message>
</sci_request>
which returns when the operation has completed (or timed out) and the body of the response will be:
<sci_reply version="1.0">
<!-- start of the sci response -->
<send_message>
  <!-- the "operation" of our sci_request -->
   <device id="00000000-00000000-00000000-00000000">
      <!-- contains the response for this device -->
      <rci_reply version="1.1">
          <!-- the rci response for the particular device -->
         <query_state>
            <device_stats>
               <cpu>36</cpu>
               <uptime>152</uptime>
               <datetime>Thu Jan 1 00:02:32 1970 (based on uptime)</datetime>
               <totalmem>8388608</totalmem>
               <usedmem>5811772</usedmem>
               <freemem>2576836</freemem>
            </device_stats>
         </query_state>
      </rci_reply>
   </device>
</send_message>
Synchronous request using a group path
POST the following to /ws/sci
<!-- common to every sci request -->
<sci_request version="1.0">
<!-- indicates we want to send an rci request -->
<send_message>
<!-- preparing us for the list of who to operate on -->
<targets>
<!-- we will send it to this group -->
<group path="group1" />
</targets>
<!-- the payload for the send_message command, an rci request -->
<rci_request version="1.1">
<query_state>
<device_stats />
</query_state>
</rci_request>
</send_message>
</sci_request>
which will return when the operation has completed (or timed out) and the body of the response will be:
Note The return will contain a response for each device included within the specified group.
<sci_reply version="1.0">
<!-- start of the sci response -->
<send_message>
<!-- the "operation" of our sci_request -->
<device id="00000000-00000000-00000000-00000001">
<!-- contains the response for the first device in the specified group -->
<rci_reply version="1.1">
<!-- the rci response for the first device in the specified group -->
<query_state>
<device_stats>
<cpu>22</cpu>
<uptime>237565</uptime>
<totalmem>8388608</totalmem>
<usedmem>7136532</usedmem>
<freemem>1252076</freemem>
</device_stats>
</query_state>
</rci_reply>
</device>
<device id="00000000-00000000-00000000-00000002">
<!-- contains the response for the second device in the specified group -->
<rci_reply version="1.1">
<!-- the rci response for the second device in the specified group -->
<query_state>
<device_stats>
<cpu>42</cpu>
<uptime>438054</uptime>
<datetime>Mon Jun 28 19:36:29 2010</datetime>
<totalmem>8388608</totalmem>
<usedmem>8165060</usedmem>
<freemem>223548</freemem>
</device_stats>
</query_state>
</rci_reply>
</device>
</send_message>
<sci_request>
Synchronous request using a device tag:
POST the following to: /ws/sci
<!-- common to every sci request -->
<sci_request version="1.0">
<!-- indicates we want to send an rci request -->
<send_message>
<!-- preparing us for the list of who to operate on -->
<targets>
<!-- we will send it all devices that have this tag -->
<device tag="tag1" />
</targets>
<!-- the payload for the send_message command, an rci request -->
<rci_request version="1.1">
<query_state>
<device_stats />
</query_state>
</rci_request>
</send_message>
</sci_request>
which will return when the operation has completed (or timed out) containing responses from all of the devices matching the specified tag.
Asynchronous Requests
SCI requests that are asynchronous return without waiting for the request to finish, and return a job ID that can be used to retrieve the status and results later.
If you POST an SCI request asynchronously and want to see the results, the general flow is:
POST the SCI request.
if rc=202 // The job is accepted
get the location from the response header or the job ID from the response content
rc = HEAD location
while rc!=200
sleep for a number of seconds
rc = HEAD location
GET location
process your results
DELETE location
A synchronous request is performed by specifying synchronous=“false” in the element specifying the operation in the request, e.g.: <send_message synchronous="false">
the response then has the form:
<sci_reply version="1.0">
<send_message>
<jobId>{job_id}</jobId>
</send_message>
</sci_reply>
where job_id identifies the request you submitted.
Retrieve Status
You can retrieve the status for a particular request, or retrieve information about submitted requests overall.
Status for a Particular Job
Do an HTTP GET on /ws/sci/{job_id}
To determine if a job is complete, do an HTTP HEAD specifying the job ID; /ws/sci/601358. A return code of 200 means the job is complete.
Overall Status of Outstanding Jobs
Do an HTTP GET on /ws/sci, and you will get a response that looks like:
<result>
<resultTotalRows>1</resultTotalRows>
<requestedStartRow>0</requestedStartRow>
<resultSize>1</resultSize>
<requestedSize>1000</requestedSize>
<remainingSize>0</remainingSize>
<Job>
<jobId>601358</jobId>
<cstId>0</cstId>
<usrId>0</usrId>
<jobType>0</jobType>
<jobSyncMode>0</jobSyncMode>
<jobReplyMode>0</jobReplyMode>
<jobTargets>00000000-00000000-0004F3FF-00000000</jobTargets>
<jobRequestPayload><rci_request><query_setting/></rci_request></jobRequestPayload>
<jobDescription>query_setting</jobDescription>
<jobStatus>2</jobStatus>
<jobTargetCount>1</jobTargetCount>
<jobProgressSuccess>1</jobProgressSuccess>
<jobProgressFailures>0</jobProgressFailures>
<jobSubmitTime>2010-03-02T15:36:22Z</jobSubmitTime>
<jobCompletionTime>2010-03-02T15:36:22Z</jobCompletionTime>
</Job>
</result>
where jobId is the ID for the request.
jobType is the type of the job (0: send_message, 1: update_firmware, 2: disconnect).
jobSyncMode indicates if the job is synchronous (0: synchronous, 1: asynchronous).
jobReplyMode indicates the reply mode (0: all, 1: none, 2: only), where only means only return errors.
jobStatus is the current status of the job (0: new, 1: in_progress, 2: complete, 3: canceled).
jobTargetCount is the number of devices the job is targeted for.
jobProgressSuccess is the number of devices that have completed the operation successfully.
jobProgressFailures is the number of devices that have completed the operation with an error.
Retrieve Progress
You can retrieve the progress for a particular SCI job by specifying the progress=true parameter. For example:
HTTP GET https://remotemanager.digi.com/ws/sci/{job_id}?progress=true
This will return the current progress (percent completion) for an SCI job, as well as its progress history. For example, let’s assume we have an SCI job that is performing a firmware update on two different devices. Performing the query shown above will give a response that looks something like:
<sci_reply version="1.0">
<status>in_progress</status>
<update_firmware>
<device id="00000000-00000000-000000FF- FF000001">
<progress time="Mon Nov 28 21:30:25 UTC 2011" status="0">Getting Target Info</progress>
<progress time="Mon Nov 28 21:30:27 UTC 2011" status="0">Sending Download Request</progress>
<progress time="Mon Nov 28 21:31:15 UTC 2011" status="5">Sending Data: 156672 out of 3130662 bytes sent</progress>
<progress time="Mon Nov 28 21:32:07 UTC 2011" status="10">Sending Data: 313344 out of 3130662 bytes sent</progress>
</device>
<device id="00000000-00000000-000000FF- FF000002">
<progress time="Mon Nov 28 21:30:26 UTC 2011" status="0">Getting Target Info</progress>
<progress time="Mon Nov 28 21:30:27 UTC 2011" status="0">Sending Download Request</progress>
<progress time="Mon Nov 28 21:31:05 UTC 2011" status="5">Sending Data: 156672 out of 3130662 bytes sent</progress>
<progress time="Mon Nov 28 21:31:48 UTC 2011" status="10">Sending Data: 313344 out of 3130662 bytes sent</progress>
<progress time="Mon Nov 28 21:32:30 UTC 2011" status="15">Sending Data: 470016 out of 3130662 bytes sent</progress>
</device>
</update_firmware>
</sci_reply>
We can also query for job progress on other types of SCI jobs, including file uploads through the File System service. Progress updates for file uploads through RCI is not supported.
Cancel a Request or Delete the Results
Do an HTTP DELETE on /ws/sci/{job id}
This will attempt to cancel the request. Some parts of the request may have already completed, and parts of the request that are in progress may continue to completion, but it should prevent any operations that have not yet begun from starting.
Available Operators
Introduction
Available operators include:
send_message allows an RCI request to be sent to the device (or the server cache).
update_firmware updates the firmware of the device.
disconnect sends a request to the device to disconnect from the server.
ping determines the round trip latency of a device connection.
query_firmware_targets gets a list of firmware targets on the device.
file_system is used to interact with files on a device. This interface is for use with devices supporting the file_system service (as opposed to other devices that support file_system interaction through RCI requests.) The RCI do_command for file_system is only supported by older devices not implementing the file_system service.
data_service sends messages to devices over the data service.
reboot issues a reboot for a device.
There are a few attributes that can be specified for an operation that can specify the behavior. They include:
<{operation_name} reply="all|errors|none">
<{operation_name} synchronous="true|false">
<{operation_name} syncTimeout="xxx">
<{operation_name} cache="true|false|only">
<{operation_name} allowOffline="true|false">
<{operation_name} waitForReconnect="true|false">
reply determines how much information should be saved in the response to a request.
all (default) means that everything should be saved.
errors implies that only errors in the response should be kept, while success messages should not be saved.
none means that result data for the operation should not be saved.
errors is useful if you are performing an operation and only want to see error information that occurred, such as when setting settings, or performing firmware update. none is useful when you aren’t concerned with the reply at all. If you are performing a synchronous request because you want to wait until the operation is complete, but do not want to receive a lot of data in the reply, this would accomplish that.
synchronous determines whether the request should be sent synchronously (default), or asynchronously (false).
syncTimeout is applicable for a synchronous request and determines how long to wait for the request to complete (in seconds) before an error is returned. The default changes based on the type. The overall timeout for the SCI request will be the accumulation of all operations combined. Unless overridden with syncTimeout, the timeouts on send_message commands are as follows:
| operation |
timeout |
| default |
1 min |
| do_command target=“file_system” |
10 min |
| do_command target=“zigbee” |
5 min |
| firmware update |
5 min |
cache determines if the request should be processed on the server if possible, or always sent to the device. Options include:
- true (default) means that if possible, the request will be processed from the server cache without being sent to the device. If it cannot, it will be sent to the device.
- false means that the request will bypass the server cache and be sent to the device.
- only means that the request should only be processed by the server cache and will never be sent to the device, even if the server is not capable of servicing the request.
allowOffline determines if this should be an offline operation. Offline operations enable you to send a request to a device that is currently disconnected. If the device is already connected, then Remote Manager will execute the command right away. If the device is not connected, then Remote Manager will execute the command as soon as the device connects to Remote Manager. Offline requests can be specified by setting the allowOffline attribute to “true”.
NOTES:
- By default, SCI requests are synchronous. For offline operations, it is recommended to use an asynchronous request by setting the synchronous attribute to “false”.
- Asynchronous offline operations will timeout after 7 days.
- If for some reason the device disconnects during processing, the operation will automatically be retried again the next time the device connects. Offline operations will be retried up to 5 times before failing.
waitForReconnect allows the completion of a command to depend on a device reconnecting. For example, normally sending a reboot command to a device would result in the command being marked as successfully completed as soon as the device acknowledges the reboot request. However, in many instances, it may make sense to wait to mark the command as successful until the device reconnects to Remote Manager. In such cases, this can be achieved by setting the waitForReconnect attribute to “true”.
Warning: Many commands do not result in the device disconnecting and reconnecting to Remote Manager, meaning that improper use of this setting could result in the request taking an indefinite amount of time to complete; use caution when using this setting.
send_message
This is used to send an RCI request to a device. The reply will contain the response from the devices or groups of devices, or any error messages. A device ID of all will cause the RCI request to be sent to all devices available to the user.
One of the main uses of RCI requests are to interact with the settings and state of a device. Remote Manager keeps a cache of the latest settings and state that it has received from a device, and this makes it possible to retrieve information about the state or settings of a device without having to go to the device.
The format of the send_message command is as follows:
<sci_request version="1.0">
<send_message>
<targets>{targets}</targets>
<rci_request version="1.1">
<!-- actual rci request -->
</rci_request>
</send_message>
</sci_request>
query_setting
Request for device settings. May contain setting group elements to subset query (only setting group subset supported. Subsetting below this level not supported).
Returns requested config settings. Requests specifying no settings groups (e.g. return all settings).
set_setting
Set settings specified in setting element. Settings data required.
Empty setting groups in reply indicate success. Errors returned as error or warning elements.
query_state
Request current device state such as statistics and status. Sub-element may be supplied to subset results.
Returns requested state. Requests specifying no groups (e.g. return all state).
Example:
<query_state>
<device_stats/>
</query_state>
reboot
Reboots device immediately.
do_command
The do_command is a child element of an RCI Request that is executed differently based on the value of its target attribute. Note that the command may not be supported for use with your device. See the file_system service.
Python
You can add callbacks to unhandled do_commands target via the rci python module on a device.
Zigbee
The zigbee rci command interacts with an xbee module.
ZigBee Discover
Returns back a list of discovered nodes, with the first indexed node being the node in the gateway.
Optional attributes:
- start says the rci should return the nodes whose index is >= start. For some reason, if start > 1, the Gateway will return this list from cache, and not perform an actual discovery.
- size Determines number of nodes to return
- clear If this is set to “clear”, it forces a clearing of the device’s cache, and will always perform a discover to get fresh results
Example:
<do_command target="zigbee">
<discover start="1" size="10" option="clear"/>
</do_command>
ZigBee Query Setting
Returns back a detailed list of settings for a given radio
Optional attribute:
- addr 64 bit address of the node to retrieve settings for. If omitted, defaults to gateway node
Example:
<do_command target="zigbee">
<query_setting addr="00:13:a2:00:40:34:0c:88!"/>
</do_command>
ZigBee Query State
This is identical to query_setting, except it returns back different fields.
ZigBee Set Setting
Basically the reverse of query_setting, so you can set settings for a particular node
Optional attributes:
- addr 64 bit address of node to set settings for. If omitted, defaults to gateway node
Example:
<do_command target="zigbee">
<set_setting addr="00:13:a2:00:40:34:0c:88!">
<radio>
<field1>value1</field1>
...
<fieldn>valuen</fieldn>
</radio>
</set_setting>
</do_command>
ZigBee Firmware Update
Updates the firmware of the radio in the gateway
Required attribute:
- file Path to a firmware file which must already exist on the gateway
Example:
<do_command target="zigbee">
<fw_update file="/WEB/firmware_file"/>
</do_command>
update_firmware
This is used to update the firmware of one or more devices. The firmware image can be hosted in your Data Services directory on Remote Manager, or can be Base64 encoded and placed in a data element within the update firmware command. The response marks each device as either submitted or failed. A response of “Submitted” means the process to send the firmware and update request to Remote Manager completed successfully.
It is still possible for the process to fail between Remote Manager and the device. You will need to go back and verify that the device firmware version has actually changed. You can do this by using the DeviceCore request defined earlier. You may also use the RCI command “query_state”.
There are optional attributes filename, and firmware_target, which are included with the update_firmware element.
filename needs to be specified if your target device supports multiple targets that can be updated in order to choose which to upgrade. These will match patterns specified by the device which can be discovered using the query_firmware_targets command.
firmware_target can be used to bypass the filename matching and force an upgrade on a particular target.
A request using a Base64 encoded file looks like:
<sci_request version="1.0">
<update_firmware filename="abcd.bin">
<targets>{targets}</targets>
<data>{base64 encoded firmware image}</data>
</update_firmware>
</sci_request>
and the reply looks like:
<sci_reply version="1.0">
<update_firmware>
<device id="00000000-00000000-00000000-000000">
<submitted />
</device>
</update_firmware>
</sci_reply>
To do the update operation with a file stored in Remote Manager Data Services, use the <file> attribute:
<sci_request version="1.0">
<update_firmware filename="abcd.bin">
<targets>
{targets}
</targets>
<file>~/firmware/abcd.bin</file>
</update_firmware>
</sci_request>
The above example assumes that you created a directory called “firmware” off the root of your home directory in Data Services. “~” is an alias to the home directory of your account.
disconnect
Disconnect is used to indicate that a device should disconnect from the server. Based on the device’s configuration, it will likely reconnect.
A request follows this format:
<sci_request version="1.0">
<disconnect>
<targets>{targets}</targets>
</disconnect>
</sci_request>
and a response looks like:
<sci_reply version="1.0">
<disconnect>
<device id="00000000-00000000-00000000-00000000">
<disconnected />
</device>
</disconnect>
</sci_reply>
ping
Ping is used to determine the round trip latency of a device connection. The result gives the actual time used to send a simple command to the device and receive a reply.
A request follows this format:
<sci_request version="1.0">
<ping>
<targets>
<device id="00000000-00000000-00042DFF-FF04A85A"/>
</targets>
</ping>
</sci_request>
The sample response contains the actual time used to send a simple command to the device and receive a reply.
<sci_reply version="1.0">
<ping>
<device>
<device id="00000000-00000000-00042DFF-FF04A85A">
<time>
<device units="ms">5</device>
</time>
</device>
</ping>
</sci_reply>
query_firmware_targets
Query Firmware Targets is used to retrieve information about the upgradeable firmware targets of a device. It will return the target number, name, version, and code size. A pattern may also be returned in the response which indicates a regular expression that is used to determine the appropriate target for a given filename.
A request follows this format:
<sci_request version="1.0">
<query_firmware_targets>
<targets>{targets}</targets>
</query_firmware_targets>
</sci_request>
and a response looks like:
<sci_reply version="1.0">
<query_firmware_targets>
<device id="00000000-00000000-00000000-00000000">
<targets>
<target number="0">
<name>Firmware Image</name>
<pattern>image\.bin</pattern>
<version>7.5.0.11</version>
<code_size>2162688</code_size>
</target>
<target number="1">
<name>Bootloader</name>
<pattern>rom\.bin</pattern>
<version>0.0.7.5</version>
<code_size>65536</code_size>
</target>
<target number="2">
<name>Backup Image</name>
<pattern>backup\.bin</pattern>
<version>7.5.0.11</version>
<code_size>1638400</code_size>
</target>
</targets>
</device>
</query_firmware_targets>
</sci_reply>
file_system
The file system command is used to interact with files on a device. This interface is for use with devices supporting the file system service (as opposed to other devices which support file system interaction through RCI requests).
Commands have the following general format:
<sci_request version="1.0">
<file_system>
<targets>{targets}</targets>
<commands>{one or more file_system commands}</commands>
</file_system>
</sci_request>
Support file system commands are as follows:
put_file
The put_file command is used to push new files to a device, or optionally write chunks to an existing file.
- path is a required attribute giving the file to write to.
- offset is an optional attribute specifying the position in an existing file to start writing at.
- truncate is an optional attribute indicating the file should be truncated to the last position of this put.
The payload is specified in one of two ways:
- Child element data with the payload Base64 encoded
- Child element file with a path to a file in storage to send
Example:
A put file operation using a file on the server as the source for the data. The contents will be inserted into the file /path_to/write1.ext, as offset 200. It is set to not truncate the file if it extends beyond the length of written data.
<sci_request version="1.0">
<file_system>
<targets>
<device id="00000000-00000000-00000000-00000000" />
</targets>
<commands>
<put_file path="/path_to/write1.ext" offset="200" truncate="false">
<file>~/referencedfilename.xml</file>
</put_file>
</commands>
</file_system>
</sci_request>
A put file with the data Base64 encoded and embedded in the request under the data element. Offset and truncate are not specified, so this example will create a new file if one does not exist, or overwrite an existing one.
<sci_request version="1.0">
<file_system>
<targets>
<device id="00000000-00000000-00000000-00000000" />
</targets>
<commands>
<put_file path="/path_to/write2.ext">
<data>ZmlsZSBjb250ZW50cw==</data>
</put_file>
</commands>
</file_system>
</sci_request>
get_file
The get_file command is used to retrieve a file from the device, either in its entirety or in chunks. There is currently a restriction such that the maximum retrieval size is 10MB. As a result, files greater than this size will have to be retrieved in chunks.
- path is a required attribute giving the file to retrieve.
- offset is an optional attribute specifying the position to start retrieving from.
- length is an optional attribute indicating the length of the chunk to retrieve.
Example:
The get file in this example will retrieve 64 bytes starting at offset 100 from the file /path_to/file.ext. Leaving off offset and length would cause the full file to be retrieved.
<sci_request version="1.0">
<file_system>
<targets>
<device id="00000000-00000000-00000000-00000000" />
</targets>
<commands>
<get_file path="/path_to/file.ext" offset="100" length="64" />
</commands>
</file_system>
</sci_request>
ls
The ls command is used to retrieve file listings and details.
- path is a required attribute specifying where to get file details for.
- hash is an optional attribute which indicates a hash over the file contents should be retrieved. Values include none, any, md5, sha-512, sha3-512, and crc32. Use any to indicate the device should choose its best available hash. (If you specify md5, sha-512, sha3-512, or crc32, the device may not support the hash or any hash mechanism).
Example:
This ls request will return a listing of the contents of /path_to_list. By specifying hash=“any”, the response will include the most optimal hash available, if any. Leaving off the hash attribute will default it to none.
<sci_request version="1.0">
<file_system>
<targets>
<device id="00000000-00000000-00000000-00000000" />
</targets>
<commands>
<ls path="/path_to_list" hash="any" />
</commands>
</file_system>
</sci_request>
rm
The rm command is used to remove files.
- path is a required attribute specifying the location to remove.
Example:
This rm request will attempt to delete /path_to/file.ext
<sci_request version="1.0">
<file_system>
<targets>
<device id="00000000-00000000-00000000-00000000" />
</targets>
<commands>
<rm path="/path_to/file.ext" />
</commands>
</file_system>
</sci_request>
data_service
A new subcommand in SCI is now supported to send messages to a device over the data service. The command element is data_service, and it must contain an element requests. The requests element contains a device_request element, with required attribute target_name and optional attribute format. target_name specifies the data service target the request will be sent to. The text data contained in the device_request element is used as the payload for the request. If format is not specified, the content will be sent as text. If format=“base64” is specified, the content will be Base64 decoded and sent to the target as a binary payload.
Example of text payload
<data_service>
<targets>
<device id="00000000-00000000-00000000-00000000" />
</targets>
<requests>
<device_request target_name="myTarget">my payload string</device_request>
</requests>
</data_service>
Example of binary payload
<data_service>
<targets>
<device id="00000000-00000000-00000000-00000000" />
</targets>
<requests>
<device_request target_name="myBinaryTarget" format="base64">YmluYXJ5ZGF0YS4uLg==</device_request>
</requests>
</data_service>
reboot
Reboot is used to issue a reboot for a device. The majority of devices may not support this operation, and will instead support reboot through RCI. This option exists as an alternative for devices that may not support RCI.
Example:
<reboot>
<targets>
<device id="00000000-00000000-00000000-00000000" />
</targets>
</reboot>
RCI (Remote Command Interface)
RCI (Remote Command Interface) is a mechanism that allows remote configuration, control, and information exchange between an RCI client, typically a web services client acting via Remote Manager, and an RCI target, typically a Digi device implementing the RCI specification.
RCI consists of a transport mechanism, such as the Remote Manager device protocol, EDP, and an XML-based request and reply document specification. For complete information on RCI, see Remote Command Interface (RCI) specification.
Sms Messages
There are two types of SMS data:
- Data: Data SMS messages are sent from the device using the python function
idigisms_send() and the messages are stored in FileData (see FileData).Data from the device is stored as a file in storage:
- Python programs specify the data contents and optionally the file name, called the path in idigisms_send().
- If a path is not specified, the file is stored with the name SmsUnnamed. If the fdArchive option is true, the file is archived.
- DIA data: Remote Manager parses DIA (Device Integration Application) messages and adds the parsed messages to the DIA data specific storage or as a file in generic storage depending on whether the device has a DIA Data Management service subscription (see DIA (device integration application).
Sending Sms Messages
Remote Manager sends SMS requests to registered devices using the SCI (Server Command Interface) web service, and the messages are handled in a manner similar to RCI (Remote Command Interface) messages.
To send an SMS message using the Remote Manager SCI web service, specify the message as a child of the of the SCI <send_message> operation using the tag as a child element. Remote Manager creates a job for each web services request, and the job can be synchronous or asynchronous. You can retrieve Remote Manager job results the same way as you retrieve results for RCI jobs.
Send message options and SMS messages
Use the following <send_message> options to control how Remote Manager handles SMS message requests:
- synchTimeout = “xxx”
Behavior is identical to existing SCI requests.
- reply = “all | errors | none”
Controls whether a reply is sent by the device back to the server for a command. Using this option, you can control the number of Remote Manager SMS messages directly sent. The default is none. Note that all and errors work the same way for all SCI requests, including SMS message requests.
- cache = “true | false | only”
Remote Manager does not currently service SMS requests from the cache. Therefore, specifying only returns an error. In addition, true or false result in the request being sent to the device. The default is false.
SMS Command XML Child Elements
The XML child elements for an SMS command.
| Command |
Description |
| ping |
Ping the device via SMS to determine whether device can receive SMS messages. No parameters. |
| provision |
Configure the device with the Remote Manager server telephone number and optionally the service ID. The restrict sender flag must be off in the device for this command. No parameters. |
| raw |
Send raw SMS message from the device with no modification from Remote Manager. This is useful in cases when customers wish to use every byte of the SMS message (Remote Manager protocol takes approximately 5 bytes per message of overhead) or when using a device that doesn’t have Remote Manager protocol support but does have SMS support. SMS raw messages can be a maximum of 160 characters. The supported characters are dependent on your carrier, but are character only (not binary). They are not guaranteed to be delivered, may be delivered more than once, and are not guaranteed to be correct (they are subject to corruption). |
| reboot |
Reboot the device immediately. No parameters. |
| request_connect |
Request a Remote Manager data connection. If a connection has already been made, forces a reconnect of the management session. No parameters. |
| command |
Send a command. Options include: maxResponseSize=’’’’’ Set maximum size of the response. If the response is larger than the maxResponseSize, the response is truncated. The value is the number of SMS messages that make up the response. This is an optional parameter. If not specified, the size of the response is determined by the device. |
| user_msg |
Send a message to a registered listener in python. This command is similar to the RCI do_command custom target command. path=’’’’’ Send requests to a specific listener. If this optional parameter is omitted, the message is delivered to the listener on the device that is registered to the null path. |
| dia |
Send a DIA command to the running DIA instance. The format of this request is documented in the DIA SMS presentation documentation. |
| Optional attribute for the above commands |
format=“base64|text” Set the encoding of the request to Base64 or text: use base64 for Base64 encoding; use text for plain text. The default format is text. All subcommands (cli, user_msg, and so on) support the format=“base64|text” attribute. If the server detects characters that will cause the response to be invalid XML, it encodes the response in Base64 and indicates this with the format=“base64” attribute. That is, even if a request uses format=“text”, the reply may have format=“base64” set. |
Using SMS Command to Send a Request Connect
You can use Remote Manager to send an SMS request connect message to a Remote Manager-registered device to cause the device to connect back to the server using the device-initiated connection method over TCP/IP. Once the device is connected, you can initiate web services requests and Remote Manager UI actions for the device. In this way, devices do not need to maintain a Remote Manager connection at all times. Instead, connections can be established dynamically as needed.
Provision Sms
To use SMS with a device, Remote Manager needs the telephone number of the device. Typically, when a registered device connects for the first time, the telephone number is read from the device and automatically provisioned. However, there are cases where auto-provisioning does not occur. For example, a device connects for the first time and cellular is not yet configured or a device is provisioned before connecting to Remote Manager. In these cases, you must manually provision the device with the telephone number.
To provision the telephone number for a Remote Manager-registered device, the telephone number must be added to an entry in the NetworkInterface that represents a SIM installed on the device. To provision a device, follow these general steps:
Step1: Retrieve the telephone number from a device
Step 2: Find the NetworkInterface record for the device
Step 3: Update NetworkInterface record
Step 4: Configure phone number without an existing NetworkInterface record
Step 1: Retrieve the Phone Number from a Device
You can retrieve the telephone number of the device using the following RCI request. The sample response contains the telephone number of the device (phnum):
<rci_request version="1.1">
<query_state>
<mobile_stats />
</query_state>
</rci_request>
<rci_reply version="1.1">
<query_state>
<mobile_stats>
<mobile_version>1.1</mobile_version>
<modemtype>GSM</modemtype>
<rssi>-42</rssi>
<quality max="5">5</quality>
<g3rssi>0</g3rssi>
<g3quality max="5">0</g3quality>
<rstat code="1">Registered (Home Network)</rstat>
<cid>34016</cid>
<lac>32004</lac>
<imsi>310410316937398</imsi>
<iccid>89014104243169373988</iccid>
<phnum>19522213895</phnum> <!-- phone number of the device -->
<manuf>SIEMENS</manuf>
<model>TC63</model>
<sn>355633002498656</sn>
<rev>REVISION 02.000</rev>
<varinfo index="1">
<desc>Network Name</desc>
<data>N/A</data>
</varinfo>
<varinfo index="2">
<desc>(E)GPRS Status</desc>
<data>GPRS Attached</data>
</varinfo>
<varinfo index="3">
<desc>Current Band</desc>
<data>850 MHz, 1900 MHz</data>
</varinfo>
<varinfo index="4">
<desc>User Band Selection</desc>
<data>Automatic</data>
</varinfo>
<varinfo index="5">
<desc>Mobile Channel</desc>
<data>235</data>
</varinfo>
<varinfo index="6">
<desc>Mobile Country Code</desc>
<data>310</data>
</varinfo>
<varinfo index="7">
<desc>Mobile Network Code</desc>
<data>410</data>
</varinfo>
<varinfo index="8">
<desc>User Carrier Selection</desc>
<data>Automatic</data>
</varinfo>
<varinfo index="9">
<desc>PLMN Color</desc>
<data>3</data>
</varinfo>
<varinfo index="10">
<desc>Base Station Color</desc>
96
<data>5</data>
</varinfo>
<varinfo index="11">
<desc>Max Power RACH</desc>
<data>0</data>
</varinfo>
<varinfo index="12">
<desc>Min Rx Level</desc>
<data>-111</data>
</varinfo>
<varinfo index="13">
<desc>Base Coefficient</desc>
<data>68</data>
</varinfo>
<varinfo index="14">
<desc>SIM Status</desc>
<data>5: SIM Initialization Complete</data>
</varinfo>
<varinfo index="15">
<desc>SIM PIN Status</desc>
<data>Ready</data>
</varinfo>
<stats_index>5</stats_index>
<multi_sim_enabled>no</multi_sim_enabled>
</mobile_stats>
</query_state>
</rci_reply>
Step 2: find the NetworkInterface Record for the Device
The information within this step only applies to configurations that have an existing entry in NetworkInterface record to update. If you perform the GET below and determine that your configuration does not have a niId value, skip this step and proceed to step 4.
To find the NetworkInterface record to update for your Remote Manager-registered device, perform a GET similar to the following:
GET /ws/DeviceInterface/?condition=devConnectwareId='00000000-00000000-00409DFF-FF2EB94D'
Replace ‘00000000-00000000-00409DFF-FF2EB94D’ with the device ID of your device.
Here is a sample reply:
<result>
<resultTotalRows>3</resultTotalRows>
<requestedStartRow>0</requestedStartRow>
<resultSize>1</resultSize>
<requestedSize>1000</requestedSize>
<remainingSize>0</remainingSize>
<DeviceInterface>
<id>
<devId>6</devId>
<devVersion>0</devVersion>
<niId>26</niId>
<niVersion>0</niVersion>
</id>
<devRecordStartDate>2011-01-13T18:22:00Z</devRecordStartDate>
<devMac>00:40:9D:2E:B9:4D</devMac>
<devCellularModemId>355633002498656</devCellularModemId>
<devConnectwareId>00000000-00000000-00409DFF-FF2EB94D</devConnectwareId>
<cstId>10</cstId>
<grpId>10</grpId>
<devEffectiveStartDate>2011-01-05T21:37:00Z</devEffectiveStartDate>
<devTerminated>false</devTerminated>
<niRecordStartDate>2011-02-15T21:45:00Z</niRecordStartDate>
<niInterfaceType>0</niInterfaceType>
<niEffectiveStartDate>2011-02-15T20:25:00Z</niEffectiveStartDate>
<niTerminated>false</niTerminated>
<niPhone>N/A</niPhone>
<niActivePhone>false</niActivePhone>
<niIdigiPhone>12029823370</niIdigiPhone>
</DeviceInterface>
</result>
Within the result, find the nild of the NetworkInterface record to be updated. In the above example, the nild is 26. Use the niId to retrieve the NetworkInterface record:
/ws/NetworkInterface/26/0 (replace with your device's niId, 0 means most recent version)
<result>
<resultTotalRows>1</resultTotalRows>
<requestedStartRow>0</requestedStartRow>
<resultSize>1</resultSize>
<requestedSize>1000</requestedSize>
<remainingSize>0</remainingSize>
<NetworkInterface>
<id>
<niId>26</niId>
<niVersion>0</niVersion>
</id>
<niRecordStartDate>2011-02-15T21:45:00Z</niRecordStartDate>
<devId>6</devId>
<devVersion>0</devVersion>
<niInterfaceType>0</niInterfaceType>
<cstId>10</cstId>
<grpId>10</grpId>
<niEffectiveStartDate>2011-02-15T20:25:00Z</niEffectiveStartDate>
<niTerminated>false</niTerminated>
<niPhone>N/A</niPhone>
<niPhoneCarrier>3</niPhoneCarrier>
<niActivePhone>false</niActivePhone>
<niIdigiPhone>12029823370</niIdigiPhone>
<niIdigiServiceId></niIdigiServiceId>
</NetworkInterface>
</result>
Step 3: Update Networkinterface Record
To update the NetworkInterface record with the device Modem ID, copy the contents of from the GET above. Update the niPhone tag with the phone number you discovered in Step1: Retrieve the telephone number from a device (replace N/A with your device phone number). Change the status of niActivePhone and then remove the id tag.
The values added below are:
niActivePhone: true (to indicate this is the active Remote Manager SMS record. There can be more than one NetworkInterface record per device. Only one can have niActivePhone true).
niPhone: The phone number of the SIM (discovered in step 1).
PUT /ws/NetworkInterface/26
Payload:
<?xml version="1.0" encoding="UTF-8"?>
<NetworkInterface>
<niRecordStartDate>2011-02-15T21:45:00Z</niRecordStartDate>
<devId>6</devId>
<devVersion>0</devVersion>
<niInterfaceType>0</niInterfaceType>
<cstId>10</cstId>
<grpId>10</grpId>
<niEffectiveStartDate>2011-02-15T20:25:00Z</niEffectiveStartDate>
<niTerminated>false</niTerminated>
<niPhone>19522213895</niPhone>
<niActivePhone>true</niActivePhone>
</NetworkInterface>
Step 4: Configure Phone Number without an Existing NetworkInterface Record
The information within this step only applies to configurations that do not have an existing entry in NetworkInterface to update (as described in step 2).
Find the the devId for your Remote Manager-registered device
Perform a GET on /ws/DeviceCore?condition=devConnectwareId=‘00000000-00000000-00409DFF-FF4A3946’ (replace with your device ID).
<?xml version="1.0" encoding="UTF-8"?>
<result>
<resultTotalRows>1</resultTotalRows>
<requestedStartRow>0</requestedStartRow>
<resultSize>1</resultSize>
<requestedSize>1000</requestedSize>
<remainingSize>0</remainingSize>
<DeviceCore>
<id>
<devId>1224</devId> <!-- devId of the device -->
<devVersion>28</devVersion>
</id>
<devRecordStartDate>2011-12-20T20:34:00.000Z</devRecordStartDate>
<devMac>00:40:9D:4A:39:46</devMac>
<devCellularModemId>357975020409993</devCellularModemId>
<devConnectwareId>00000000-00000000-00409DFF-FF4A3946</devConnectwareId>
<cstId>27</cstId>
<grpId>27</grpId>
<devEffectiveStartDate>2011-12-20T20:23:00.000Z</devEffectiveStartDate>
<devTerminated>false</devTerminated>
<dvVendorId>4261412864</dvVendorId>
<dpDeviceType>ConnectPort X4</dpDeviceType>
<dpFirmwareLevel>34406404</dpFirmwareLevel>
<dpFirmwareLevelDesc>2.13.0.4</dpFirmwareLevelDesc>
<dpRestrictedStatus>0</dpRestrictedStatus>
<dpLastKnownIp>10.8.16.16</dpLastKnownIp>
<dpGlobalIp>66.77.174.126</dpGlobalIp>
<dpConnectionStatus>1</dpConnectionStatus>
<dpLastConnectTime>2011-12-20T20:24:00.000Z</dpLastConnectTime>
<dpContact />
<dpDescription />
<dpLocation />
<dpPanId>0xd367</dpPanId>
<xpExtAddr>00:13:A2:00:40:66:A1:B2</xpExtAddr>
<dpServerId>ClientID[3]</dpServerId>
<dpZigbeeCapabilities>383</dpZigbeeCapabilities>
</DeviceCore>
</result>
- Update the devId tag below with the devId number discovered in step a, devId is 1224 in the above example. Replace the devId number in the example below with your device’s devId number.
- Ensure the the niInterfaceType value is set to 0.
- Update the niPhone tag below with the phone number (found within the phnum tag) discovered in step 1. Replace the phone number displayed in the example below with your device’s phone number.
The values added below are:
devId: The devID number of the device.
niPhone: The phone number of the device (discovered in step 1).
niInterfaceType: The interface type of the device (0 means most recent version).
POST /ws/NetworkInterface
<NetworkInterface>
<devId>1224</devId>
<niInterfaceType>0</niInterfaceType>
<niTerminated>false</niTerminated>
<niPhone>19522213895</niPhone>
</NetworkInterface>
The following example RCI request will configure a device to enable SMS, configure SMS, disable client initiated Remote Manager connections, and configure paged Remote Manager connections. See below for an explanation of the parameters.
RCI request:
<rci_request version="1.1">
<set_setting>
<smscell>
<state>on</state>
</smscell>
<idigisms>
<state>on</state>
<restrict_sender>on</restrict_sender>
<phnum>12029823370</phnum>
<service_identifier></service_identifier>
</idigisms>
<mgmtconnection index="1">
<connectionType>client</connectionType>
<connectionEnabled>off</connectionEnabled>
</mgmtconnection>
<mgmtconnection index="4">
<connectionType>paged</connectionType>
<connectionEnabled>on</connectionEnabled>
<pagedConnectionOverrideEnabled>on</pagedConnectionOverrideEnabled>
<serverArray index="1">
<serverAddress>en://login.remotemanager.digi.com</serverAddress>
</serverArray>
</mgmtconnection>
<mgmtglobal>
<connIdleTimeout>2220</connIdleTimeout>
</mgmtglobal>
<mgmtnetwork index="1">
<networkType>modemPPP</networkType>
<connectMethod>mt</connectMethod>
<mtRxKeepAlive>3000</mtRxKeepAlive>
<mtTxKeepAlive>3000</mtTxKeepAlive>
<mtWaitCount>3</mtWaitCount>
</mgmtnetwork>
</set_setting>
</rci_request>
RCI for SMS
RCI group: idigisms
| Field |
Options |
Description |
| state |
on, off |
Remote Manager SMS support enabled or disabled. If off, SMS messages will not be processed. |
| phnum |
number |
The phone number that the device will use to send messages to Remote Manager. This needs to be obtained from Digi (each cluster has its own phone number). |
| service_identifier |
string |
An ID that when combined with the phone number forms the complete address of Remote Manager server. This needs to be obtained from Digi (each cluster has its own phone number). |
| restrict_sender |
on, off |
If on, only Remote Manager SMS messages originating from “phnum” and with the service ID “service_identifier” will be honored as Remote Manager SMS messages. |
RCI group: smscell
| Field |
Options |
Description |
| state |
on, off |
Enables basic SMS support for a device. This needs to be on for Remote Manager SMS to communicate. |
RCI group: mgmtconnection index = “1” (client initiated Remote Manager connections)
| Field |
Options |
Description |
| connectionEnabled |
on, off |
Enables client initiated connections. When off, the device will not attempt to keep a Remote Manager connection open. |
RCI group: mgmtconnection index = “4” (paged - i.e. temporary - - Remote Manager connections)
| Field |
Options |
Description |
| connectionEnabled |
on, off |
Enables temporary connections. A connection request results in a paged Remote Manager connection being established to the server. If this parameter is off, a connection will not be made. |
| pagedConnectionOverrideEnabled |
on, off |
When on, paged connections will take priority over client initiated requests so that connection requests always result in a new connection. Set to on. |
| serverArrayindex=“1” serverAddress |
url |
Send to the dns name of Remote Manager server in the form: en://<dns-name>. |
RCI group: mgmtglobal
| Field |
Options |
Description |
| connIdleTimeout |
Timeout in seconds |
Connection is dropped after this number of seconds of inactivity. Any traffic on the connection, including keep-alive traffic, count as non-idle for purposes of this timer. |
RCI group: mgmtnetwork index = “1 “ (cellular Remote Manager connection configuration)
| Field |
Options |
Description |
| mtRxKeepAlive |
Timeout in seconds |
Receive keep-alive timeout. Must be higher than connIdleTimeout or connIdleTimeout is defeated. |
| mtTxKeepAlive |
Timeout in seconds |
Transmit keep-alive timeout. Must be higher than connIdleTimeout or connIdleTimeout is defeated. |
| mtWaitCount |
Number |
Number of missed keep-alives before connection is considered dropped. Shown for completeness only; is not directly related to connection request behavior. |
Send Remote Manager SMS Request Connect
To send a connect request to a device via SMS, POST the following SCI request to /ws/sci:
<sci_request version="1.0">
<send_message synchronous="true" syncTimeout="60" reply="all">
<targets>
<device id="00000000-00000000-00000000-00000000" />
</targets>
<sms>
<request_connect />
</sms>
</send_message>
</sci_request>
Details:
SCI is used to send SMS requests to Remote Manager-registered devices. The behavior is very similar to RCI processing from a user’s perspective.
As in RCI, web services requests result in jobs being created in Remote Manager. These jobs can be synchronous or asynchronous and job results are retrieved the same way they are for RCI jobs.
The <send_message> command will be used, <send_message> options have the following effect with SMS:
- synchronous= “true|false”
“true " results in a synchronous request; “false” for asynchronous.
Time in seconds that the operation is given to complete. Valid for synchronous jobs only.
“all " means return a reply SMS,
“errors " means request a reply but the result of the command will only show errors,
“none " means do not request a response.
This controls whether an SMS reply is sent by the device back to the server for a command. This is primarily intended to allow the SMS user to directly control the number of Remote Manager SMS messages being sent, since they are charged for each one. Note, this option is honored even when it results in less than ideal behavior. For instance, a no-reply ping is useless.
SMS requests are specified by the tag <sms> as a child element of <send_message>.
<request_connect>, requests a device to connect using EDP (reconnects if already connected).
- request_connect takes no parameters
Wait for Device to Connect
The connection status of any Remote Manager-registered device may be found by performing a GET on /ws/DeviceCore.
The result has an entry for each Remote Manager-registered device. In that entry, the element dpConnectionStatus is 0 if the device is disconnected and 1 if connected:
<dpConnectionStatus>0</dpConnectionStatus>
A GET on /ws/DeviceCore returns a list of all Remote Manager-registered devices. To retrieve status for a single device, issue a GET on /ws/DeviceCore/{id} where the id is the id associated with a particular device.
Send a Disconnect
Once work is complete to a device, a web services client may optionally disconnect the registered device from Remote Manager:
POST /ws/sci
<sci_request version="1.0">
<disconnect>
<targets>
<device id="00000000-00000000-00000000-00000000" />
</targets>
</disconnect>
</sci_request>
SM/UDP
The SM/UDP (Short Message/User Datagram Protocol) feature allows devices to leverage the very small data footprint of Remote Manager SM protocol (currently used for SMS) over UDP. However, it is important to note that SM/UDP requests vary greatly from SMS as SM/UDP requests are not immediately sent to a device. Instead, requests of this type are queued as devices may not be publicly addressable. This creates a way for devices to interact with Remote Manager in a way that is efficient from a data perspective and does not require a persistent connection. This feature enables devices with constrained data plans to keep data traffic to an absolute minimum by only occasionally sending data readings to Remote Manager.
Initially, no requests are queued in the server. A device will send a request to the server and the server will process the request, sending a reply to the device only if the device specified that one should be sent in the request.
At some point an SM/UDP request may be targeted for the device. This request can be sent via a Web Services request, using the options within the Actions Menu of the Devices page, or as the result of an automation. When a device sends an SM/UDP request (known as a datagram) to Remote Manager, Remote Manager will process the request and queue it for delivery to the device. The next time the device sends a message (regardless of whether a reply was specified), Remote Manager will check for queued messages and send them down to the device.
For example, if you send the SM/UDP Reboot request to your device, the device will not reboot immediately. Instead, the SM/UDP Reboot request will be queued for the device. The next time an SM/UDP request is sent to the device, Remote Manager will check for queued messages and send the queued SM/UDP Reboot request to the device instructing it to reboot itself. Once a request is queued for a device, it may remain queued for multiple days. Once the request is actually sent to a device, it typically has a timeout of 60 seconds (plus a small window in some circumstances).
Sending and Receiving SM/UDP messages
Remote Manager sends SM/UDP requests to Remote Manager-registered devices via SCI. SM/UDP requests are handled in a similar manner to RCI messages. They are specified as a child of the <send_message> command. As in RCI, web services requests cause Remote Manager to create jobs. These jobs can be synchronous or asynchronous and job results are retrieved the same way they are for RCI jobs.
It is suggested that SM/UDP requests be done asynchronously since requests of this type require the device to send a message before a server message can be sent, and therefore can potentially take a long time to complete. Synchronous requests are acceptable in situations where the device is frequently sending messages to the server.
send_message options have the following effect with SM/UDP:
-
synchTimeout=“xxx”
Behavior is identical to existing SCI requests.
-
reply=“all|errors|none”
Controls whether a reply is sent by the device back to the server for a command. This is primarily intended to allow you to control the number of SM/UDP messages being sent directly. The default is “none”. Note that “all” and “errors” continue to work as they do currently in other SCI requests.
-
cache=“true|false|only”
Remote Manager does not currently service SM/UDP requests from the cache. Therefore, specifying “only” will return an error. In addition, “true” or “false” will result in the request being sent to the device. The default is “false”.
SM/UDP requests are specified by the tag <sm_udp> as a child element of <send_message>.
SM/UDP Command XML Child Elements
The following xml elements can be children of an SM/UDP command
| Command |
Description |
| ping |
Request to determine whether device is able to receive SM/UDP requests - No parameters |
| reboot |
Reboot device immediately - No parameters |
| request_connect |
Request a Remote Manager data connection. If a connection has already been made, this will force a reconnect of the management session. - No parameters |
| command |
Command line interface request maxResponseSize=’’’’’ Set maximum size of the response. If the response is larger than this value, it will be truncated. The value is the number of SM/UDP messages into which the response is broken. This is an optional parameter. If not specified, the size of the response is determined by the device. |
| user_msg |
Send a message to a registered listener in python. This command is similar to the RCI do_command custom target command. path=’’’’’ Send requests to a specific listener. If this optional command is omitted, the message is delivered to the listener on the device that is registered to the null path. |
| Optional attribute for the above commands |
format=“base64|text” Set the encoding of the request to Base64 or text. Using “base64” indicates Base64 encoding, and “text” means the request is in plain text. The default for format is text. All subcommands (cli, user_msg, etc.) support the format=“base64|text” attribute.Note If the server detects characters that will cause the response to be invalid XML, it will encode the response in Base64 and indicate this with the format=“base64” attribute. That is, even if a request uses format=“text”, the reply may have format=“base64” set. |
SM/UDP Request Connect
Remote Manager can be used to send a SM/UDP “request connect” message to a Remote Manager-registered device which will cause it to connect back to the server using the device-initiated connection method over TCP/IP. Once it is connected, web services requests and UI actions can be made to the device. With this support, devices no longer need to maintain a Remote Manager connection at all times. Connections instead can be established dynamically.
This section describes the web services actions to accomplish this. All of these actions can be performed in the Remote Manager UI as well.
The following example will configure a Remote Manager-registered device to enable SM/UDP.
POST to /ws/DeviceCore to provision a device with SM/UDP enabled.
<DeviceCore>
<devMac>00:40:9D:00:00:00</devMac>
<dpUdpSmEnabled>true</dpUdpSmEnabled>
</DeviceCore>
The device will be added to your account and configured to enable SM/UDP.
If you want to disable SM/UDP for a device, use the following example.
PUT to /ws/DeviceCore to update the device and disable SM/UDP.
<DeviceCore>
<devConnectwareId>00000000-00000000-00409DFF-FF000000</devConnectwareId>
<dpUdpSmEnabled>false</dpUdpSmEnabled>
</DeviceCore>
After sending this request the device will no longer be configured for SM/UDP.
Message Compression
<dpSmCompressionAvailable>true/false</dpSmCompressionAvailable>
This configures the server to allow compression to be used for SM requests. Defaults to false, but can be inferred by a device sending a compressed request.
Pack Command
<dpSmPackAvailable>true/false</dpSmPackAvailable>
This configures the server to allow pack commands to be sent to the device. The pack command allows multiple SM commands to be merged and sent in a single datagram to reduce data usage and overhead. Defaults to false, but can be inferred by a device sending a pack command.
Battery Operated Mode
<dpSmBatteryOperated>true/false</dpSmBatteryOperated>
This configures the server to send requests to the device in battery operated mode. Battery operated mode can be used for devices that should only recieve a single reply to a request sent to the server, where it was indicated that the device needed a response. This tells the device that it can immediately shut down its network connection to conserve power. This mode implies that the device also supports the pack command. Unless the device requires this mode, it may add unnecessary limitations. Defaults to false.
Send SM/UDP Request Connect
To send a connect request to a device via SM/UDP, POST the following SCI request to /ws/sci:
<sci_request version="1.0">
<!-- It is suggested SM/UDP requests be done asynchronously as they can
take a while and requests done synchronously may time out before the
response has been received. See the Check Request Status Example
for information on retrieving status and results. -->
<send_message synchronous="false">
<targets>
<device id="00000000-00000000-00000000-00000000"/>
</targets>
<sm_udp>
<request_connect/>
</sm_udp>
</send_message>
</sci_request>
Details:
SCI is used to send SM/UDP requests to Remote Manager-registered devices. The behavior is very similar to RCI processing.
As in RCI, web services requests result in jobs being created in Remote Manager. These jobs can be synchronous or asynchronous and job results are retrieved the same way they are for RCI jobs.
Digi recommends you execute SM/UDP requests asynchronously. Synchronous requests may time out before the response has been received.
The <send_message> command will be used, <send_message> options have the following effect with SM/UDP:
“true” results in a synchronous request; “false” for asynchronous.
SM/UDP requests are specified by the tag <sm_udp> as a child element of <send_message>.
<request_connect>, requests a device to connect using EDP (reconnects if already connected).
- request_connect takes no parameters
Wait for Device to Connect
The connection status of any Remote Manager-registered device may be found by performing a GET on /ws/DeviceCore.
The result has an entry for each Device Cloud-registered device. In that entry, the element dpConnectionStatus is 0 if the device is disconnected and 1 if connected:
<dpConnectionStatus>0</dpConnectionStatus>
Note: A GET on /ws/DeviceCore returns a list of all Device Cloud-registered devices. To retrieve status for a single device, issue a GET on /ws/DeviceCore/{id} where id is the id associated with a particular device.
Send a Disconnect
Once work is complete to a device, a web services client may optionally disconnect the registered device from Device Cloud:
POST /ws/sci
<sci_request version="1.0">
<disconnect>
<targets>
<device id="00000000-00000000-00000000-00000000" />
</targets>
</disconnect>
</sci_request>