Detailed Introduction to Remote Manager APIs
Remote Manager at its core is primarily API driven. The vast majority of the services provided by the system are accessible via the Remote Manager web service APIs.
In this article, you’ll see various techniques to discover what the Remote Manager APIs are and how to use them.
Notes about examples
These tools are strongly recommended if you like to use web service APIs from the command line.
HTTPie
The examples in this article use the HTTPie tool (https://httpie.io/) to demonstrate the web APIs. The HTTP response headers and response body are included in the output.
The HTTPie tool is a command line tool that can use a user’s netrc file to get credentials for API calls.
It allows the user to completely avoid URL encoding and use simple shortcut syntax to pass HTTP header values, API parameters, data payloads and select what output to display.
The examples are using HTTPie in a zshell environment, so you may have to modify each example for whatever environment and tool you use to call web service APIs. For simplicity, our recommendation is to download HTTPie.
jq and xq
Other tools you’ll see used in these examples consist of jq (https://stedolan.github.io/jq/) and xq (https://github.com/kislyuk/xq).
jq is a JSON command line processing tool, at its simplest, it allows you to format and colorize JSON. At its most complex it allows you to run queries and script like programs over JSON output.
xq is a wrapper for the jq tool that first converts XML input to JSON and then does normal jq processing on it.
API Authentication
The Remote Manager APIs use HTTP Basic Authentication. The username and password are the same as the username and password you use to sign-on to the Remote Manager UI or the application user you create.
In the examples here and in the API reference documentation, we often use the HTTPie tool or curl tool to call the APIs and do not discuss authentication. Authentication is the same for every API call.
Both HTTPie and curl can use the netrc file to load credentials for the API calls, HTTPie does this by default, curl requires a -n option.
If you use another tool, configure the tool to use HTTP Basic Authentication with the username and password.
HTTP Basic authentication is well-supported by languages and API tools.
If you are doing basic-auth manually, with a username of fred and a password of secret, do the following steps:
- Concatenate the username and password string with a colon, resulting in:
fred:secret
- Base64 encode the concatenated string, resulting in:
ZnJlZDpzZWNyZXQ=
- Prefix the value with Basic and a space, resulting in:
Basic ZnJlZDpzZWNyZXQ=
- Use the resulting value for the HTTP
Authorization header, resulting in a header of Authorization: Basic ZnJlZDpzZWNyZXQ=
Application Users
Your application can use any user and password in the system for API calls. The user role defines the access that the call has to the system.
For long term API access to Remote Manager we recommend creating application users in the system.
Application users are not allowed to sign-on to the Remote Manager UI and are used for API only access.
- In the Systems -> Users page, add a user and select the
Application or Read only application role.
- Assign the user a name and strong password
- Use the name and password for API applications.
API Keys
API keys can be used as an alternative to HTTP Basic Authentication when calling an API. API keys are useful when you have a script that needs to make API calls, your user normally requires two-factor authentication or your user logs in through a SAML identity provider (Single Sign-On).
API key creation is disabled by default and must be enabled by an administrator for your account under the account settings. Once enabled, each user in the account is able to create API keys in their user profile. The API keys work for users logging in through Single Sign-On and do not require two-factor authentication.
Creating an API key will return an id and secret. You must copy the secret and keep it secure as it is never returned after the key is created. Keys will expire after at most one year so you must replace any in use keys before they expire.
The headers X-API-KEY-ID and X-API-KEY-SECRET are used to supply the API key id and secret when making an API call.
curl:
curl -H "X-API-KEY-ID: <your-api-key-id>" -H "X-API-KEY-SECRET: <your-api-key-secret>" https://remotemanager.digi.com/ws/v1/devices/inventory
HTTPie
http https://remotemanager.digi.com/ws/v1/devices/inventory 'X-API-KEY-ID:<your-api-key-id>' 'X-API-KEY-SECRET:<your-api-key-secret>'
API Summary
Remote Manager APIs are typically case sensitive. That means the api /ws/v1/users/inventory exists, but /ws/v1/Users/Inventory will not work.
There are two main types of APIs in Remote Manager. Legacy APIs and Modern APIs.
API Explorer
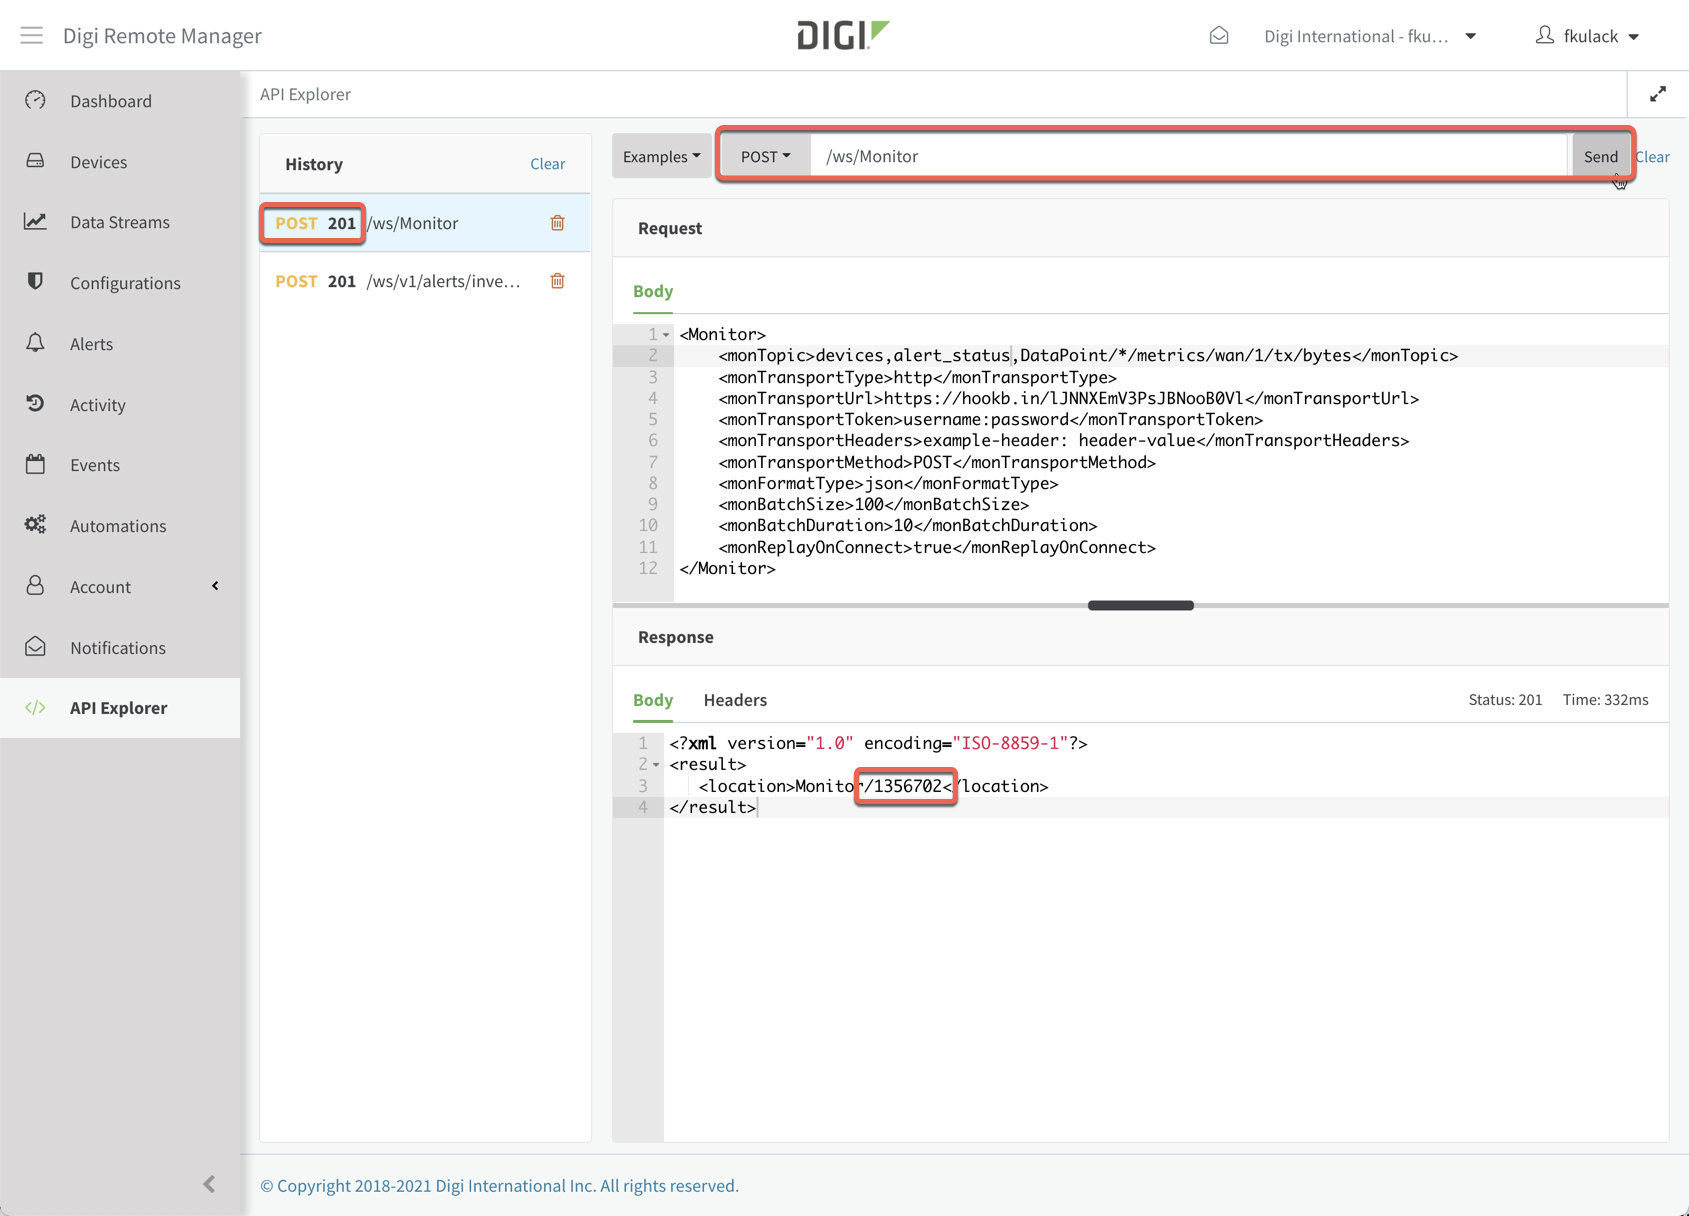
The Remote Manager UI has a page called “API explorer”. API explorer allows you to graphically explore the available APIs.
If you find a missing API or have questions about using the APIs, use the feedback button in the UI to request changes to the documentation.
The API explorer provides a set of examples, as well as the ability to type Remote Manager APIs and payloads in manually and enter parameters and select the HTTP method type.
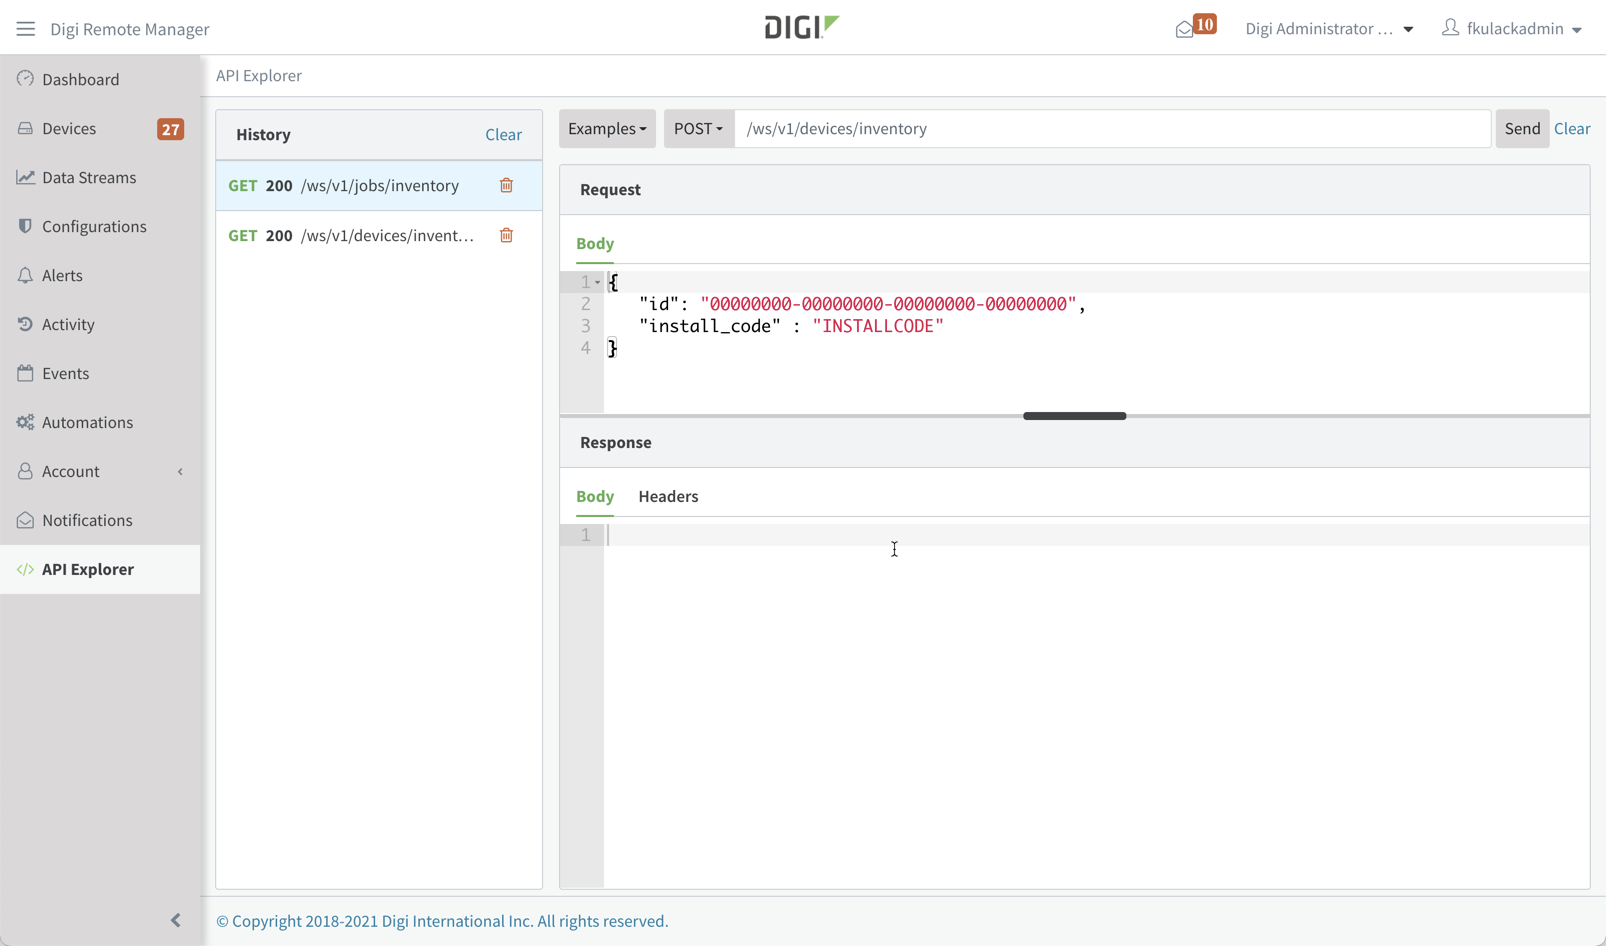
In this screen shot for API explorer, there are a couple of things to notice:
- I selected “Examples → v1/devices → Provision a device” and the example payload was added automatically, the API explorer helps determine payloads
- I have recently run 2 other APIs a GET /ws/v1/devices/inventory and a GET /ws/v1/jobs/inventory and those are in the history list, I can go back and look at the request and response payload while I’m still in this API explorer session
- I can pull down the button labeled “POST” to change to a different HTTP method and I can type in the pathname for the API.
You should spend some time experimenting with the APIs.
Self Documenting APIs
Our modern APIs provide a bit of self documentation. You can call top level APIs using GET and receive a json payload that describes the sub APIs and their usage.
At the top level, call /ws/v1 API to get a table of contents of all the major API types.
You’ll see in this example, there are 22 major categories of APIs in the Remote Manager system (this was from version 22.7 of Remote Manager).
➜ http remotemanager.digi.com/ws/v1
HTTP/1.1 200

{
  "count": 22,
  "list": [
    {
      "path": "/ws/v1/account"
    },
    {
      "path": "/ws/v1/alerts"
    },
    {
      "path": "/ws/v1/automations"
    },
    {
      "path": "/ws/v1/configs"
    },
    {
      "path": "/ws/v1/containers"
    },
    {
      "path": "/ws/v1/device_logs"
    },
    {
      "path": "/ws/v1/devices"
    },
    {
      "path": "/ws/v1/events"
    },
    {
      "path": "/ws/v1/files"
    },
    {
      "path": "/ws/v1/firmware_updates"
    },
    {
      "path": "/ws/v1/groups"
    },
    {
      "path": "/ws/v1/health_configs"
    },
    {
      "path": "/ws/v1/jobs"
    },
    {
      "path": "/ws/v1/metadata"
    },
    {
      "path": "/ws/v1/monitors"
    },
    {
      "path": "/ws/v1/network_interfaces"
    },
    {
      "path": "/ws/v1/notifications"
    },
    {
      "path": "/ws/v1/reports"
    },
    {
      "path": "/ws/v1/settings"
    },
    {
      "path": "/ws/v1/streams"
    },
    {
      "path": "/ws/v1/subaccounts"
    },
    {
      "path": "/ws/v1/users"
    }
  ]
}
You can use this trick again to see the APIs belonging to any category. In this example we see the automations API documentation.
In the automations API, there are 14 sub APIs (although there are actually more than that if you consider that some APIs support multiple HTTP methods like GET/POST/PUT/DELETE. For example the automations/inventory/{id} API is a GET/PUT/DELETE API
# Use jq to see JUST the API path names
➜ http remotemanager.digi.com/ws/v1/automations | jq -r ".list[] | .path"
/ws/v1/automations
/ws/v1/automations/inventory
/ws/v1/automations/inventory/{id}
/ws/v1/automations/run
/ws/v1/automations/runs
/ws/v1/automations/runs/cancel/{id}
/ws/v1/automations/runs/inventory
/ws/v1/automations/runs/inventory/{id}
/ws/v1/automations/runs/results/{id}/{device_id}
/ws/v1/automations/runs/status/{id}
/ws/v1/automations/runs/status/{id}/{device_id}
/ws/v1/automations/schedules
/ws/v1/automations/schedules/inventory
/ws/v1/automations/schedules/inventory/{id}
Query Language Syntax
One of the features that the self documenting APIs gives you is details on the query language for each API.
In the below output, we see that there’s an automations/inventory API that includes parameters “query”, “orderby”, “size” and “cursor” (like the majority of our v1 inventory APIs do). The payload then goes further to describethe query parameter: what fields can you use to construct your query, what operators each field supports and whether a field supports orderby.
From this description we know that for the objects returned by the automations/inventory API, the objects include the following fields and we can query
- A “customer_id” field that is a number
- An “id” field that is a number
- A “name” field that is text
All of the fields can be used in an orderby clause.
So we could build a query that looks like this (which would have to be correctly URL encoded).
customer_id = 1034 and id > 10 and name contains 'script'
See v1 API Query Language for more information about the query language capabilities
The query field shown in this describes queryable fields for the automations/inventory API.
➜ http remotemanager.digi.com/ws/v1/automations
HTTP/1.1 200

{
    "count": 14,
    "list": [
        {
            "path": "/ws/v1/automations/inventory",
            "requests": [
                {
                    "method": "GET",
                    "params": [
                        "query",
                        "orderby",
                        "size",
                        "cursor"
                    ],
                    "query": [
                        {
                            "field": "customer_id",
                            "operators": [
                                "=",
                                "<>",
                                "<",
                                "<=",
                                ">",
                                ">="
                            ],
                            "orderby": true,
                            "type": "Numeric"
                        },
                        {
                            "field": "id",
                            "operators": [
                                "=",
                                "<>",
                                "<",
                                "<=",
                                ">",
                                ">="
                            ],
                            "orderby": true,
                            "type": "Numeric"
                        },
                        {
                            "field": "name",
                            "operators": [
                                "=",
                                "contains",
                                "startsWith",
                                "endsWith",
                                "<>",
                                "<",
                                "<=",
                                ">",
                                ">="
                            ],
                            "orderby": true,
                            "type": "Text"
                        },
...snip...
Modern API Examples
Adding a device
In order to add a device to your account on Remote Manager, you can use the UI of course, but this article is about the API.
You can use a POST API (which is typically the type of API used for create operations) to the ws/v1/devices/inventory endpoint.
The required fields for posting a device are at least
- The device ID (A little like a UUID the canonical device ID is represented in the form 00000000-00000000-00000000-00000000). Depending on the type of device, it typically includes the device’s primary mac address or the device’s IMEI number.
- The install code or default password of the device. Usually printed on the label or part of the QR code on the device. This 10 or 12 character password is how a device is securely registered with the system. NOTE: Some older devices don’t use install codes for registration.
- Other fields like group, mac, tags, notes, and description can also be used.
For example, this request sends the json payload to the POST devices/inventory API.
The result is HTTP status 201 and we can see the device is created. Right now the device is disconnected and a lot of the fields that are identified the first time the device connects are not present.
➜ http POST remotemanager.digi.com/ws/v1/devices/inventory <<< '{"id":"00000000-00000000-0040FFFF-FF8001B0", "install_code":"MYPASSW0RD", "group": "test/group"}'
HTTP/1.1 201

{
    "count": 1,
    "list": [
        {
            "channels_uri": "/ws/v1/devices/channels/00000000-00000000-0040FFFF-FF8001B0",
            "connection_status": "disconnected",
            "customer_id": 73846,
            "firmware_status": "not_identified",
            "group": "test/group",
            "health_status": "unknown",
            "id": "00000000-00000000-0040FFFF-FF8001B0",
            "mac": "00:40:FF:80:01:B0",
            "maintenance_mode": "off",
            "management_uri": "/ws/v1/devices/management/00000000-00000000-0040FFFF-FF8001B0",
            "metrics_uri": "/ws/v1/devices/metrics/00000000-00000000-0040FFFF-FF8001B0",
            "restricted_status": "unrestricted",
            "type": " "
        }
    ]
}
Deleting a device
It’s a simple matter to remove a device from your account, assuming that its there already.
➜ http DELETE remotemanager.digi.com/ws/v1/devices/inventory/00000000-00000000-0040FFFF-FF8001B0
HTTP/1.1 204
Device queries
We can use the query language in the devices/inventory API to build rather complex queries to search for devices. This becomes particularly useful if using an account that has subaccounts from the API and searching for devices across all subaccounts in the system. See v1 API Query Language for more information about the types of queries you can build.
For example, if I want to search for devices that are currently live and connected to my account, have updated their status in some form in the last day, and are in an office with an IP range of 10.20.1.x, I would use this query.
We can also see here a more full payload describing an in-use device object.
➜ http remotemanager.digi.com/ws/v1/devices/inventory query=="connection_status = 'connected' and last_update > -1d and ip startswith '10.20.1.'"
HTTP/1.1 200

{
    "count": 2,
    "list": [
        {
            "alerts": 1,
            "capabilities": {
                "cli_service_available": true,
                "sm_compression_available": true,
                "sm_encryption_key_distribution_service_available": true,
                "sm_pack_available": true
            },
            "channels_uri": "/ws/v1/devices/channels/00000000-00000000-002704FF-FF30D5A1",
            "connection_status": "connected",
            "contact": "Fred A Kulack",
            "customer_id": 7493,
            "firmware_status": "none",
            "firmware_version": "20.11.32.168",
            "group": "demoGroup",
            "health_status": "error",
            "id": "00000000-00000000-002704FF-FF30D5A1",
            "ip": "10.20.1.109",
            "last_connect": "2021-02-18T14:21:16.883Z",
            "last_disconnect": "2021-02-18T14:19:42.387Z",
            "last_update": "2021-02-18T21:01:39.607Z",
            "location": "Rochester, MN",
            "mac": "00:27:04:30:D5:A1",
            "maintenance_mode": "off",
            "management_uri": "/ws/v1/devices/management/00000000-00000000-002704FF-FF30D5A1",
            "metrics_uri": "/ws/v1/devices/metrics/00000000-00000000-002704FF-FF30D5A1",
            "name": "SilverSurfer",
            "public_ip": "10.20.1.109",
            "registration_date": "2021-01-11T16:36:00.000Z",
            "restricted_status": "unrestricted",
            "serial_number": "6330010536411709",
            "sku": "ASB-6330-MX00-OUS",
            "tags": [
                "TestAutomations"
            ],
            "type": "AcceleratedConcepts 6330-MX",
            "vendor_id": 4261412874
        },
...snip...
Paging through results
By default, inventory and other paging APIs use a page size of 1000 to decrease load and prevent timeouts and make payload sizes manageable.
The APIs typically use the “size”, and “cursor” parameters as the way to page through results. When an API reaches the full page size, and there are still more objects to return, it also returns a cursor value and often a next_uri parameter.
The cursor or next_uri parameter are used to get the next page of results. Do not change the size parameter or any other parameters during subsequent calls.
For example, this is how you page through a set of results. There are 3 objects in my account that match the query. Since I use a page size of 1, I’ll have to page through 3 additional times. If all the remaining data is returned, no cursor or next_uri parameter is returned. In this case, page size is a perfect multiple of available data so one extra query is needed that returns 0 object.
# Initial Query
➜ http remotemanager.digi.com/ws/v1/devices/inventory query=="connection_status = 'connected'" size==1
HTTP/1.1 200

{
    "count": 1,
    "cursor": "b2b8205b-8247-9cdb-8247-9cdaaf6999c6",
    "list": [
        { ... snip out single device object...}
    ],
    "next_uri": "/ws/v1/devices/inventory?query=connection_status+%3D+%27connected%27&size=1&cursor=b2b8205b-8247-9cdb-8247-9cdaaf6999c6",
    "size": 1
}


# Next Page
➜ http remotemanager.digi.com/ws/v1/devices/inventory query=="connection_status = 'connected'" size==1 cursor==b2b8205b-8247-9cdb-8247-9cdaaf6999c6
HTTP/1.1 200

{
    "count": 1,
    "cursor": "08eef948-3858-60f7-3858-60f563bc71c1",
    "list": [
        { ... snip out single device object...}
    ],
    "next_uri": "/ws/v1/devices/inventory?query=connection_status+%3D+%27connected%27&size=1&cursor=08eef948-3858-60f7-3858-60f563bc71c1",
    "size": 1
}


# Next Page
➜ http remotemanager.digi.com/ws/v1/devices/inventory query=="connection_status = 'connected'" size==1 cursor==08eef948-3858-60f7-3858-60f563bc71c1
HTTP/1.1 200

{
    "count": 1,
    "cursor": "9ce7cc7a-9fbd-8739-9fbd-873a5d56244b",
    "list": [
        { ... snip out single device object...}
    ],
    "next_uri": "/ws/v1/devices/inventory?query=connection_status+%3D+%27connected%27&size=1&cursor=9ce7cc7a-9fbd-8739-9fbd-873a5d56244b",
    "size": 1
}


# Final query finds that we're at the end
➜ http remotemanager.digi.com/ws/v1/devices/inventory query=="connection_status = 'connected'" size==1 cursor==9ce7cc7a-9fbd-8739-9fbd-873a5d56244b
HTTP/1.1 200

{
    "count": 0,
    "list": [],
    "size": 1
}
Bulk APIs
Remote Manager bulk APIs are typically the same level and parameters as the inventory APIs. They allow direct CSV return of the json data.
For example, if we do the same query for devices we did in the previous example, we get some output like this:
➜ http remotemanager.digi.com/ws/v1/devices/bulk query=="connection_status = 'connected' and last_update > -1d and ip startswith '10.20.1.'"
HTTP/1.1 200

add_tags,address,alerts,capabilities,carrier,carrier2,cellular_modem_id,channels_uri,compliant,connection_status,contact,customer_id,description,extended_address,firmware_id,firmware_status,firmware_version,geoposition,group,health_status,id,install_code,ip,ipsec_status,ipsec_status2,ipsec_status3,ipsec_status4,key,last_compliant,last_connect,last_disconnect,last_noncompliant,last_noncompliant_reason,last_update,location,mac,maintenance_mode,management_uri,metrics_uri,name,network,network2,notes,parent,password,product_id,public_ip,registration_date,remove_tags,restricted_status,serial_number,signal_percent,signal_percent2,signal_quality,signal_quality2,signal_strength,signal_strength2,sku,tags,type,vendor_id
,,1,413696,,,,"/ws/v1/devices/channels/00000000-00000000-002704FF-FF30D5A1",,connected,"Fred A Kulack",7493,,,,none,20.11.32.168,,demoGroup,error,"00000000-00000000-002704FF-FF30D5A1",,10.20.1.109,,,,,,,2021-02-18T14:21:16.883Z,2021-02-18T14:19:42.387Z,,,2021-02-18T21:01:39.607Z,"Rochester, MN",00:27:04:30:D5:A1,off,"/ws/v1/devices/management/00000000-00000000-002704FF-FF30D5A1","/ws/v1/devices/metrics/00000000-00000000-002704FF-FF30D5A1",SilverSurfer,,,,,,,10.20.1.109,2021-01-11T16:36:00.000Z,,unrestricted,6330010536411709,,,,,,,ASB-6330-MX00-OUS,TestAutomations,"AcceleratedConcepts 6330-MX",4261412874
,,0,,"Bugs Bunny's Binary Bandwidth","Daffy Duck's Digital Services",,"/ws/v1/devices/channels/00000000-00000000-0040FFFF-FF10A300",no,connected,,7493,,,,not_identified,4.8.0.10,"44.067327, -92.506738",demoGroup,normal,"00000000-00000000-0040FFFF-FF10A300",,10.20.1.115,,,,,,2019-12-20T19:58:28.000Z,2021-02-18T14:21:19.663Z,2021-02-18T14:19:42.387Z,2020-12-10T21:32:57.740Z,"Firmware 4.8.0.10 is not compliant",2021-02-18T21:15:01.410Z,,00:40:FF:10:A3:00,off,"/ws/v1/devices/management/00000000-00000000-0040FFFF-FF10A300","/ws/v1/devices/metrics/00000000-00000000-0040FFFF-FF10A300",GhostRider,"FourF (44Ghz)","1XRTT, EVDO0",,,,,10.20.1.115,2019-06-17T15:30:00.000Z,,unrestricted,WR54-001854,90,30,-10,-40,-22,-88,,TestAutomations,"TransPort WR54-DUAL-CELLULAR",4261412873
...etc...
Fields for bulk APIs.
You can use the fields parameter for the bulk APIs to only include the desired fields in the CSV output.
➜ http remotemanager.digi.com/ws/v1/devices/bulk query=="connection_status = 'connected' and last_update > -1d and ip startswith '10.20.1.'" fields=id,connection_status,last_update
HTTP/1.1 200

id,connection_status,last_update
00000000-00000000-002704FF-FF30D5A1,connected,2021-02-18T21:01:39.607Z
00000000-00000000-0040FFFF-FF10A300,connected,2021-02-18T21:15:01.410Z
...etc...
Legacy API Examples
API conditions
At the beginning we talked about the legacy APIs being a much more direct mapping of the Remote Manager data model than the v1 APIs.
Because of that, instead of having a storage agnostic query capability for filtering and searching, the legacy APIs use SQL syntax.
NOTE: We do scrub the SQL syntax to prevent SQL injection and use of sql functions and other attacks.
Additionally, conditions require the exact use of the field names (and yes, those fields are what’s in the physical DB. Yuck!)
For example, the /ws/DeviceCore is the legacy API that is closest to ws/v1/devices/inventory API. It returns the device core object.
Lets construct a legacy condition that matches our v1/devices/inventory query
connection_status = 'connected' and last_update > -1d and ip startswith '10.20.1.'"
Note the differences and relative difficulty of use with regard to the enumerated type dpConnectionStatus, and the update time not supporting timestamp shortcuts.
➜ http remotemanager.digi.com/ws/DeviceCore condition=="dpConnectionStatus = 1 and dpGlobalIP like '10.20.1.%' and dpLastUpdateTime > '2021-02-17T21:15:01.410Z'"
HTTP/1.1 200

<?xml version="1.0" encoding="ISO-8859-1"?>
<result>
   <resultTotalRows>2</resultTotalRows>
   <requestedStartRow>0</requestedStartRow>
   <resultSize>2</resultSize>
   <requestedSize>1000</requestedSize>
   <remainingSize>0</remainingSize>
   <DeviceCore>
      <id>
         <devId>3412224</devId>
         <devVersion>7</devVersion>
      </id>
      <devRecordStartDate>2021-01-20T14:29:00.000Z</devRecordStartDate>
      <devSerialNo>6330010536411709</devSerialNo>
      <devMac>00:27:04:30:D5:A1</devMac>
      <devConnectwareId>00000000-00000000-002704FF-FF30D5A1</devConnectwareId>
      <cstId>7493</cstId>
      <grpId>261067</grpId>
      <devEffectiveStartDate>2021-01-11T16:36:00.000Z</devEffectiveStartDate>
      <devTerminated>false</devTerminated>
      <dvVendorId>4261412874</dvVendorId>
      <dpDeviceType>AcceleratedConcepts 6330-MX</dpDeviceType>
      <dpFirmwareLevel>336273576</dpFirmwareLevel>
      <dpFirmwareLevelDesc>20.11.32.168</dpFirmwareLevelDesc>
      <dpRestrictedStatus>0</dpRestrictedStatus>
      <dpLastKnownIp>10.20.1.109</dpLastKnownIp>
      <dpGlobalIp>10.20.1.109</dpGlobalIp>
      <dpConnectionStatus>1</dpConnectionStatus>
      <dpLastConnectTime>2021-02-18T14:21:16.883Z</dpLastConnectTime>
      <dpContact>Fred A Kulack</dpContact>
      <dpDescription/>
      <dpLocation>Rochester, MN</dpLocation>
      <dpZigbeeCapabilities>0</dpZigbeeCapabilities>
      <dpCapabilities>481907</dpCapabilities>
      <dpTags>,TestAutomations,</dpTags>
      <grpPath>demoGroup</grpPath>
      <dpLastDisconnectTime>2021-02-18T14:19:42.387Z</dpLastDisconnectTime>
      <dpLastUpdateTime>2021-02-18T21:01:39.607Z</dpLastUpdateTime>
      <dpHealthStatus>2</dpHealthStatus>
      <dpName>SilverSurfer</dpName>
      <numFiredAlarms>1</numFiredAlarms>
      <dpSku>ASB-6330-MX00-OUS</dpSku>
      <dpFirmwareStatus>2</dpFirmwareStatus>
   </DeviceCore>
   <DeviceCore>
        ... snip out single device object...
   </DeviceCore>
</result>
Paging through results
The Legacy API pages through results in a slightly different form, using the size and start parameters.
As you go through each query, you start at row 0, and increase your start row by the requested size for each page.
The output pages use the fields requestedSize, resultSize and resultTotalRows and remainingSize.
In this example, you can see we page through 3 pages.
# Initial page, start at row 0
➜ http remotemanager.digi.com/ws/DeviceCore condition=="dpConnectionStatus = 1" size==1
HTTP/1.1 200

<?xml version="1.0" encoding="ISO-8859-1"?>
<result>
   <resultTotalRows>3</resultTotalRows>
   <requestedStartRow>0</requestedStartRow>
   <resultSize>1</resultSize>
   <requestedSize>1</requestedSize>
   <remainingSize>2</remainingSize>
   <DeviceCore>
    ... snip out single device object...
   </DeviceCore>
</result>

# Next page, start at row 1
➜ http remotemanager.digi.com/ws/DeviceCore condition=="dpConnectionStatus = 1" size==1 start==1
HTTP/1.1 200

<?xml version="1.0" encoding="ISO-8859-1"?>
<result>
   <resultTotalRows>3</resultTotalRows>
   <requestedStartRow>1</requestedStartRow>
   <resultSize>1</resultSize>
   <requestedSize>1</requestedSize>
   <remainingSize>1</remainingSize>
   <DeviceCore>
   ... snip out single device object...
   </DeviceCore>
</result>

# Final page, start at row 2
➜ http remotemanager.digi.com/ws/DeviceCore condition=="dpConnectionStatus = 1" size==1 start==2
HTTP/1.1 200

<?xml version="1.0" encoding="ISO-8859-1"?>
<result>
   <resultTotalRows>3</resultTotalRows>
   <requestedStartRow>2</requestedStartRow>
   <resultSize>1</resultSize>
   <requestedSize>1</requestedSize>
   <remainingSize>0</remainingSize>
   <DeviceCore>
    ... snip out single device object...
   </DeviceCore>
</result>
JSON output for legacy APIs
You can add a retrieve json from many of the Legacy APIs. However because of the way the legacy API works the conversion is IMPERFECT and you can miss data..
Instead, a preferred solution is to convert to json in the client, using for example the xq tool mentioned at the beginning of this document.
➜ http remotemanager.digi.com/ws/DeviceCore Accept:application/json condition=="dpConnectionStatus = 1" size==1
HTTP/1.1 200

{
    "items": [
        {
            "cstId": "7493",
            "devConnectwareId": "00000000-00000000-0004F3FF-FF0E4BD8",
            "devEffectiveStartDate": "2020-06-02T17:55:00.000Z",
            "devMac": "00:04:F3:0E:4B:D8",
            "devRecordStartDate": "2021-01-29T17:05:00.000Z",
            "devSerialNo": "IX14-420042",
            "devTerminated": "false",
            "dpCapabilities": "481907",
            "dpCompliant": "true",
            "dpConnectionStatus": "1",
            "dpContact": "Fred Kulack",
            "dpDescription": "S1luwLvGdnfF0nFnoPQ8Rb0bLeecqV5K0p0BSBlZRd1EddeV8y",
            "dpDeviceType": "Digi IX14",
            "dpFirmwareLevel": "336273576",
            "dpFirmwareLevelDesc": "20.11.32.168",
            "dpFirmwareStatus": "2",
            "dpGlobalIp": "172.20.10.3",
            "dpHealthStatus": "0",
            "dpLastCompliant": "2021-01-29T17:21:42.203Z",
            "dpLastConnectTime": "2021-02-18T14:21:17.130Z",
            "dpLastDisconnectTime": "2021-02-18T14:19:42.387Z",
            "dpLastKnownIp": "172.20.10.3",
            "dpLastNonCompliant": "2021-01-29T17:21:38.583Z",
            "dpLastNonCompliantReason": "1 settings are not compliant: system/1/contact",
            "dpLastUpdateTime": "2021-02-18T22:08:29.560Z",
            "dpLocation": "Rochester, MN 1",
            "dpName": "Vision",
            "dpRestrictedStatus": "0",
            "dpSignalPercent": "47",
            "dpSku": "IX14-M601",
            "dpTags": ",TestAutomations,",
            "dpZigbeeCapabilities": "0",
            "dvVendorId": "4261412874",
            "grpId": "228227",
            "grpPath": "Configs",
            "id": {
                "devId": "3134058",
                "devVersion": "24"
            },
            "numFiredAlarms": "1"
        }
    ],
    "remainingSize": "2",
    "requestedSize": "1",
    "requestedStartRow": "0",
    "resultSize": "1",
    "resultTotalRows": "3"
}
v1 API Query Language
Some Remote Manager v1 APIs include a query parameter for GET requests. Using the query parameter, you can build complex expressions for selecting Remote Manager objects.
Query language summary
- Similar in concept to SQL or other query languages.
- Use conditions and operators based on field types.
- Single quoted text literals
'TheText' .
- Text escape for quote character is the quote:
'isn''t difficult' .
- Numeric literals support 0x prefix for hex.
- Relative values from “now’ for timestamp values. For example,
-10s for 10 seconds ago or +30d for 30 days from now.
- Text-based comparisons are case insensitive.
- Use the
and and or keywords as well as parenthesis to group simple conditions into more complex expressions.
- Use the
not keyword to negate individual conditions or complex parenthesized conditions.
- Use the special value keyword
empty to represent empty string, null, and unset.
Info
Although the query parameter in each API provides the same query expression capability, the fields that you can query depend on the fields returned for objects of that API. For example, a query using the ws/v1/devices/inventory API specifies device fields, while a query using the ws/v1/alerts/inventory APIs specifies alert fields.
Warning
Be sure to correctly URL encode the query expression (for example space encodes to %20 in a URL parameter value.
Specify values in query conditions
The syntax for specifying literal values varies depending on the type of literal value. Not all syntaxes from other query languages are supported.
| Value Type |
Description |
| String, Enumerated String, Group |
Specify these values using single quotes. If the value contains a single quote, specify two single quotes. Enumerated strings cannot accept all values, for example connection_status can only be connected or disconnected. For example: connection_status = 'connected' or name = 'Fred''s Device' or group = 'TheGroup' or not group = 'TheGroup' |
| Numeric |
Specify these values using a normal decimal number notation or a hex number notation. For example: value = 0 or value = -3.14or value = 0x10 |
| Timestamp |
Specify these values using a relative time notation where positive or negative values are supported. Use a one letter suffix to indicate time units: s for seconds, m for minutes, h for hours, d for days (exactly 24 hours) and w for weeks (exactly 7 days). For example: last_updated > -60m or last_connect >= -24h or expires < +30d |
| Geoposition |
Specify a bounding box value. The geoposition can be within or outside of the bounding box. The bounding box consists of four coordinates of the form: [ Southwest longitude, Southwest latitude, Northeast longitude, Northwest latitude ]. For example, to select items approximately within the continental United States: geoposition within [ 125.0, 25.0, 65.0, 50.0 ] |
Specify operators in query conditions
The following table summarizes Remote Manager v1 query language conditions.
| Operator |
Permitted Types |
Description |
| = <> |
Enumerated String, Enumerated Value, Group, Tags, Timestamp |
Exact equality or inequality. For a tag, indicates the presense or absense of the tag on the item. For a group, indicates the full group path. |
| < <= >= > |
String, Numeric, Timestamp |
The string, number or timestamp sorts before or after the value. |
| contains |
String, Tag |
The String contains the specified substring. Any tag contains the specified substring. |
| startswith, endsWith |
String, Tag, Group |
The string starts with or ends with the specified value. Any tag starts with or ends with the specified value. For a group, targets the full group path. For example, group startswith 'test/' targets any device in the root/test group and all subgroups, while group startswith 'test' targets any device in the root/test* groups and any subgroups. |
| within, outside |
Geoposition |
The geoposition is within or outside of a bounding box. For example, to select items approximately within the continental United Statess, query for geoposition within [ 125.0, 25.0, 65.0, 50.0 ] |
Example Queries
-
Complex Queries
- Query of
group startsWith '/NorthWest' and (connection_status = 'disconnected' or signal_percent < 20) - find any devices in the /Northwest group and any subgroups that are either disconnected or have a low signal strength
- Query of
tags = 'important' and (health_status = 'error' or health_status = 'warning') - Find any devices that have the ‘important’ tag and are in an error or warning health status
- Query of
tags = 'important' and not (health_status = 'error' or health_status = 'warning') - Find any devices that have the ‘important’ tag and are not in an error or warning health status
- Query of
last_connect = empty - Find any devices whose last connect value is unset (have never connected).
- Query of
not last_connect = empty - Find any devices whose last connect value is set (have connected at least once).
-
Group Queries
- Query of
group = '/test' - query full group path, so matches any device in group ‘/test’ and ignores any subgroups.
- Query of
group startsWith 'test/' - query full group path, so matches any device in the test root group and any subgroups.
- Query of
group startsWith 'test' - query full group path, so matches any device in any root group whose name starts with ’test’ and all subgroups.
- Query of
group endsWith '/leaf' - query full group path, so matches any device in any path that ends with the group name ’leaf’.
-
Tag Queries
- Query of
tags = empty - matches any device having no tags.
- Query of
tags <> empty - matches any device having any tags.
- Query of
tags = 'sensor' - matches any device having a tag ‘sensor’.
- Query of
tags <> 'sensor' - matches any device having no tag ‘sensor’.
- Query of
tags contains 'ns' - matches any device having any tag containing ’ns’.
- Query of
tags startsWith 'sens' - matches any device having any tag that starts with ‘sens’.
- Query of
tags endsWith 'or' - matches any device having any tag that ends with ‘or’.
-
Geoposition Queries
- Query of
geoposition within [ 125.0, 25.0, 65.0, 50.0 ] - matches any device with coordinates within the specified bounding box (approximately the continental United States).
- Query of
geoposition outside [ 125.0, 25.0, 65.0, 50.0 ] - matches any device with coordinates outside the specified bounding box (approximately the continental United States).
Working with Subaccounts
This article describes how to make use of Digi Remote Manager APIs to work with subaccounts.
Introduction
This article describes how to make use of Digi Remote Manager APIs to work with subaccounts.
When an account has multiple subaccounts:
- Devices can be assigned to the parent group or a subaccount and be moved between the accounts by a user of the parent account
- Users can be assigned to a child subaccount and those users only have access to devices in the child group
v1/subaccounts API
The v1/subaccounts API is used to create, edit, and delete subaccounts.
Use GET /ws/v1/subaccounts/inventory to get a list of the parent account and all subaccounts.
POST to /ws/v1/subaccounts/inventory to create an account. An example payload is:
{
   "company_name": "Company ABC",
   "email": "user@company-abc.com",
   "username": "user-company-abc",
   "password": "xxxx",
   "name": "My display name",
   "notes": "Any notes that might be relevant for the parent account. The sub account cannot see the name, notes or tags fields. For example: The security procedures are under review for this account.",
   "tags": [ "Good Standing", "Gold Plan" ]
}
The body of the response will contain a customer_id field which is the key used for making other API requests for the subccount.
{
  "company_name": "Company ABC",
  "username": "user-company-abc",
  "password": "xxx",
  "email": "user@company-abc.com",
  "customer_id": 74214,
  "name": "My display name",
  "notes": "Any notes that might be relevant for the parent account. The sub account cannot see the name, notes or tags fields. For example: The security procedures are under review for this account.",
  "tags": [
    "Good Standing",
    "Gold Plan"
  ]
}
The following APIs would be used to get, update, and delete that subaccount:
-
GET /ws/v1/subaccounts/inventory/74214
-
PUT /ws/v1/subaccounts/inventory/74214 with a payload that has the requested changes
-
DELETE /ws/v1/subaccounts/inventory/74214
For information on the API, see v1/subaccounts.
Viewing Inventory Across All Subaccounts
After creating subaccounts and assigning devices to them, the account-filter header is used to get results that include the items in the parent account and all subaccounts.
Use this API to get a list of all devices in the parent and all subaccounts
curl -u 'parentuser' -H "account-filter: all" https://remotemanager.digi.com/ws/v1/devices/inventory
The account-filter header can be used to get lists of items which include the parent and all subaccounts from APIs such as:
- GET v1/devices/inventory
- GET v1/jobs/inventory
- GET v1/users/inventory
- GET v1/configs/inventory
Working with an item in a subaccount
Once an item is found, use the actor header to work with it. For example, to update a device in a subaccount use a PUT with an API request in the format:
curl -u 'parentuser' -H "actor: 74214" -X PUT -d '{"notes": "user data here"}' https://remotemanager.digi.com/ws/v1/devices/inventory/00000000-00000000-00000000-00000000
Similarly, use the actor header with any API call to allow items to be created, updated, or deleted in the subaccount.
Use a POST to create a device in the subaccount with the format:
curl -u 'parentuser' -H "actor: 74214" -H 'Content-Type: application/json' -X POST -d '{"id": "00000000-00000000-00000000-00000000", "install_code" : "INSTALLCODE"}' https://remotemanager.digi.com/ws/v1/devices/inventory
When the actor header is used on a GET, only items in the subaccount will be returned.
The table below shows what the result will be when a parent account user makes an API call to GET /ws/v1/devices/inventory using the specified headers. The account is set up with a parent account and 2 subaccounts.
ParentAccount (customer_id = 50)
ChildAccount-A (customer_id=55) and ChildAccount-B (customer_id=56)
| actor |
account-filter |
Result |
|
|
Lists devices in ParentAccount |
| 55 |
|
Lists devices in ChildAccount-A |
|
all |
Lists devices in ParentAccount, ChildAccount-A, and ChildAccount-B |
Throttles
This article describes what throttles are and how to prevent throttling.
What are throttles?
Throttles generally protect Digi Remote Manager from “rogue” devices or applications using system resources in a way that denies services to others.
Throttling generally occurs when a device or application is “over-using” its Digi Remote Manager access, where the allowed usage metrics are determined by subscription level which is based on the account type such as Premier.
Throttle Implementation
Throttles are calculated on a sliding scale (transactions per minute) and maintain a queue in order to provide bursting capabilities. An example is a sliding window of x transactions per y time interval (12 transactions per hour). Also, throttles may limit the number of concurrent requests, example is concurrent web service requests.
There is a sliding 10 second window for requests (so, for instance, at a limit of 180 per minute, you can send at most 30 in a ten second window before you hit that limit).
Device Data Service Throttler
Device data uploads are limited to 60 per minute. An example is a device uploading data into data streams (note that multiple data points can be sent in a single upload). One concurrent transaction is the maximum allowed since the data service can only process one request at a time. If exceeded a server error status is returned to the device, the device either has to slow down and retry.
This throttle can be controlled by a subscription to Device Throttling. Premier accounts have the values set to 60 transactions per minute. Other account types may have more restrictive device throttling.
Web Services Throttler
The web services throttler limits the number of web service API calls allowed by a customer. This is controlled by the subscription to Web Service messaging. An example is for Premier accounts the values are set to 240 transactions per minute and 4 concurrent transactions. Other account types may have more restrictive web service throttling.
When a throttle rate is exceeded the request results in an HTTP response status code of 429
Alarms
A System Throttles alarm event will be fired if devices are sending data too fast or if web service requests are exceeded.
Effects of Throttling
When requests are being throttled, it can cause issues for your intended solution. Suppose you have devices sending up data points to Remote Manager and you have an application that is continuously querying using web service requests to do the following:
Warning
NOTE: Do not actually do this - it is NOT scalable as explained below.
Get a list of devices using /ws/v1/devices/inventory
for each device
	for each expected stream name
		 get stream history using /ws/v1/streams/history/device-id/your-stream-name
		 for each datapoint
		 	process datapoint for solution
If this loop is going as fast as possible, it is likely to encounter throttling. Side effects of throttling to the intended solution include:
- Data from a device not being processed as quickly as desired
- SCI Requests to a device being throttled and difficult to get processed because the throttling caused by the queries makes the SCI request retries fail repeatedly
Additionally, when requesting the history for each stream, data in the stream is likely to be retrieved that is not needed as it has already been processed or has not changed since the previous request.
Solutions to Prevent Throttling
Use Monitors
Monitors allow data to be stored and retrieved efficiently. The data can be pushed to your solution as it arrives via HTTP or TCP monitors or you can use a polling monitor with a cursor. Monitors will only send new data so your solution will not have to process historical data multiple times. The data can be persisted so data is not lost if your application is not available temporarily.
For a practical tutorial with monitors, see Tutorial: Experimenting with Remote Manager Monitors
When using monitors, be sure to pay attention to the batch_size, batch_duration, and persistent values to make your solution process data as effectively as possible.
Use Remote Manager Features
If your solution requires processing at regular intervals, consider using the automations feature.
If your solution requires continuous verification of device firmware, device configuration, and device file system contents, consider using the configurations feature.
If you need to upgrade device firmware or modem firmware, consider using the automations or configurations feature.
Tutorial: Experimenting With Monitors
This tutorial goes through the steps required to create a web hook that receives several types of information
- It receives information about the status of all devices in your Remote Manager account
- It receives alerts when devices in a particular group are offline for an extended period of time (5 minutes)
- It receives any data points uploaded from all devices to the data stream metrics/wan/1/tx/bytes in order to keep track of the number of bytes sent out the wan.
You might want a solution like this so you can easily track your registered inventory and the state of it, including knowing when to debug a critical connectivity problem if a device loses connectivity.
Monitor Introduction
Remote Manager generates events for a variety of scenarios. This includes uploading data from devices, device state changes, and alarms that have triggered or reset.
Monitors effectively provide an event driven alternative to repeated queries with possibly complex conditions. Monitors also provide a way to receive events of many types from many devices. Fetching the data for all these devices and heterogeneous resource types may require a very large number of queries in order to retrieve all the data.
Push Monitors
A push monitor is an interface that a user can use to write applications that take advantage of event driven programming to watch for or “monitor” when events occur. Using a push monitor involves creating a client application that is an HTTP web server or a client application that connects with TCP to wait for events to be received. Push monitors can be “persistent”, so that if the user’s server crashes or is unavailable, events that may have been missed by the monitor can be resent or replayed.
Performance is improved by using push monitors because the user doesn’t have to poll for data and only those events which match the monitor “topic” will be delivered.
Create a push monitor using a post to the /ws/Monitor API.
Query Monitors
A polling or query monitor is an interface very similar to a push monitor. A query monitor will aggregate various types of monitor events into a single queue. Instead of the system pushing the events to a target web server application or through an active TCP connection, the user can later query that queue in an efficient polling fashion, requesting only the “next” events from the queue, and easily skipping all events they’ve seen already.
Performance is improved by using query monitors because the caller doesn’t have to call many APIs to get a variety of data from the system and the query monitor parameters allow continuing where the last call left off using a “polling cursor”. Query monitors can also reduce complexity because a server infrastructure doesn’t need to be maintained.
Create a query monitor using a post to the /ws/Monitor API, retrieve events from the monitor using the /ws/v1/monitors/history API.
Event types
There are a wide variety of events that occur and the events also indicate an operation (for example, create, update, delete of a resource)
alert_status event - Alerts are triggered, reset or acknowledged (a modern version of AlarmStatus)devices event - When a device is added, removed or changes its properties (a modern version of DeviceCore)firmware_updates and firmware_updates_progress events - When a firmware update finishes or changes its progressjobs and JobResult events - When SCI jobs on the system created, run, or are completedCLIEvent event - When a console session starts, terminates or the device sends dataDataPoint event - When a device uploads an individual data pointDataStream event - When operations on a data stream occurDeviceCore event - When a device itself is created, updated or deletedFileData and FileDataCore events - When files are manipulated on the systemXbeeCore event - When an Xbee device is created, update or deleted- Others…
Alerting Introduction
In general, this tutorial isn’t about the alerting capabilities of Remote Manager.
Suffice it to say that Remote Manager has Alarms and Alerts. They are the same thing. The term “alarms” is used in many of the classic APIs and user interfaces, while “alerts” typically refer to the same feature in modern (/ws/v1) APIs and user interfaces. You can create alerts using the Remote Manager API explorer, the classic Remote Manager user interface or the modern user interface.
In general, an alert definition is created to trigger on some condition. The alert fires when the condition occurs and stays in a fired state unless:
- The alert is manually reset
- The alert is configured to automatically reset upon some other condition
- The alert is marked acknowledged by manual user action
The system may send notification emails for alerts, but that is not the topic for discussion in this tutorial.
Some of the types of alerts:
- Device Offline - fires when a device is offline for a specific amount of time
- Device Excessive Disconnects - Fires when the number of disconnects of a device reaches a threshold
- DataPoint Condition - Fires when a data point is updated to a certain value or range
- DataPoint On Change - Fires when the value of a data point changes from a previous value to a new value
- Missing DataPoint - Fires when a data point isn’t updated in a timely fashion
- Device Name On Change - Fires when the name of a device is changed
- Others…
Alert UI
In the modern Remote Manager user interface, you can see all of the existing alerts and create new alerts by navigating to Alerts → Definitions. Use the Create button to define a new alert. After adding an alert in this way, you can call ws/v1/alerts/inventory to see alert definition.
Alert UI - Classic
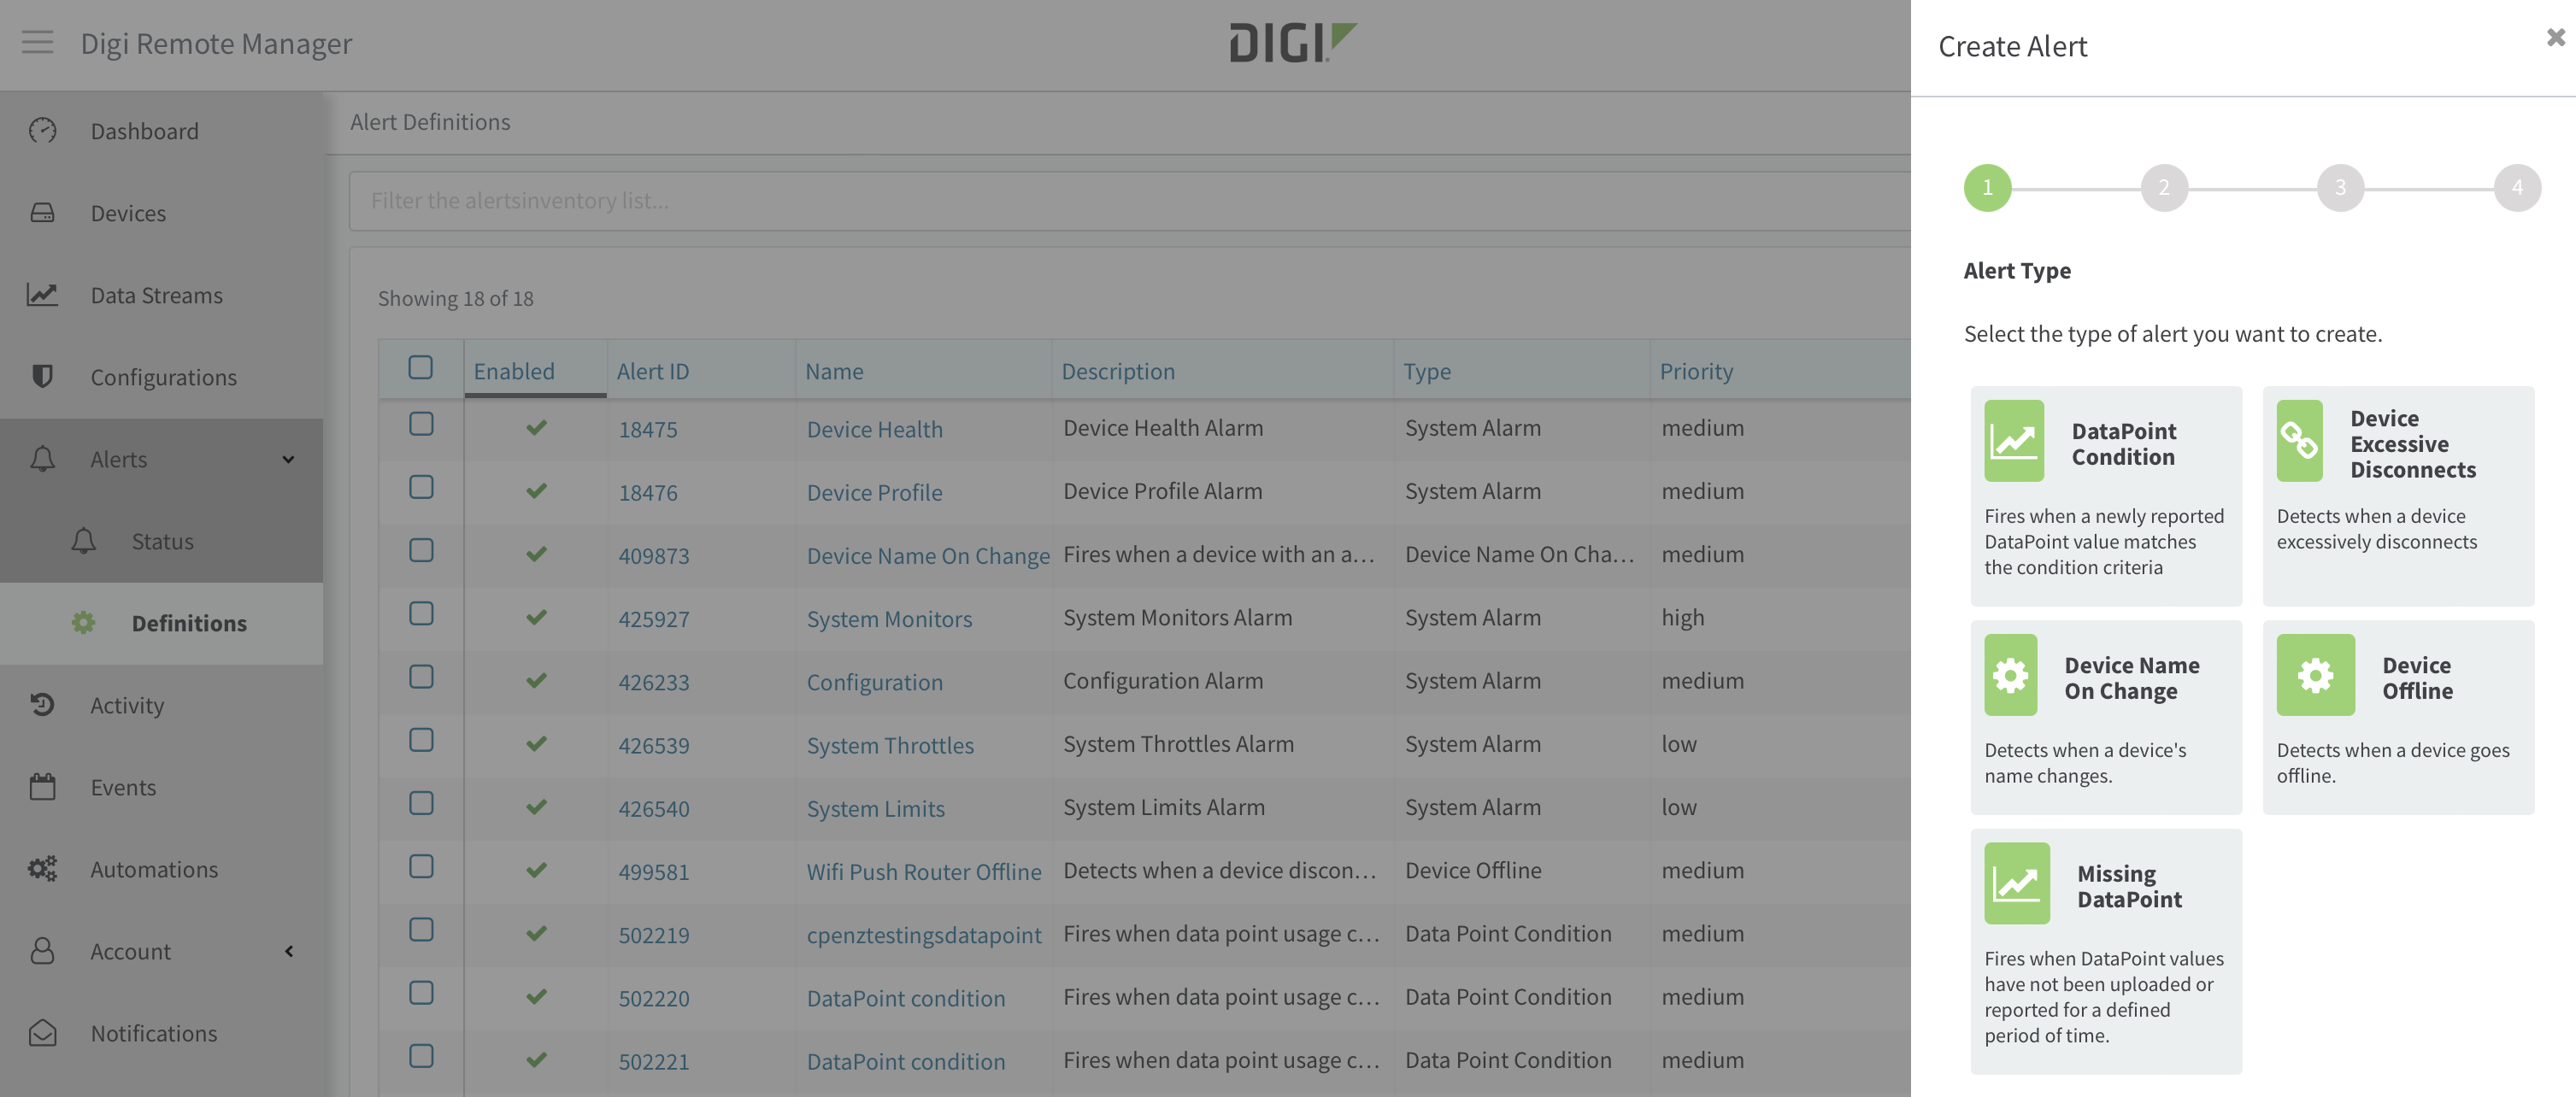
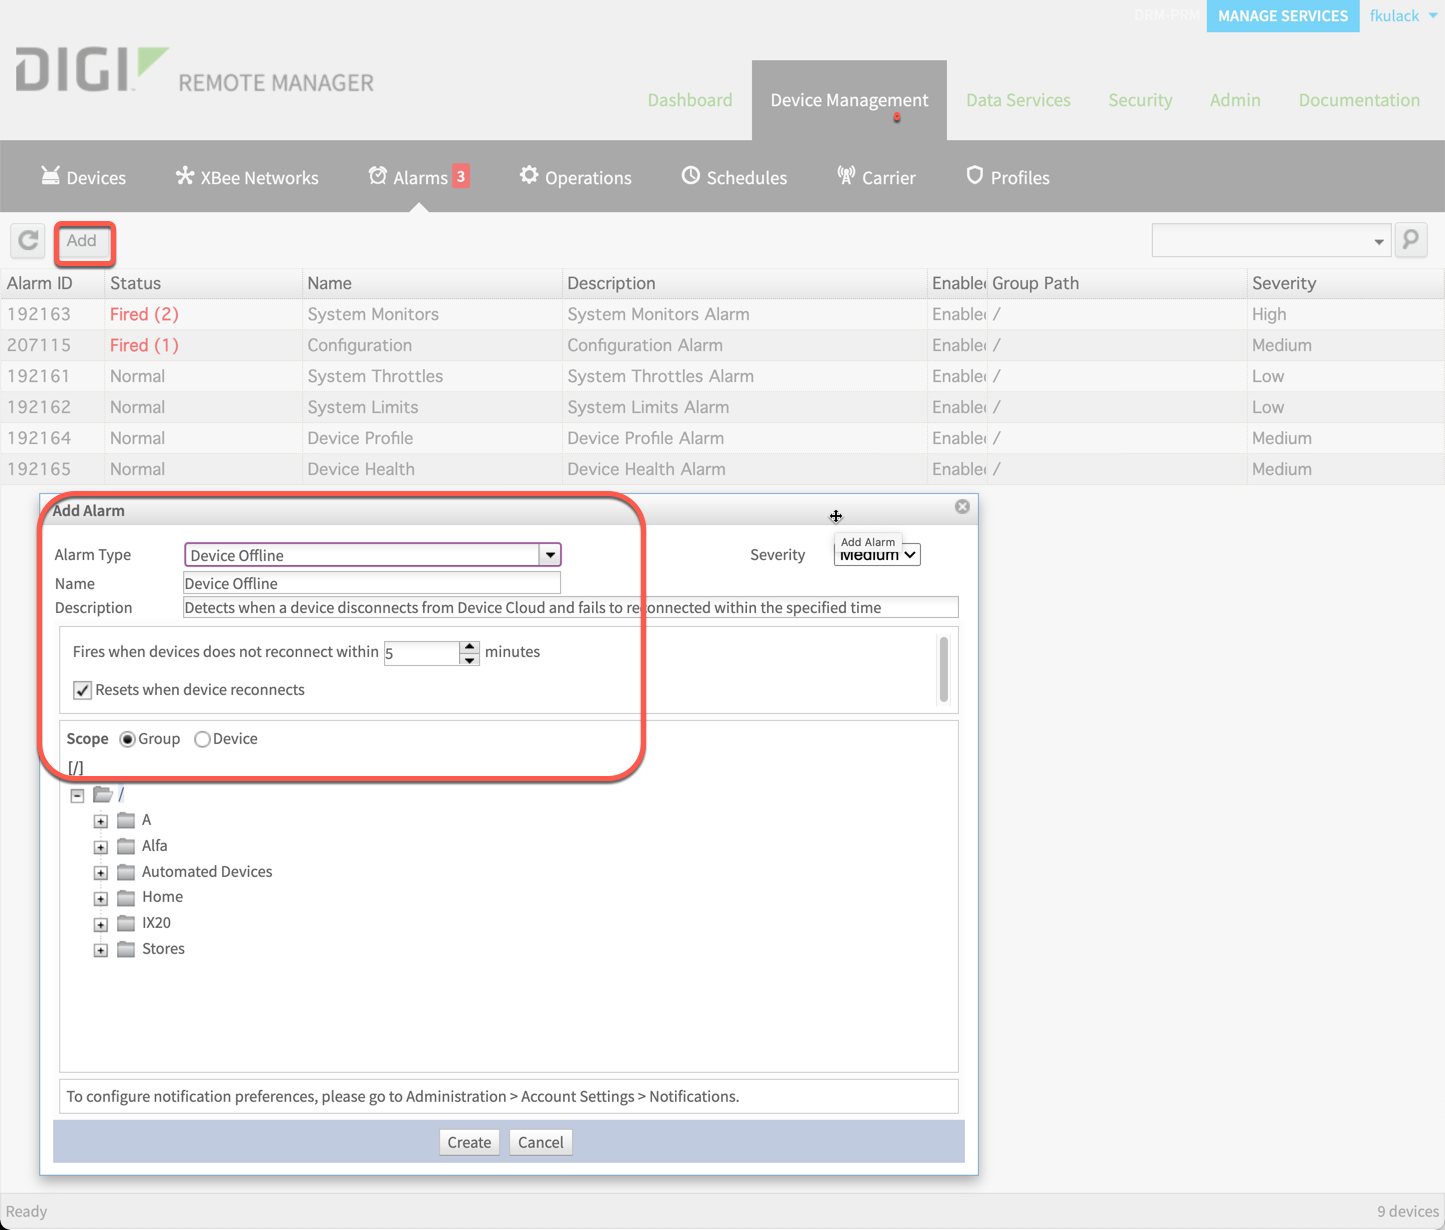
Some of the alert types are not in the modern Remote Manager user interface. You can see all of the available alert types and their properties by using the classic Remote Manager UI and navigating to Device Management → Alarms and using the Add alarm dialog. After adding an alarm in this way, you can call ws/v1/alerts/inventory to see the modern version of an alert that is represented by the alarm.
Receive Monitor Events
In our example, we used the Hookbin web tool at https://hookbin.com/ to capture and inspect monitor events sent from Remote Manager. NOTE The HookBin site is no longer available, but other similar sites work well for this sort of experimenting. For example: https://requestbin.com/.
Setup an Alert
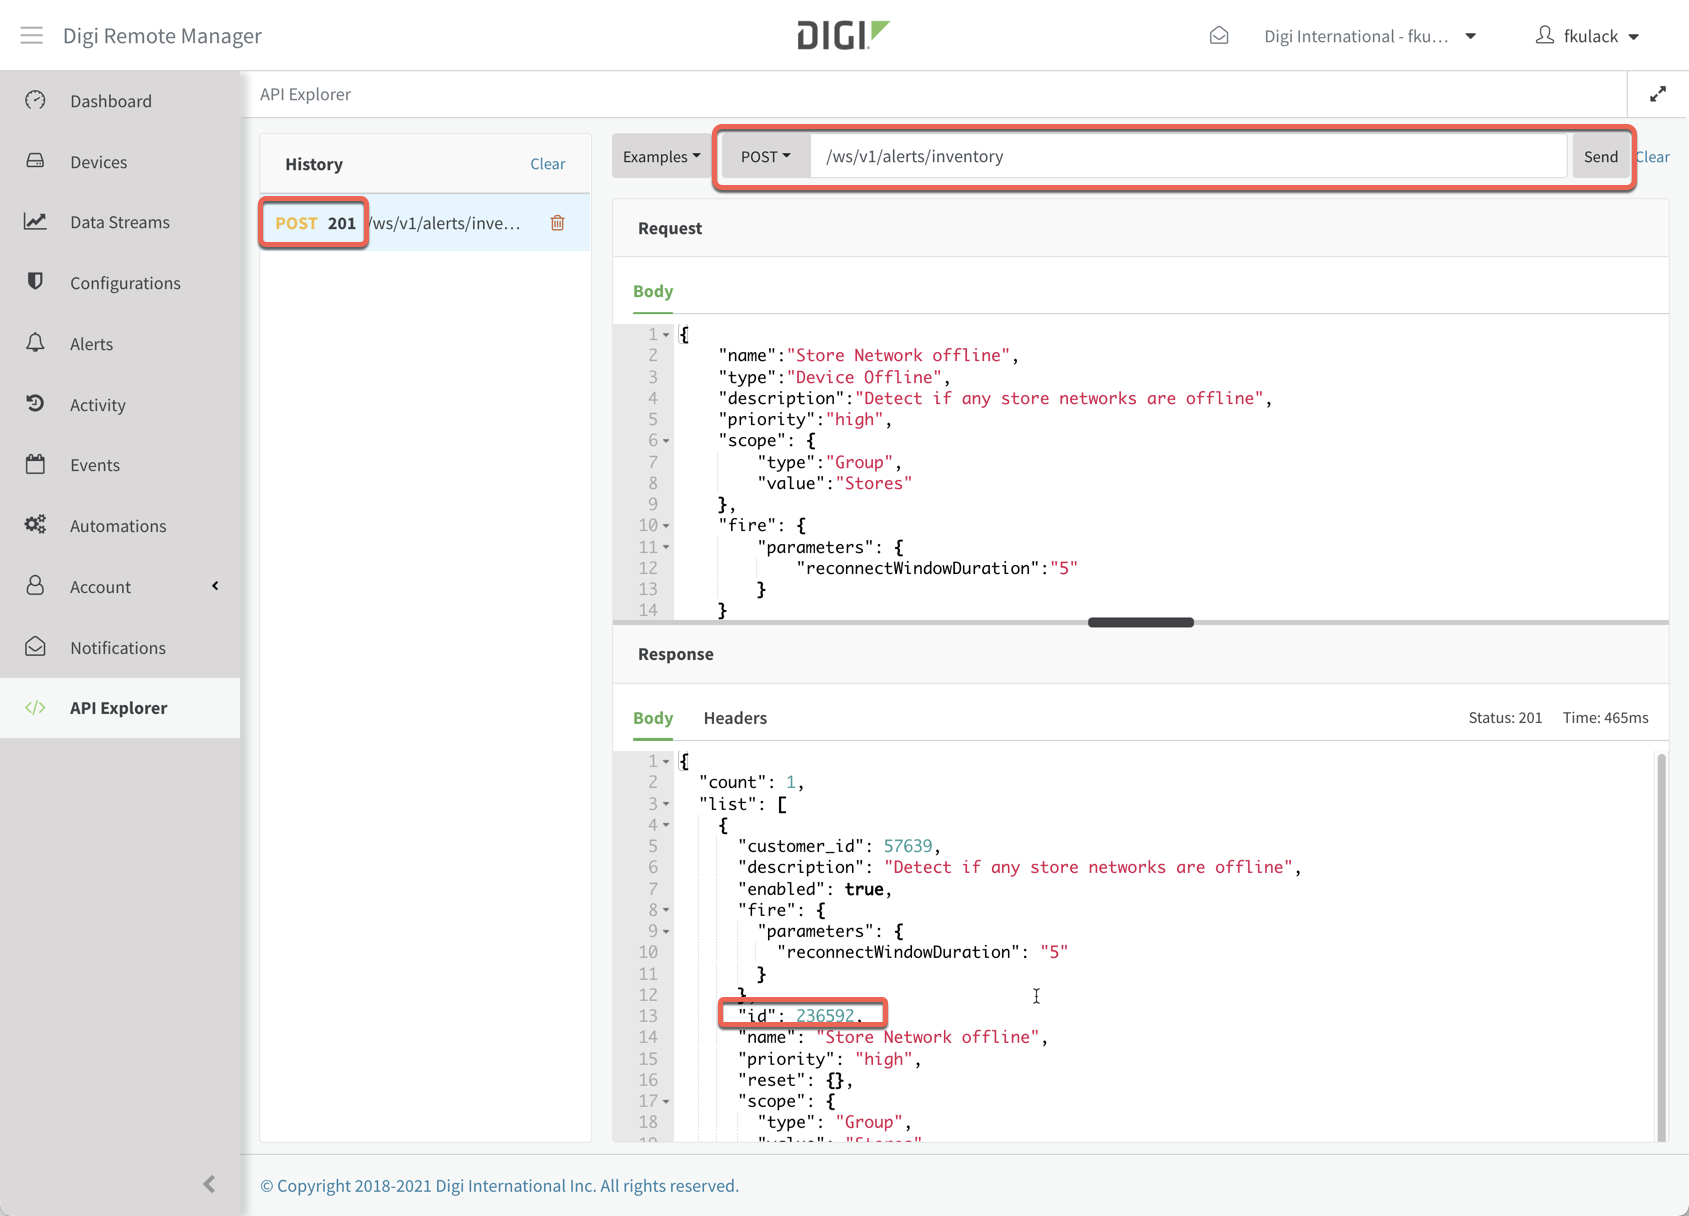
We’re going to start by setting up an alert to watch for device offline events. When a device in our Remote Manager account group “Stores” disconnects, and stays disconnected for 5 minutes, we want an alert to fire so that we can be notified of the condition.
In the introduction to alerts section, we showed how to navigate to the user interface and create an alert. In this section, we’re going to use the API explorer to create this alert by POSTing a payload directly to the /ws/v1/alerts/inventory API.
The payload looks like this, and creates an alert named “Store Network offline” for any device in group “Stores”.
{
    "name":"Store Network offline",
    "type":"Device Offline",
    "description":"Detect if any store networks are offline",
    "priority":"high",
    "scope": {
        "type":"Group",
        "value":"Stores"
    },
    "fire": {
        "parameters": {
            "reconnectWindowDuration":"5"
        }
    }
}
In the following screen shot you can see we created an alert, with alert ID of 236592. We’ll use that in the monitor and identify an event sent with that alert ID later.
Setting up the Monitor
Receiver
Go to https://requestbin.com/ and create your own web hook. In the example that follows, we create a hook using the old hookbin web site, and it had a URL of https://hookb.in/lJNNXEmV3PsJBNooB0Vl.
You can test that hook using Postman or any stand alone tool that calls web APIs. Here is an example in cURL on the command line:
curl -X POST -d '{"test":"42"}' https://hookb.in/lJNNXEmV3PsJBNooB0Vl
{"success":true}
Create the monitor
Create the monitor by posting a payload to the /ws/v1/monitors/inventory API. The monitor payload describes some required configuration features for the monitor.
For this example, we will use the following payload:
{
    "topics" : [
        "devices",
        "alert_status",
        "DataPoint/*/metrics/wan/1/tx/bytes"
    ],
    "type": "http",
    "url": "https://hookb.in/lJNNXEmV3PsJBNooB0Vl",
    "auth_token": "username:password",
    "headers" : [
        "example-header: header-value"
    ],
    "method": "POST",
    "format": "json",
    "batch_size": 100,
    "batch_duration": 10,
    "persistent": true
}
Some of these parameters are obvious, others are not, I’ll briefly describe what they represent.
- topics - Specific event topics from the monitor introduction section. Note that some events, like DataPoint take qualifiers to get specific about what type of resource is being monitored.
- type - We’re setting up an outgoing HTTP monitor, other options are “tcp” and “polling” for a query only monitor
- auth_token - Is the basic auth required for this monitor
- headers - Headers that can additionally be sent along with each request (useful for API keys or other types of authentication)
- method - HTTP Post or put are used
- format - What format should the payload be sent to the target in? Supported format types are json or xml
- batch_size - Maximum of how many events should be batched together? Don’t recommend setting this to 1, your monitor may not be able to keep up in busy situations.
- batch_duration - If the batch isn’t full, at what point should the data be sent anyway?
- persistent - If your monitor is not up and can’t receive data, should data be kept so it can be re-sent? Note, all monitor data expires after 7 days. This is sometimes referred to as an “auto replay on connect” because it ensures we persist all data that would have been destined to the monitor even if its down or there have been systemic problems with it and replay any missed data to the target if the target has been down.
- NOTE: Any monitor that has persistent and is saving data, can have its history (events that were generated) retrieved using the ws/v1/monitors/history API until those events expire.
So, in the following screen shot you can see that we’ve created the monitor with ID 1356702. We’ll use that later in other API calls.
Create the monitor with the XML APIs
Create the monitor by posting a payload to the /ws/Monitor API. The monitor payload describes some required configuration features for the monitor.
For this example, we will use the following payload:
<Monitor>
    <monTopic>devices,alert_status,DataPoint/*/metrics/wan/1/tx/bytes</monTopic>
    <monTransportType>http</monTransportType>
    <monTransportUrl>https://hookb.in/lJNNXEmV3PsJBNooB0Vl</monTransportUrl>
    <monTransportToken>username:password</monTransportToken>
    <monTransportHeaders>example-header: header-value</monTransportHeaders>
    <monTransportMethod>POST</monTransportMethod>
    <monFormatType>json</monFormatType>
    <monBatchSize>100</monBatchSize>
    <monBatchDuration>10</monBatchDuration>
    <monReplayOnConnect>true</monReplayOnConnect>
</Monitor>
Some of these parameters are obvious, others are not, I’ll briefly describe what they represent.
- monTopic - Specific event topics from the monitor introduction section. Note that some events, like DataPoint take qualifiers to get specific about what type of resource is being monitored.
- monTransportType - We’re setting up an outgoing HTTP monitor, other options are “tcp” and “polling” for a query only monitor
- monTransportToken - Is the basic auth required for this monitor
- monTransportHeaders - Headers that can additionally be sent along with each request (useful for API keys or other types of authentication)
- monTransportMethod - Post or put are used
- monFormatType - What format should the payload be sent to the target in? Supported format types are json or xml
- monBatchSize - Maximum of how many events should be batched together? Don’t recommend setting this to 1, your monitor may not be able to keep up in busy situations.
- monBatchDuration - If the batch isn’t full, at what point should the data be sent anyway?
- monReplayOnConnect - If your monitor is not up and can’t receive data, should data be kept so it can be re-sent? Note, all monitor data expires after 7 days. This is sometimes referred to as a “persistent monitor” because it ensures we persist all data that would have been destined to the monitor even if its down or there have been systemic problems with it.
- NOTE: Any monitor that has monReplayOnConnect and is saving data, can have its history (events that were generated) retrieved using the ws/v1/monitors/history API until those events expire.
Use API Explorer
We can use API explorer for creating the monitor using either the json API ws/v1/monitors/inventory or the xml API ws/Monitor. So, in the following screen shot you can see that we’ve created the monitor with ID 1356702. We’ll use that ID later in other API calls.
Watch the monitor
At this point, we can go back to hook bin and look at what events we might be receiving. We will immediately start to receive some events.
- Any time the device status is updated (it connects, disconnects, is moved to a new group, gets a new name, etc, etc)
- Any time it uploads a data point for stream metrics/wan/1/tx/bytes (my test device is set to upload every 5 minutes)
- Any time any alert status changes
The first message we receive at hook is shown below.
Monitor Payload: initial
We get a Basic authorization and example-header HTTP header matching what we’ve setup in our monitor. In this post, we’ve received a single monitor event as indicated by the monitor-aggregate-count header.
The payload is as follows. This is an alert status event showing that the monitor was connected. The alert_status event has an id of 192163 which is a different alert than the one we created so we don’t have to pay attention to it.
Some fields of the payload:
- Monitor payloads have a Document and Msg element where the Msg element is either an individual event or a list of events (in json, “Msg” is either an object or an array of objects)
- topic - Depending on the event type, the topic represents routing/summary information about the payload.
- group, operation, timestamp - More information about when and why the individual event was generated
- alert_status - This element will be named depending on what the data type is. In payloads in this tutorial, you’ll see this element being a “device”, a “DataPoint” or the “alert_status” because those are the topics used when we created the monitor.
{
  "Document": {
    "Msg": {
      "topic": "57639/alert_status/192163/Monitor%3A1356700",
      "group": "*",
      "operation": "INSERTION",
      "timestamp": "2021-11-18T18:22:55.604Z",
      "alert_status": {
        "customer_id": 57639,
        "enabled": true,
        "id": 192163,
        "last_update": "2021-11-18T18:22:55.535Z",
        "maintenance_mode": "off",
        "notes": "Monitor connected",
        "severity": "high",
        "source": "Monitor:1356700",
        "status": "reset"
      }
    }
  }
}
The screen shot of the first event from hookbin is shown here:

Monitor Payload: device and DataPoint
When the device updates its metric data, the monitor receives another payload. Note in this payload, there are 2 events in the monitor payload, so the “monitor-aggregate-count” HTTP header is 2.
Also note that the “Msg” element in the payload is a list, containing each of the two types of events, a “DataPoint” and the “device” payload with the device being updated.
Of special interest in this payload:
- The data point is being updated from a previous value of 39558 to 41358 bytes (The streamUnits field indicates bytes)
- That this device being updated is in the “Stores” group, so that the handler of the event can take some different action depending on that information.
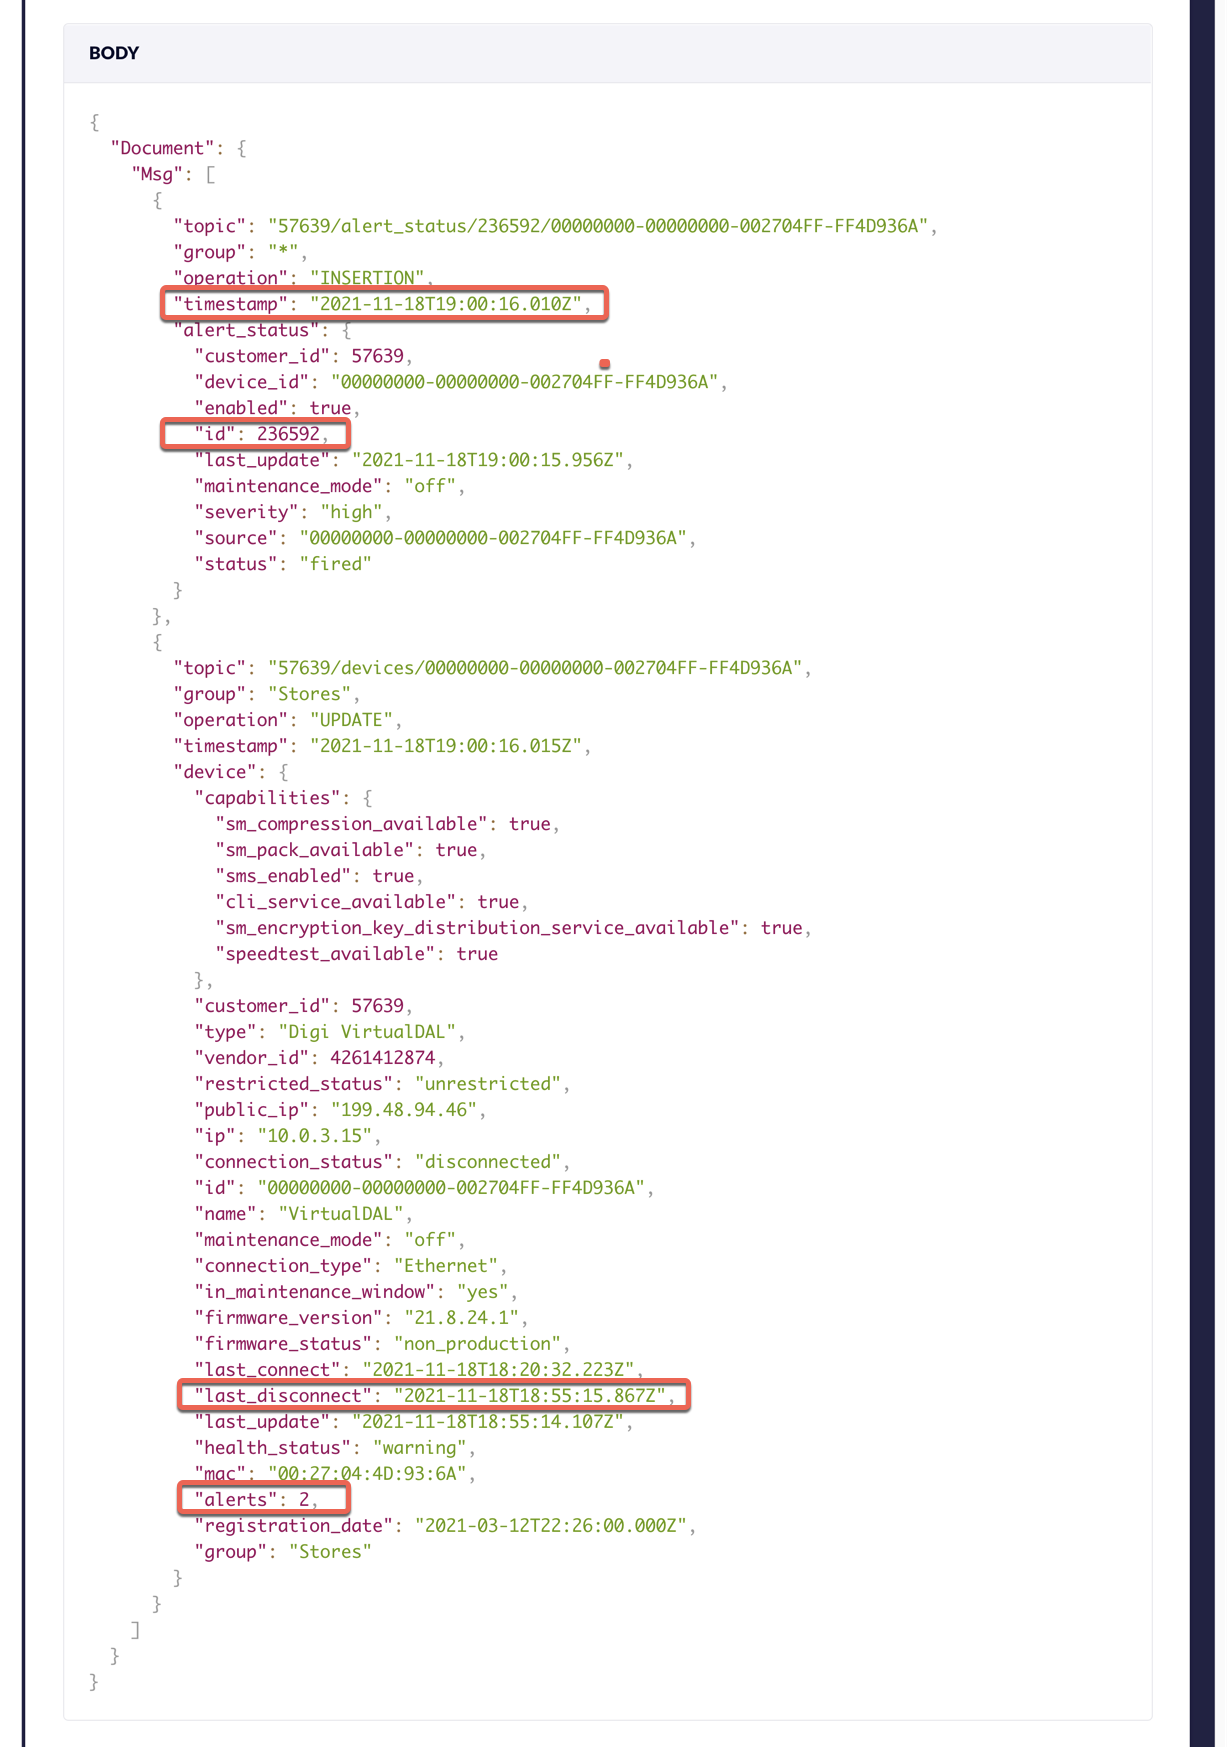
Monitor Payload: Device Offline alert_status
After disconnecting a device in the stores group, and waiting five minutes, the monitor receives another payload.
There are a couple of things going on in this payload. Since we have the monitor batch size set to 100 and the batch duration set to 10 seconds, we get to see both the device event and the alert at the same time.
Some interesting things that caused this payload:
- You can see by the device “last_disconnect” field, that the device disconnected at 18:55.
- You can see by the alert_status event timestamp field that the alert was fired at 19:00 (5 minutes later because of the alert configuration)
- The device is only included in this payload because at 19:00, the alert firing caused the number of alerts associated with the device to be bumped from 1 to 2 (refer back to a prior device payload where it was 1). That change caused a device status to occur so the “device” event was included in this payload too.
Clean up
We should be sure to delete the monitor and the alert so that we don’t create noise in our account or run up usage.
Delete the alert

Delete the monitor

Summary
This tutorial demonstrates how to use API explorer and HookBin to experiment with Remote Manager monitors and APIs.
Have fun!
Tutorial: Monitors with Templated Payloads
The monitor feature of Remote Manager supports templates that customize the format used to deliver events. This can be helpful when a service is not able to easily consume the built-in XML and JSON formats and a different schema is required by the target.
For additional background on monitors see Experimenting with Monitors where we took a look at the monitor feature in Remote Manager and how it can be used to aggregate and deliver events based on a list of subscribed topics.
Supplying a Template
For a Monitor
The monSchemaType and monSchemaData fields can be used to supply a template. For example, a query monitor can be created that includes a template with a POST to /ws/Monitor with a payload such as:
<Monitor>
    <monTopic>DataPoint/*/metrics/cellular</monTopic>
    <monTransportType>polling</monTransportType>
    <monSchemaType>handlebars</monSchemaType>
    <monSchemaData>
        [
        {{#each this}}
          {{#if @index}},{{/if}}
          { "{{DataPoint.streamId}}":{{DataPoint.data}} }
        {{/each}}
        ]
    </monSchemaData>
</Monitor>
Test with the History API
A monitor may be responsible for sending data to your production system and not be a good candidate for testing or experimenting.
Supplying a template to the monitory history API is a good way to rapidly test different templates without changing a monitor.
Retrieving the history of the query monitor with a GET to /ws/v1/monitors/history/<monId> shows the result of the template in the output field.
This example:
- Targets monitor 1772299
- Uses the
start_time parameter to start with data from 5 minutes ago
- Uses the
size parameter to limit the maximum data items to return to 10
- Uses the
schema parameter to supply a template
- Uses the httpIe command line tool to send the web request.
NOTE: In your own testing, you’ll have to be careful with escaping special characters (especially if you use the curl command line tool)
http remotemanager.digi.com/ws/v1/monitors/history/1772299 \
 start_time==-5m \
 size==10 \
 schema=='[
{{#eachFiltered this}}
  {{#if DataPoint.streamId}}
  {{#if @index}},{{/if}}
    {{json DataPoint.streamId}}
  {{/if}}
{{/eachFiltered}}]'
The result is the following:
Note:
- The output field has been formatted to show proper spaces and newlines.
- The device IDs have been changed to
00000000-00000000-00000000-00000000
{
    "count": 10,
    "cursor": "99084a20-b838-11ed-9b29-e2a950f87599",
    "next_uri": "/ws/v1/monitors/history/1772299?start_time=-5m&size=10&schema=%5B%0A%7B%7B%23eachFiltered+this%7D%7D%0A++%7B%7B%23if+DataPoint.streamId%7D%7D%0A++%7B%7B%23if+%40index%7D%7D%2C%7B%7B%2Fif%7D%7D%0A++++%7B%7Bjson+DataPoint.streamId%7D%7D%0A++%7B%7B%2Fif%7D%7D%0A%7B%7B%2FeachFiltered%7D%7D%5D&cursor=99084a20-b838-11ed-9b29-e2a950f87599",
    "output": "[
  "00000000-00000000-00000000-00000000/metrics/sys/mem/used",
  "00000000-00000000-00000000-00000000/metrics/sys/cpu/used",
  "00000000-00000000-00000000-00000000/metrics/sys/storage/config/used",
  "00000000-00000000-00000000-00000000/metrics/sys/storage/opt/used",
  "00000000-00000000-00000000-00000000/metrics/sys/storage/tmp/used",
  "00000000-00000000-00000000-00000000/metrics/sys/storage/var/used",
  "00000000-00000000-00000000-00000000/metrics/eth/1/rx/bytes",
  "00000000-00000000-00000000-00000000/metrics/sys/location",
  "00000000-00000000-00000000-00000000/metrics/eth/1/rx/packets",
  "00000000-00000000-00000000-00000000/metrics/eth/1/rx/overruns"
]",
    "polling_cursor": "99084a20-b838-11ed-9b29-e2a950f87599",
    "polling_uri": "/ws/v1/monitors/history/1772299?start_time=-5m&size=10&schema=%5B%0A%7B%7B%23eachFiltered+this%7D%7D%0A++%7B%7B%23if+DataPoint.streamId%7D%7D%0A++%7B%7B%23if+%40index%7D%7D%2C%7B%7B%2Fif%7D%7D%0A++++%7B%7Bjson+DataPoint.streamId%7D%7D%0A++%7B%7B%2Fif%7D%7D%0A%7B%7B%2FeachFiltered%7D%7D%5D&cursor=99084a20-b838-11ed-9b29-e2a950f87599",
    "size": 10
}
See Handlebars Template for details about the Handlebars template format.
Handlebars Playgrounds
There are playground environments online that let you quickly try out templates given a data model that you supply, such as https://handlebarsjs.com/playground.html . These playgrounds do not include the custom helpers Remote Manager provides. If you want to try out custom helpers in these environments you can paste the following into the box they have for custom helpers (captioned Preparation-Script in the above playground).
Note, these should be considered unsupported implementations of the custom helpers and are solely provided to experiment in the sandbox environments. The actual implementation of the helpers differs in Remote Manager.
Here are some experimental JavaScript Custom Helpers, this list does not include all the helpers provided by Remote Manager:
Handlebars.registerHelper('firstPathComponent', function(text) {
return text.split('/')[0];
});
Handlebars.registerHelper('remainingPathComponents', function(text) {
return text.split('/').splice(1).join('/');
});
Handlebars.registerHelper('formatTime', function(timestamp) {
return new Date(timestamp).toISOString();
});
Handlebars.registerHelper("endsWith", function(text, suffix, options) {
if (text.endsWith(suffix)) {
return options.fn(this);
} else {
return options.inverse(this);
}
});
Handlebars.registerHelper("eq", function(inputOne, inputTwo, options) {
if (inputOne === inputTwo) {
return options.fn(this);
} else {
return options.inverse(this);
}
});
Handlebars.registerHelper("eachFiltered", function(context, options) {
if (!options) {
throw new Exception('Must pass iterator to #each');
}
let fn = options.fn,
inverse = options.inverse,
i = 0,
ret = '',
data;
if (typeof context === 'function') {
context = context.call(this);
}
if (options.data) {
data = {};
for (let key in options.data) {
if (Object.prototype.hasOwnProperty.call(arguments[i], key)) {
data[key] = arguments[i][key];
}
}
data._parent = options.data;
}
function execIteration(field, index, last) {
if (data) {
data.key = field;
data.index = index;
data.first = index === 0;
}
let blockOutput = fn(context[field], {
data: data,
blockParams: [context[field], field]
});
if(blockOutput.trim()) {
ret = ret + blockOutput;
return true;
} else {
return false;
}
}
if (context && typeof context === 'object') {
if (context && typeof context === 'object'
? toString.call(context) === '[object Array]'
: false) {
let nonEmptyIndex = 0;
for (let j = context.length; i < j; i++) {
if (i in context) {
if(execIteration(i, nonEmptyIndex, i === context.length - 1)) {
nonEmptyIndex++;
}
}
}
} else if (global.Symbol && context[global.Symbol.iterator]) {
const newContext = [];
const iterator = context[global.Symbol.iterator]();
for (let it = iterator.next(); !it.done; it = iterator.next()) {
newContext.push(it.value);
}
context = newContext;
let nonEmptyIndex = 0;
for (let j = context.length; i < j; i++) {
if(execIteration(i, nonEmptyIndex, i === context.length - 1)) {
nonEmptyIndex++;
}
}
} else {
let priorKey;
let nonEmptyIndex = 0;
Object.keys(context).forEach(key => {
// We're running the iterations one step out of sync so we can detect
// the last iteration without have to scan the object twice and create
// an itermediate keys array.
if (priorKey !== undefined) {
if(execIteration(priorKey, nonEmptyIndex)) {
nonEmptyIndex++;
}
}
priorKey = key;
i++;
});
if (priorKey !== undefined) {
if(execIteration(priorKey, nonEmptyIndex++, true)) {
nonEmptyIndex++;
}
}
}
}
if (i === 0) {
ret = inverse(this);
}
return ret;
});
Handlebars.registerHelper('slice', function(context, sep, start, length, options) {
if (start === 0 || length < 1) {
throw new Exception('Bad start or length parameter');
}
const components = context.split(sep)
let end = false
if (start < 0) {
end = true
start = -start
}
start-=1
if (!end) {
return components.slice(start, start+length).join(sep)
}
else {
return components.slice(components.length-1-start, components.length-1-start+length).join(sep)
}
});
Handlebars.registerHelper('json', function(context, options) {
const dft = options.hash.default ? options.hash.default : null;
if (!context) {
return dft
}
const pretty = options.hash.pretty ? 2 : null;
const escapeHTML = !!options.hash.escapeHTML;
let json = JSON.stringify(context, null, pretty)
if (!escapeHTML) {
return json;
}
// Better techniques for escaping HTML are available using
// the DOM or jQuery, but this is a simple example with no
// dependencies
return json
.replace(/&/g, '&')
.replace(/</g, '<')
.replace(/>/g, '>')
.replace(/"/g, '"')
.replace(/'/g, ''');
});
Handlebars.registerHelper('replace', function(context) {
var current = context;
const options = arguments[arguments.length - 1];
if (current) {
let index=1;
while (index+1 < arguments.length-1) {
const match = arguments[index];
const replace = arguments[index+1];
current = current.replaceAll(match, replace);
index += 2
}
}
if (current !== context) {
console.log(`Replaced to ${current}`);
if (!options.data) {
options.data = {};
}
options.data.replaced = current;
return options.fn(this, options);
} else {
return options.inverse(this);
}
});
Building a Template
Data Model
The data model supplied to the template engine is the list of monitor events in their JSON representation. For example, a monitor subscribed to DataPoint events would have the following available to the template:
[
   {
      "topic":"1234/DataPoint/00000000-00000000-12341234-12341234/metrics/cellular/1/sim1/tx/bytes",
      "group":"somegroup",
      "operation":"INSERTION",
      "timestamp":"2021-12-07T20:07:08.563Z",
      "context": {
        "deviceType": "Default Simulated Device Type",
        "deviceName": "deviceA",
        "vendorId": "0"
      },
      "DataPoint":{
         "id":"41a1ac50-5799-11ec-afa9-f6681641504e",
         "streamId":"00000000-00000000-12341234-12341234/metrics/cellular/1/sim1/tx/bytes",
         "streamUnits":"",
         "streamType":"UNKNOWN",
         "description":"",
         "data":"64",
         "timestamp":1638907628437,
         "serverTimestamp":1638907628437,
         "quality":0,
         "cstId":1234
      }
   },
...
   {
      "topic":"1234/DataPoint/00000000-00000000-12341234-12341234/metrics/cellular/2/sim1/tx/bytes",
      "group":"somegroup",
      "operation":"INSERTION",
      "timestamp":"2021-12-07T20:15:44.125Z",
      "context": {
      "deviceType": "Default Simulated Device Type",
      "deviceName": "deviceA",
      "vendorId": "0"
      },
         "DataPoint":{
         "id":"74f1b360-579a-11ec-afa9-f6681641504e",
         "streamId":"00000000-00000000-12341234-12341234/metrics/cellular/2/sim1/tx/bytes",
         "streamUnits":"",
         "streamType":"UNKNOWN",
         "description":"",
         "data":"72",
         "previousData":"8",
         "timestamp":1638908144022,
         "serverTimestamp":1638908144022,
         "quality":0,
         "cstId":1234
      }
   }
]
Since the template is supplied a list of events you will typically need to iterate over the content of the data model using either the each or eachFiltered helpers.
Testing Your Template
It can take a few tries to get a template that has the desired output, so there are stages you can go through that can make it easier to experiment.
Getting the Data Model
First off, start by creating a query monitor that is subscribed to the topics you are interested in. Query monitors can be queried repeatedly without having to publish new data, so tweaks to your template can be seen quickly. See above for an example of creating a query monitor with a template.
Once you have a query monitor created, wait for some events and then retrieve the raw JSON representation of the events by doing a GET to /ws/v1/monitors/history/.json?ignore_schema=true&include_context=true. The items in the list field is what will be supplied to your template.
DataPoint Context
Published DataPoint events for use in templates will include a context that has the device name, device type, and vendor ID if they are defined for the device that sent the event. Examples of the data can be retrieved using the include_context parameter as mentioned in the previous section.
Handlebars Playgrounds
If you are just starting out with a template you might want to paste the content of the list field from above into a Handlebars Playground so that you can see a live representation of what your template would output.
Refinement through the Query Monitor
Once you are happy with the template, you can update the query monitor used to retrieve the data model with a PUT to /ws/Monitor/ with the updated template in the monSchemaData field, like below:
<Monitor>
  <monSchemaType>handlebars</monSchemaType>
  <monSchemaData>...updated template here</monSchemaData>
</Monitor>
After the monitor is updated you can query the output with a GET to /ws/v1/monitors/history/ to see if the format of the output field is correct.
HTTP Monitor Request Capturing and Inspection
Next, if you’re using an HTTP monitor you can create the HTTP monitor but target an endpoint that allows you to easily see what is being delivered from Remote Manager. An example site that allows capturing requests is https://requestbin.com/. You can point your HTTP monitor against a site like this and then look at the requests to see if the body of the request matches your expected template output.
Integrate Your Application
Finally, if you are planning to use an HTTP or TCP monitor you can now create the monitor with the desired monTransportType and and template and verify that it has the desired output when delivering events to your TCP monitor client or web server. The more rapid testing available with the playground and query monitor should result in a template that works quickly with the HTTP or TCP monitor, avoiding the overhead of having to wait for traffic and event delivery.
Batching
Templates do not have the ability to change how monitor events are batched, they are only allowed to determine the output that should be used for a given batch of events. If a monitor is configured to send events in batches of 1000, then a template will be supplied those 1000 events and expected to represent every event in the output.
It’s possible for a template to filter out events by choosing not to include anything for them in the output (perhaps using if or endsWith), but the monitor will still consider the event as having been processed even if a template chooses to not include anything from the event.
Common Patterns
JSON Output
A common use case is a template that generates JSON output. A starting pattern for such a template where the monitor is subscribed to DataPoint events is
[
{{#each this}}
  {{#if @index}},{{/if}}
  { "{{DataPoint.streamId}}":"{{DataPoint.data}}" }
{{/each}}
]
In this example square brackets are used to create a list in JSON and the each helper is used to iterate through each of the DataPoint events in the data model. For each event, curly braces add an object to the json output and we extract the DataPoint.streamId and DataPoint.data fields from the data model. We use the if helper along with the @index attribute from the each helper to ensure a comma delimiter is inserted between each object.
Filtered JSON Output
This use case is very similar to the JSON Output case, but there may be specific events in the data model that you want to skip. Special care needs to be taken in this case to ensure that the delimiters in your output don’t get doubled up for skipped events. An example of this is
[
{{#eachFiltered this}}
  {{#if @index}},{{/if}}
  {{#endsWith streamId 'ts1/bat'}}
  { "{{DataPoint.streamId}}":"{{DataPoint.data}}" }
  {{/endsWith}}
{{/eachFiltered}}
]
We’ve swapped the each helper for eachFiltered and added an endsWith helper to ensure only events that have a particular streamId are included. eachFiltered is necessary to ensure the @index attribute appropriately considers events we’ve filtered out…otherwise if the first event is filtered out we would still end up with a comma delimiter resulting in invalid JSON.
Handlebars Templates
Both the automations feature and the monitors feature of Remote Manager support templates that can be used to assign values to extract values and generate values.
-
The monitors feature uses templates to convert or generate the output of a monitor event. The template is used to convert a payload from the system into the expected payload that the target of the monitor wants to receive.
-
The automations feature uses templates to generate variables that can be used in the automation steps, to construct other variables or in if-then-else conditions.
The templating engine supported by Remote Manager is Handlebars. Handlebars.java is the specific implementation used which has a good support reference at https://jknack.github.io/handlebars.java/.
The JavaScript implementation of Handlebars (Handlebars Introduction is a bit more common and documentation for it should apply, though the output of templates may differ slightly from the JavaScript version, typically with regard to whitespace. Sandbox environments like https://handlebarsjs.com/playground.html can be helpful in testing out a template, though keep in mind they are based on the JavaScript version.
Helpers
The following built-in handlebars helpers are available for use in templates:
eachif,lookupunlesswith
These additional helpers are also available in Remote Manager.
addandcapitalizeFirstcapitalizedefaultIfEmpty,eachFilteredendsWitheqextractfirstPathComponentformatNumformatTimegtgte,joinjsonlowerltltemulneqnotnownumberorremainingPathComponentsreplacesliceslugifysubstringupperyesno
Descriptions of the built-in helpers can be found in the Handlebars documentation.
The additional helpers are Remote Manager specific and can be found below.
The model
The handlebars template language uses a model that defines input data and variables that are available
to the template.
-
For the monitors feature, the model contains the entire input payload of the monitor event. The payload syntax and type differs depending on the events flowing through the monitor. See Tutorial: Monitors with Templated Payloads for more information.
-
For the automations feature, the model contains the built-in variables and any user variables that have been defined in the automation.
- The automations built-in variables and example values are:
customer_id - The account ID of that the automation is running indebug_mode - true/false, is the device currently in debug modedevice_id - The device ID for the running automation, for example 00000000-00000000-123456FF-FF123456firmware_version - The firmware version of the device, for example 1.0.0.0group - The group that the device is in, for example group1input - When processing a variable step with multiple expressions, the 2nd through final expression receives the input variable in the model. The input variable receives the output of the previous expression. The input variable can be used for building up a final result from a series of expressions in a single variable step.last_result - The result of the last automation step, for example, the output of a CLI commandlocation - The value of the location field of a device, for example Rochester, MNmaintenance_window - true/false, is the device in a maintenance windowname - The device name, for example Bus0042run_count - The number of times the step has runtags - The tags associated with the device, for example: tag1,tag2type - The type of device the automation is running on, for exmaple: Digi TX64
Expansion
By default, handlebars escapes the output of the variable, but you can use triple braces to avoid escaping.
For a model with these fields
-
name with the value World!
-
greeting with It's an amazing
-
Template expression Hello, {{name}}! will expand to Hello, World!.
-
Template expression {{name}} will expand to World!.
-
Template expression {{{name}}} will expand to World!.
-
Template expression {{greeting}} {{name}} will expand to It's an amazing World!
-
Template expression {{{greeting}}} {{{name}}} will expand to It's an amazing World!
Using Helpers
Helper Blocks
When a helper has a block inside, the helper is invoked using the # character at the start tag and the / character at the end tag.
For example, in the following expression, the if helper contains blocks of other text, so we use #if to open and /if to close
the helper call. {{#if name}}Hello, {{name}}!{{else}}Hi!{{/if}} will output Hello, World! if the model contains a field name with the value World!.
A helper that does not contain a block can be used with no start and end tags, for example, {{and first_name last_name}} simply outputs true if both first_name and last_name are set.
Nesting
You can use parenthesis to nest helpers inside other helpers.
For example, the template expression {{capitalize (lower 'HELLO, WORLD!')}} uses the capitalize and lower helpers to output Hello, World!.
First the expansion converts the literal text to lowercase and then capitalizing the first letter of each word.
Helper Reference
add
Syntax: {{add input1 input2...}}
Add all the numbers together. The inputs can be numbers or strings that can be converted to numbers.
Expression {{add 1 2}} renders 3.0, while {{add input 2 3}} adds 5 to the value of input.
Note: Input numbers are converted to decimals and may be formatted with decimal points. Use the formatNum helper to control the format.
For example, {{formatNum '###0;-###0' (add 1 2)}} results in 3.
and
Syntax: {{#and input1 input2...}}output-if-true{{else}}output-if-false{{/and}}
The and operator determines if all inputs are truthy (true or not empty). Can be used with non-boolean values.
Supports an else section and multiple operators. For example, {{#and input1 input2 input3}}Yes{{else}}No{{/and}} will output Yes if all inputs are truthy, otherwise No.
Expression {{and input1 input2}} renders true or false directly.
Expression {{and input1 input2 yes='Result Yes' no='Result No'}} renders Result Yes or Result No directly.
capitalizeFirst
Syntax: {{capitalizeFirst input}}
Capitalizes the first letter of the input string.
capitalize
Syntax: {{capitalize input}}
Capitalizes the first letter of each word in the input string.
defaultIfEmpty
Syntax: {{defaultIfEmpty input default}}
Output the default value if the input value is empty or not set. For example: {{defaultIfEmpty test 'NotSet'}} will output NotSet if the variable test is not set in the model
eachFiltered
Syntax: {{#eachFiltered input}}output{{/eachFiltered}}
eachFiltered helps you iterate through input. eachFiltered operates very similarly to the built-in each helper. It differs by not updating the @first and @index attributes unless the nested block outputs something other than whitespace. This can be helpful when outputting delimiters when you may be filtering out content using if or endsWith. The @last attribute is not provided as the current block does not know whether the next will provide output or not.
A typical use case for this would be to iterate over something in the data model and then output delimiters between your content for entries that have not been filtered out.
The eachFiltered helper most often is used with an if helper to comma separate each of the generated objects when iterating over an array.
For example, if the data model contains the following:
{
  "units": [
    {
      "name": "unit1",
      "value": 1
    },
    {
      "name": "unit2",
      "value": 2
    }
  ]
}
Then the following template would output a comma separated list of the units:
{{#eachFiltered units}}{{#eachFiltered this}}{{#if @index}},{{/if}}
{{name}}
{{/eachFiltered}}
Will generate the following (some whitespace not included here):
endsWith
Syntax: {{#endsWith input1 input2}}output{{/endsWith}}
endsWith will optionally include a block if the first argument ends with the second argument.
A typical use for this would be to filter out stream ids unless they match a particular suffix.. For example, if streamId=00000000-00000000-123456FF-FF123456/ts1/bat in the data model then {{#endsWith streamId '/ts1/bat'}}battery{{/endsWith}} will output battery.
This helper is very similar to the built-in if helper and also provides else sections. An else section looks like {{#endsWith streamId '/ts1/bat'}}battery{{else}}notbattery{{/endsWith}} and would output notbattery if the streamId argument does not end with the supplied suffix.
eq
Syntax: {{#eq input1 input2}}output{{/eq}}
eq will optionally include a block if the first argument is equal to the second argument. The comparison is case sensitive.
This can be used in any situation where you want to check if something in the data model matches a particular value or if two parts of the data model are equal.. For example, if streamId=00000000-00000000-123456FF-FF123456/ts1/bat in the data model then {{#eq streamId '00000000-00000000-123456FF-FF123456/ts1/bat'}}battery{{/eq}} will output battery.
This helper is very similar to the built-in if helper and also provides else sections. An else section looks like {{#eq streamId '00000000-00000000-123456FF-FF123456/ts1/bat'}}battery{{else}}notbattery{{/eq}} and would output notbattery if the streamId argument is not equal to the supplied value.
Syntax: {{extract regular-expression input}}
Extract substring(s) using a regular expression.
The regular expression is evaluated using Google RE2 regular expression syntax.
The first match of the regular expression is found in the input text. If the regular expression doesn’t contain capture groups, then the match is returned as output. If the regular expression contains 1 or more capture groups, then the capture groups are concatenated together and returned as output.
For example, with the data model containing input=This is a RegularExpression extraction, the template expression {{extract 'Reg[a-zA-Z]+' input}} will output RegularExpression while the template expression {{extract '(?i)(this is ).*(extraction)' input}} will output This is extraction.
firstPathComponent
Syntax: {{firstPathComponent input}}
firstPathComponent outputs the first entry in a path.
A typical use for this would be to extract the device identifier from a stream ID. For example, if streamId=00000000-00000000-123456FF-FF123456/ts1/bat in the data model then {{firstPathComponent streamId}} will output 00000000-00000000-123456FF-FF123456.
Syntax: {{formatNum format input}}
Format a number or string that can be parsed as a number given a formatting string.
For example, {{formatNum '###0;-###0' 1234.567}} results in 1235, while {{formatNum '#,###.00;(#,###.00)' -1234.567}} results in (1,234.57).
Syntax: {{formatTime input}}
formatTime will output a date and time in ISO-8601 format. The input is expected to be a UNIX timestamp in milliseconds.
Millisecond timestamps are common in monitor events, so this helper is useful when an ISO-8601 time is preferred. For example, if timestamp=1637353224575 in the data model then {{formatTime timestamp}} will output 2021-11-19T20:20:24.575Z.
gt
Syntax: {{#gt input1 input2}}output-if-true{{else}}output-if-false{{/and}}
Compare input1 is greater than input2.
Supports an else section and multiple operators. For example, {{#gt input1 input2}}Yes{{else}}No{{/and}} will output Yes or No.
Expression {{gt input1 input2}} renders true or false directly.
Expression {{gt input1 input2 yes='Result Yes' no='Result No'}} renders Result Yes or Result No directly.
Note: Most elements are strings, even if they are extracted as digits from prior output or set as digits in a variable expression.
To compare numbers use the number helper to convert the strings to numbers first.
{{#gt (number input1) (number input2)}}output-if-true{{else}}output-if-false{{/and}}
gte
Syntax: {{#gte input1 input2}}output-if-true{{else}}output-if-false{{/and}}
Compare input1 is greater than or equal to input2.
Supports an else section and multiple operators. For example, {{#gt input1 input2}}Yes{{else}}No{{/and}} will output Yes or No.
Expression {{gte input1 input2}} renders true or false directly.
Expression {{gte input1 input2 yes='Result Yes' no='Result No'}} renders Result Yes or Result No directly.
Note: Most elements are strings, even if they are extracted as digits from prior output or set as digits in a variable expression.
To compare numbers use the number helper to convert the strings to numbers first.
{{#gte (number input1) (number input2)}}output-if-true{{else}}output-if-false{{/and}}
join
Syntax: {{join input(s) separator}}
Joins an array, iterator or iterable using a separator.
If the model contains input1=a, input2=b, expression {{join input1 input2 input3, 'c' ', '}} renders a, b, c.
json
Syntax: {{json input [pretty=true] [escapeHTML=true] [default="{}"]}}
json will generate correctly formatted json for the input object. An input value of this can be used to use the current object. The pretty parameter can be used to output the json in a more human readable format. The escapeHTML parameter can be used to escape HTML characters in the output. The default parameter can be used to specify a default value to output if the input is null or empty.
A typical use of this would be to output an object after some looping or filtering is done, for example inside an if, endsWith, eachFiltered expression, or other helper.
With a data model of:
[
  {"streamId":"00000000-00000000-123456FF-FF123456/ts1/notbat", "data": "0"},
  {"streamId":"00000000-00000000-123456FF-FF123456/ts1/bat", "data": "1"},
  {"streamId":"00000000-00000000-123456FF-FF123456/ts1/bat", "data": "2"}
]
The template:
[{{#eachFiltered this}}{{#if @index}},{{/if}}{{json this pretty=true}}{{/eachFiltered}}]
NOTE: You can use a template like this to always turn monitor payloads into a JSON formatted list of elements
even if there is only one element in the payload.
Will generate:
[{
  "streamId" : "00000000-00000000-123456FF-FF123456/ts1/notbat",
  "data" : "0"
},{
  "streamId" : "00000000-00000000-123456FF-FF123456/ts1/bat",
  "data" : "1"
},{
  "streamId" : "00000000-00000000-123456FF-FF123456/ts1/bat",
  "data" : "2"
}]
lower
Syntax: {{lower input}}
Convert the input string to lowercase.
Expression {{lower 'HELLO'}} renders hello.
lt
Syntax: {{#lt input1 input2}}output-if-true{{else}}output-if-false{{/and}}
Compare input1 is less than input2.
Supports an else section and multiple operators. For example, {{#lt input1 input2}}Yes{{else}}No{{/and}} will output Yes or No.
Expression {{lt input1 input2}} renders true or false directly.
Expression {{lt input1 input2 yes='Result Yes' no='Result No'}} renders Result Yes or Result No directly.
Note: Most elements are strings, even if they are extracted as digits from prior output or set as digits in a variable expression.
To compare numbers use the number helper to convert the strings to numbers first.
{{#lt (number input1) (number input2)}}output-if-true{{else}}output-if-false{{/and}}
lte
Syntax: {{#lte input1 input2}}output-if-true{{else}}output-if-false{{/and}}
Compare input1 is less than or equal to input2.
Supports an else section and multiple operators. For example, {{#lte input1 input2}}Yes{{else}}No{{/and}} will output Yes or No.
Expression {{lte input1 input2}} renders true or false directly.
Expression {{lte input1 input2 yes='Result Yes' no='Result No'}} renders Result Yes or Result No directly.
Note: Most elements are strings, even if they are extracted as digits from prior output or set as digits in a variable expression.
To compare numbers use the number helper to convert the strings to numbers first.
{{#lte (number input1) (number input2)}}output-if-true{{else}}output-if-false{{/and}}
mul
Syntax: {{mul input1 input2...}}
Multiply all the numbers together. The inputs can be numbers or strings that can be converted to numbers.
With a model value of input1=42, expression {{mul input1 2}} renders 84.0.
Note: Input numbers are converted to decimals and may be formatted with decimal points. Use the formatNum helper to control the format.
For example, with a model value of input1=42, expression {{formatNum '###0;-###0' (add input2 2)}} results in 84.
neq
Syntax: {{#neq input1 input2}}output-if-true{{else}}output-if-false{{/and}}
Compare input1 is not equal to input2.
Supports an else section and multiple operators. For example, {{#neq input1 input2}}Yes{{else}}No{{/and}} will output Yes or No.
Expression {{neq input1 input2}} renders true or false directly.
Expression {{neq input1 input2 yes='Result Yes' no='Result No'}} renders Result Yes or Result No directly.
Note: Most elements are strings, even if they are extracted as digits from prior output or set as digits in a variable expression.
To compare numbers use the number helper to convert the strings to numbers first.
{{#neq (number input1) (number input2)}}output-if-true{{else}}output-if-false{{/and}}
not
Syntax: {{#not input}}output-if-true{{else}}output-if-false{{/and}}
The not operator, determines if all inputs are falsy (false or empty). Can be used with non-boolean values.
Supports an else section and multiple operators. For example, {{#not input1}}Yes{{else}}No{{/and}} will output Yes or No.
Expression {{not input1}} renders true or false directly.
Expression {{not input1 yes='Result Yes' no='Result No'}} renders Result Yes or Result No directly.
now
Syntax: {{now [format] [tz=timezone|timeZoneId]}}
Generate a human-readable formatted current date or time.
The format parameter is a string that specifies the format of the output.
Format can be one of
full - for example Thursday, March 28, 2024long - for example, March 28, 2024medium - for example, Mar 28, 2024short - 3/28/24- Or a pattern matching the java DatetimeFormatter syntax.
The tz parameter is optional and specifies the timezone to use. If the tz parameter is not provided, the timezone of the system is used.
- Expression
{{now}} renders Mar 28, 2024
- Expression
{{now format='full' tz='America/Chicago'}} renders Thursday, March 28, 2024
- Expression
{{now format='full' tz='America/Chicago'}} renders 03/28/24
- Expression
{{now format='YYYY/MM/DD hh:mm:ss a' tz='America/Chicago'}} renders 2024/03/88 10:45:36 AM
- Expression
{{now format='YYYY/MM/DD HH:mm:ss z' tz='America/Chicago'}} renders 2024/03/88 10:45:36 AM
- Expression
{{now format='YYYY/MM/DD HH:mm:ss zzz' tz='America/Chicago'}} renders 2024/03/88 10:51:07 CDT
number
Syntax: {{number input}}
The input can be a number or string that can be converted to a number.
Used to convert a string to a number. Most useful for comparison helpers that require numeric comparison instead of text comparison or to change the formatting of an existing number using formatNum helper.
Expression {{formatNum '#,###;-#,###' (number '122342')}} renders 122,342.
or
Syntax: {{#or input1 input2...}}output-if-true{{else}}output-if-false{{/and}}
The or operator determines if any inputs are truthy (true or not empty). Can be used with non-boolean values.
Supports an else section and multiple operators. For example, {{#or input1 input2 input3}}Yes{{else}}No{{/and}} will output Yes if all inputs are truthy, otherwise No.
Expression {{or input1 input2}} renders true or false directly.
Expression {{or input1 input2 yes='Result Yes' no='Result No'}} renders Result Yes or Result No directly.
remainingPathComponents
Syntax: {{remainingPathComponents input}}
remainingPathComponents outputs all parts of a path beyond the first entry.
A typical use for this would be to skip the device identifier in a stream ID to output the common stream ID. For example, if streamId=00000000-00000000-123456FF-FF123456/ts1/bat in the data model then {{remainingPathComponents streamId}} will output ts1/bat.
replace
Syntax: {{#replace input match1 replacement1 [match2 replacement2 ...]}}{{@replaced}}{{/replace}}
replace combines an if statement with text replacement. It replaces the input string content. All occurrences of match text is replaced with replacement text, and the result is assigned the @replaced attribute. Multiple replacements can be specified by including additional pairs of match and replace parameters and the replacement occurs from left most parameters to rightmost.
For example, with field=abc in the data model, then {{#replace field "a" "z" "b" "z" "c" "z"}}{{@replaced}}{{/replace}} will output zzz.
A typical use for this might be to generate short device IDs by replacing the duplicate zero’s or generating names from streams.
For example, if streamId=00000000-00000000-123456FF-FF123456/ts1/bat in the data model then {{#replace streamId "00000000-00000000-123456FF-FF123456/" "" "ts1/bat" "Battery"}}{"{{@replaced}}": 99}{{/replaced}} will output {"Battery: 99}.
slice
Syntax: {{slice input separator start length}}
slice slice a string with separators into individual components given. slice first splits the string to a list using the separator, then uses the start and length parameters to select components of the list that are output. The output components are joined with the separator before being output.
- The start value is the 1-based index from the start of the list (1 is the first component)
- Use a negative start value to slice from the end of the list (-1 is the last component)
- Start must be non-zero and length must be greater than 0
- If the absolute value of the start parameter is greater than the number of components, then an empty string is output.
- If the length parameter is greater than the number of components remaining in the list, then all remaining components are output.
A typical use case for this might be to extract several path components from the end of a stream ID.
For example, if streamId=00000000-00000000-123456FF-FF123456/ts1/bat in the data model then {{slice streamId '/' -2 2}} will output ts1/bat.
Similarly, with streamId=00000000-00000000-123456FF-FF123456/metrics/sys/cpu/used in the data model then {{slice streamId '/' 3 2}} will output sys/cpu.
slugify
Syntax: {{slugify input}}
Generate a slug from the input string. A slug is a URL-friendly version of a string, typically used for URLs or filenames.
Converts to lowercase, removes any non-word characters and convers spaces to hyphens. Strips whitespace from the beginning and end of the string.
Expression {{slugify 'Hello, World!'}} renders hello-world.
substring
Syntax: {{substring input start-index end-index}}
Extracts a substring from the input string. The start-index is the 0-based index of the first character to include in the output. The end-index is the 0-based index and the output does not include the character at this index. The end-index is optional and if not provided, the substring will include all characters from the start-index to the end of the string.
Expression {{substring 'Hello, World!' 3 5}} renders lo.
Expression {{substring 'Hello, World!' 7}} renders World!.
upper
Syntax: {{upper input}}
Convert the input string to uppercase.
Expression {{upper 'Hello'}} renders HELLO.
yesno
Syntax: {{yesno booleanval [yes='YesValue'] [no='NoValue'] [maybe='MaybeValue']}}
Renders a yes, no or maybe value based on the input boolean value. If the input is not boolean this helper will fail.
If the input is true render the yes value, false render the no value, and if the input is null or unset render the maybe value.
For example, {{yesno true yes='True' no='False' maybe='Maybe'}} will output True.
NOTE: Convert the input to boolean using the and or or helper if needed.
For example, {{yesno (and 'inputstring') yes='True' no='False' maybe='Maybe'}} will output True.
Additional Examples
Filtering
For example, given the data model
[
  {"streamId":"00000000-00000000-123456FF-FF123456/ts1/notbat"},
  {"streamId":"00000000-00000000-123456FF-FF123456/ts1/bat"},
  {"streamId":"00000000-00000000-123456FF-FF123456/ts1/bat"}
]
and template
[
{{#eachFiltered this}}
  {{#if @index}},{{/if}}
  {{#endsWith streamId 'ts1/bat'}}
  {"battery":99}
  {{/endsWith}}
{{/eachFiltered}}
]
the eachFiltered helper would ensure that the @index attribute is not incremented after the first item is entirely filtered out which lets it be used to determine if a delimiter should be included in the output. In this case it allows for the template to output JSON with the correct comma placement, resulting in output of (some newlines not shown):
[
  {"battery":99}
  ,
  {"battery":99}
]
NOTE: Whitespace has been added to the template and removed from the output for clarity.
Filtering with replacement
For example, given the data model
[
  {"streamId":"00000000-00000000-123456FF-FF123456/ts1/notbat", "data": "0"},
  {"streamId":"00000000-00000000-123456FF-FF123456/ts1/bat", "data": "1"},
  {"streamId":"00000000-00000000-123456FF-FF123456/ts1/bat", "data": "2"}
]
and template
[
{{#eachFiltered this}}
  {{#replace (slice streamId "/" -2 2) "ts1/bat" "Battery" "cl2/cval" "Sensor"}}
  {{#if @index}},{{/if}}
  {
    "{{@replaced}}": {{data}}
  }
  {{/replace}}
{{/eachFiltered}}
]
The replace helper would ensure that only streams that are of interest are used, and, along with the
subexpression using the slice helper those streams are used to name the output data.
The output would be
[
  {
    "Battery": 1
  },
  {
    "Battery": 2
  }
]
NOTE: Whitespace has been added to the template and removed from the output for clarity.
Note the built-in each helper can generally be used instead if you are not filtering out entries while iterating.
Use Streams as item names
For example, given the data model
[
  {"streamId":"00000000-00000000-123456FF-FF123456/cl2/val", "data": "0"},
  {"streamId":"00000000-00000000-123456FF-FF123456/ts1/bat", "data": "1"},
  {"streamId":"00000000-00000000-123456FF-FF123456/cl1/cval", "data": "2"}
]
and template
[
{{#eachFiltered this}}
  {{#replace (slice streamId "/" -2 2) "/" "."}}
  {{#if @index}},{{/if}}
   {
    "{{@replaced}}": {{data}},
    "unit": "{{firstPathComponent streamId}}"
   }
  {{/replace}}
{{/eachFiltered}}
]
The combined use of the replace helper maps the stream name into a valid json name, and, along with the
subexpression using the slice helper those streams are used to name the output data.
The output would be
[
   {
    "cl2.val": 0,
    "unit": "00000000-00000000-123456FF-FF123456"
   },
   {
    "ts1.bat": 1,
    "unit": "00000000-00000000-123456FF-FF123456"
   },
   {
    "cl1.cval": 2,
    "unit": "00000000-00000000-123456FF-FF123456"
   }
]
NOTE: Whitespace has been added to the template and removed from the output for clarity.